Welcome to Trial Submission Studio
Transform clinical trial data into FDA-compliant CDISC formats with confidence.
Trial Submission Studio is a free, open-source desktop application for transforming clinical trial source data (CSV) into CDISC-compliant submission formats.
Caution
ALPHA SOFTWARE - ACTIVE DEVELOPMENT
Trial Submission Studio is currently in early development. Features are incomplete, APIs may change, and bugs are expected. Do not use for production regulatory submissions.
Always validate all outputs with qualified regulatory professionals before submission to regulatory authorities.
See It in Action
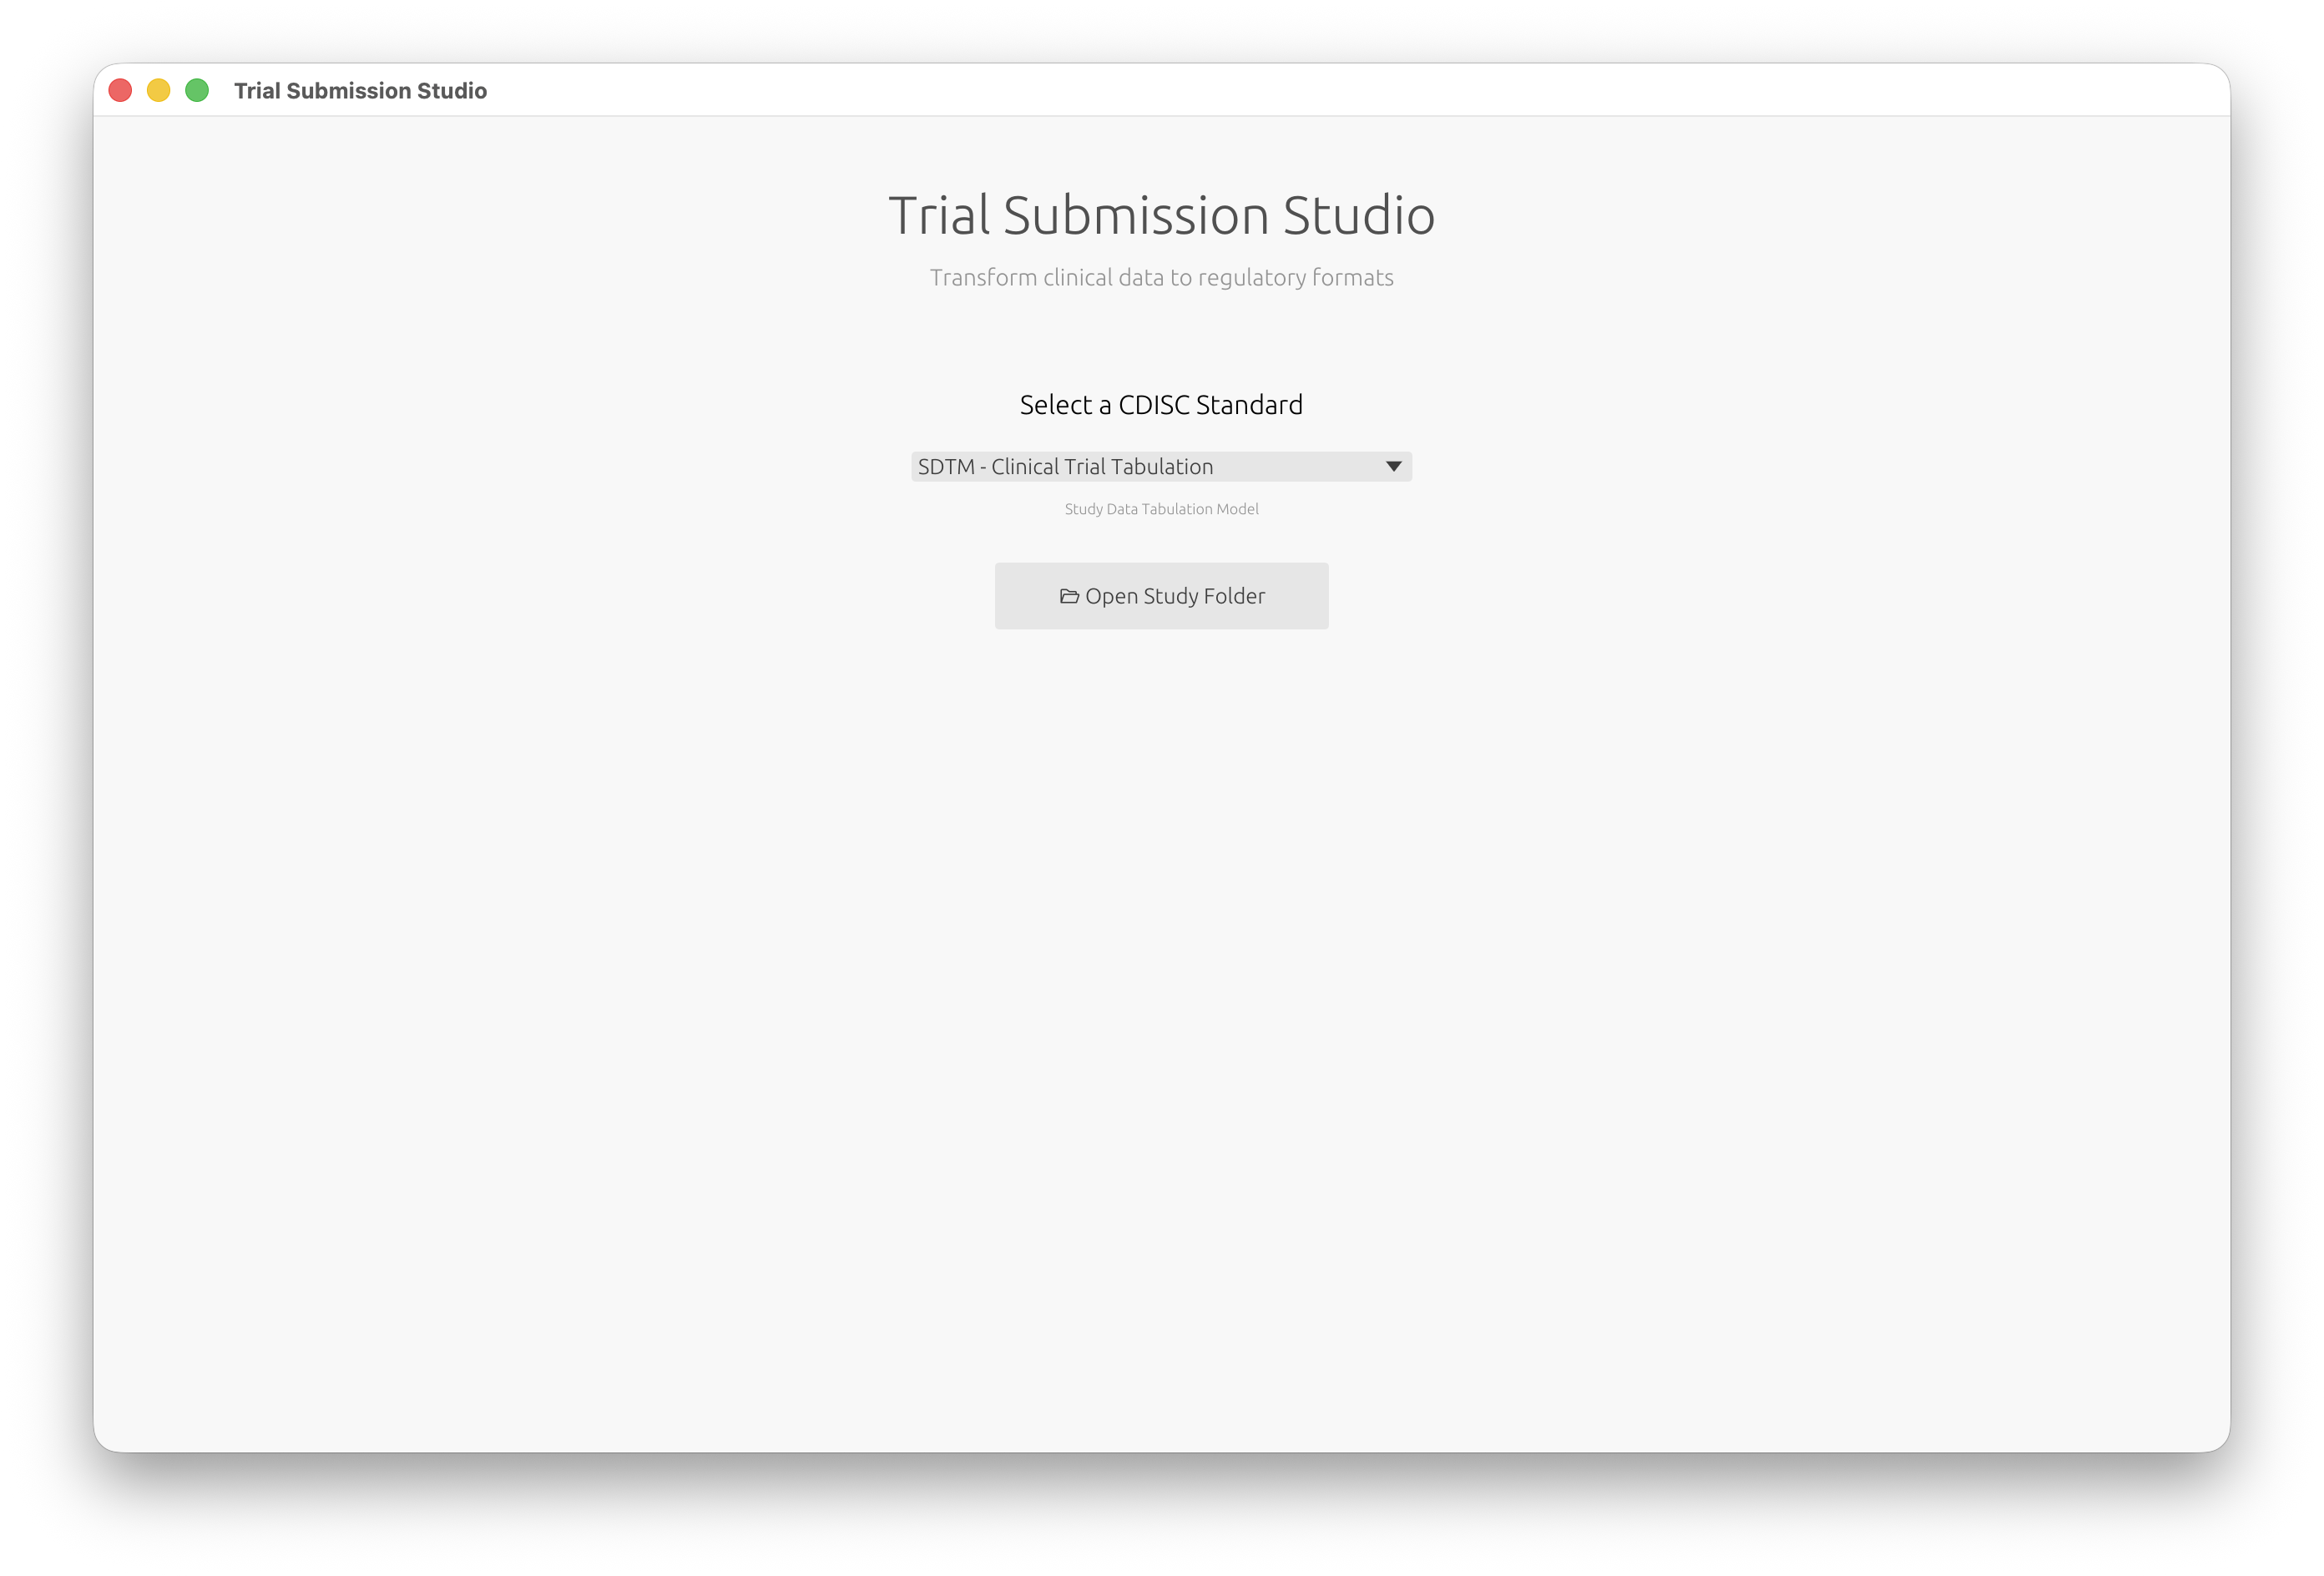
Select your CDISC standard and open your study data:
Automatic domain discovery with intelligent column mapping:

Built-in validation against CDISC standards:
Quick Links
| New Users | Clinical Programmers | Developers |
|---|---|---|
| Installation | User Guide | Architecture |
| Quick Start | CDISC Standards | Contributing |
| System Requirements | Output Formats | Development Setup |
Key Features
| Feature | Description |
|---|---|
| Multi-format Output | XPT V5/V8, Dataset-XML, Define-XML 2.1 |
| Intelligent Mapping | Fuzzy matching for automatic column-to-variable mapping |
| CDISC Validation | Built-in controlled terminology validation |
| Cross-platform | Native GUI for macOS, Windows, and Linux |
| Offline Operation | All CDISC standards embedded locally |
Supported Standards
Currently Supported:
- SDTM-IG v3.4
- Controlled Terminology (2024-2025 versions)
Planned:
- ADaM-IG v1.3
- SEND-IG v3.1.1
Getting Help
- Documentation: You’re reading it! Use the sidebar to navigate.
- Issues: Report bugs on GitHub
- Discussions: Ask questions on GitHub Discussions
License
Trial Submission Studio is open source software licensed under the MIT License.
Installation
Download the latest release for your platform from our GitHub Releases page.
Download Options
| Platform | Architecture | Format | Download |
|---|---|---|---|
| macOS | Apple Silicon (M1/M2/M3+) | .dmg or .zip | Download |
| macOS | Intel (x86_64) | .dmg or .zip | Download |
| Windows | x86_64 (64-bit) | .zip | Download |
| Windows | ARM64 | .zip | Download |
| Linux | x86_64 (64-bit) | .tar.gz | Download |
Verifying Your Download
Each release includes SHA256 checksum files (.sha256) for security
verification.
macOS/Linux
# Download the checksum file and binary, then verify
shasum -a 256 -c trial-submission-studio-*.sha256
Windows (PowerShell)
# Compare the checksum
Get-FileHash trial-submission-studio-*.zip -Algorithm SHA256
Platform-Specific Instructions
macOS
- Download the
.dmgfile for your architecture - Open the
.dmgfile - Drag Trial Submission Studio to your Applications folder
- On first launch, you may need to right-click and select “Open” to bypass Gatekeeper
[!TIP] Which version do I need?
Click the Apple menu () > About This Mac:
- Chip: Apple M1/M2/M3 → Download the Apple Silicon version
- Processor: Intel → Download the Intel version
Windows
- Download the
.zipfile for your architecture - Extract the archive to your preferred location
- Run
trial-submission-studio.exe
Linux
- Download the
.tar.gzfile - Extract:
tar -xzf trial-submission-studio-*.tar.gz - Run:
./trial-submission-studio
Uninstalling
Trial Submission Studio is a portable application that does not modify system settings or registry entries.
Windows
- Delete the extracted folder containing
trial-submission-studio.exe - Optionally delete settings from
%APPDATA%\trial-submission-studio\
macOS
- Drag Trial Submission Studio from Applications to Trash
- Optionally delete settings from
~/Library/Application Support/trial-submission-studio/
Linux
- Delete the AppImage file or extracted folder
- Optionally delete settings from
~/.config/trial-submission-studio/
Next Steps
- Quick Start Guide - Get up and running in 5 minutes
- System Requirements - Verify your system meets the requirements
- Building from Source - For developers who want to compile from source
Quick Start Guide
Get up and running with Trial Submission Studio in 5 minutes.
Overview
This guide walks you through the basic workflow:
flowchart LR
    A["Import CSV"] --> B["Map Columns"]
    B --> C["Validate"]
    C --> D["Export"]

    style A fill:#4a90d9,color:#fff
    style D fill:#50c878,color:#fff
- Import your source CSV data
- Map columns to SDTM variables
- Validate against CDISC standards
- Export to XPT format
Step 1: Launch the Application
After installing Trial Submission Studio, launch the application:
- macOS: Open from Applications folder
- Windows: Run
trial-submission-studio.exe - Linux: Run
./trial-submission-studio
You’ll see the welcome screen where you can select your CDISC standard:
Step 2: Import Your Data
- Click Open Study Folder and select your data folder
- Trial Submission Studio will automatically:
- Detect column types
- Identify potential SDTM domains
- Parse date formats
Tip
Your data should have column headers in the first row.
Step 3: Review Discovered Domains
Trial Submission Studio automatically discovers domains from your source data:
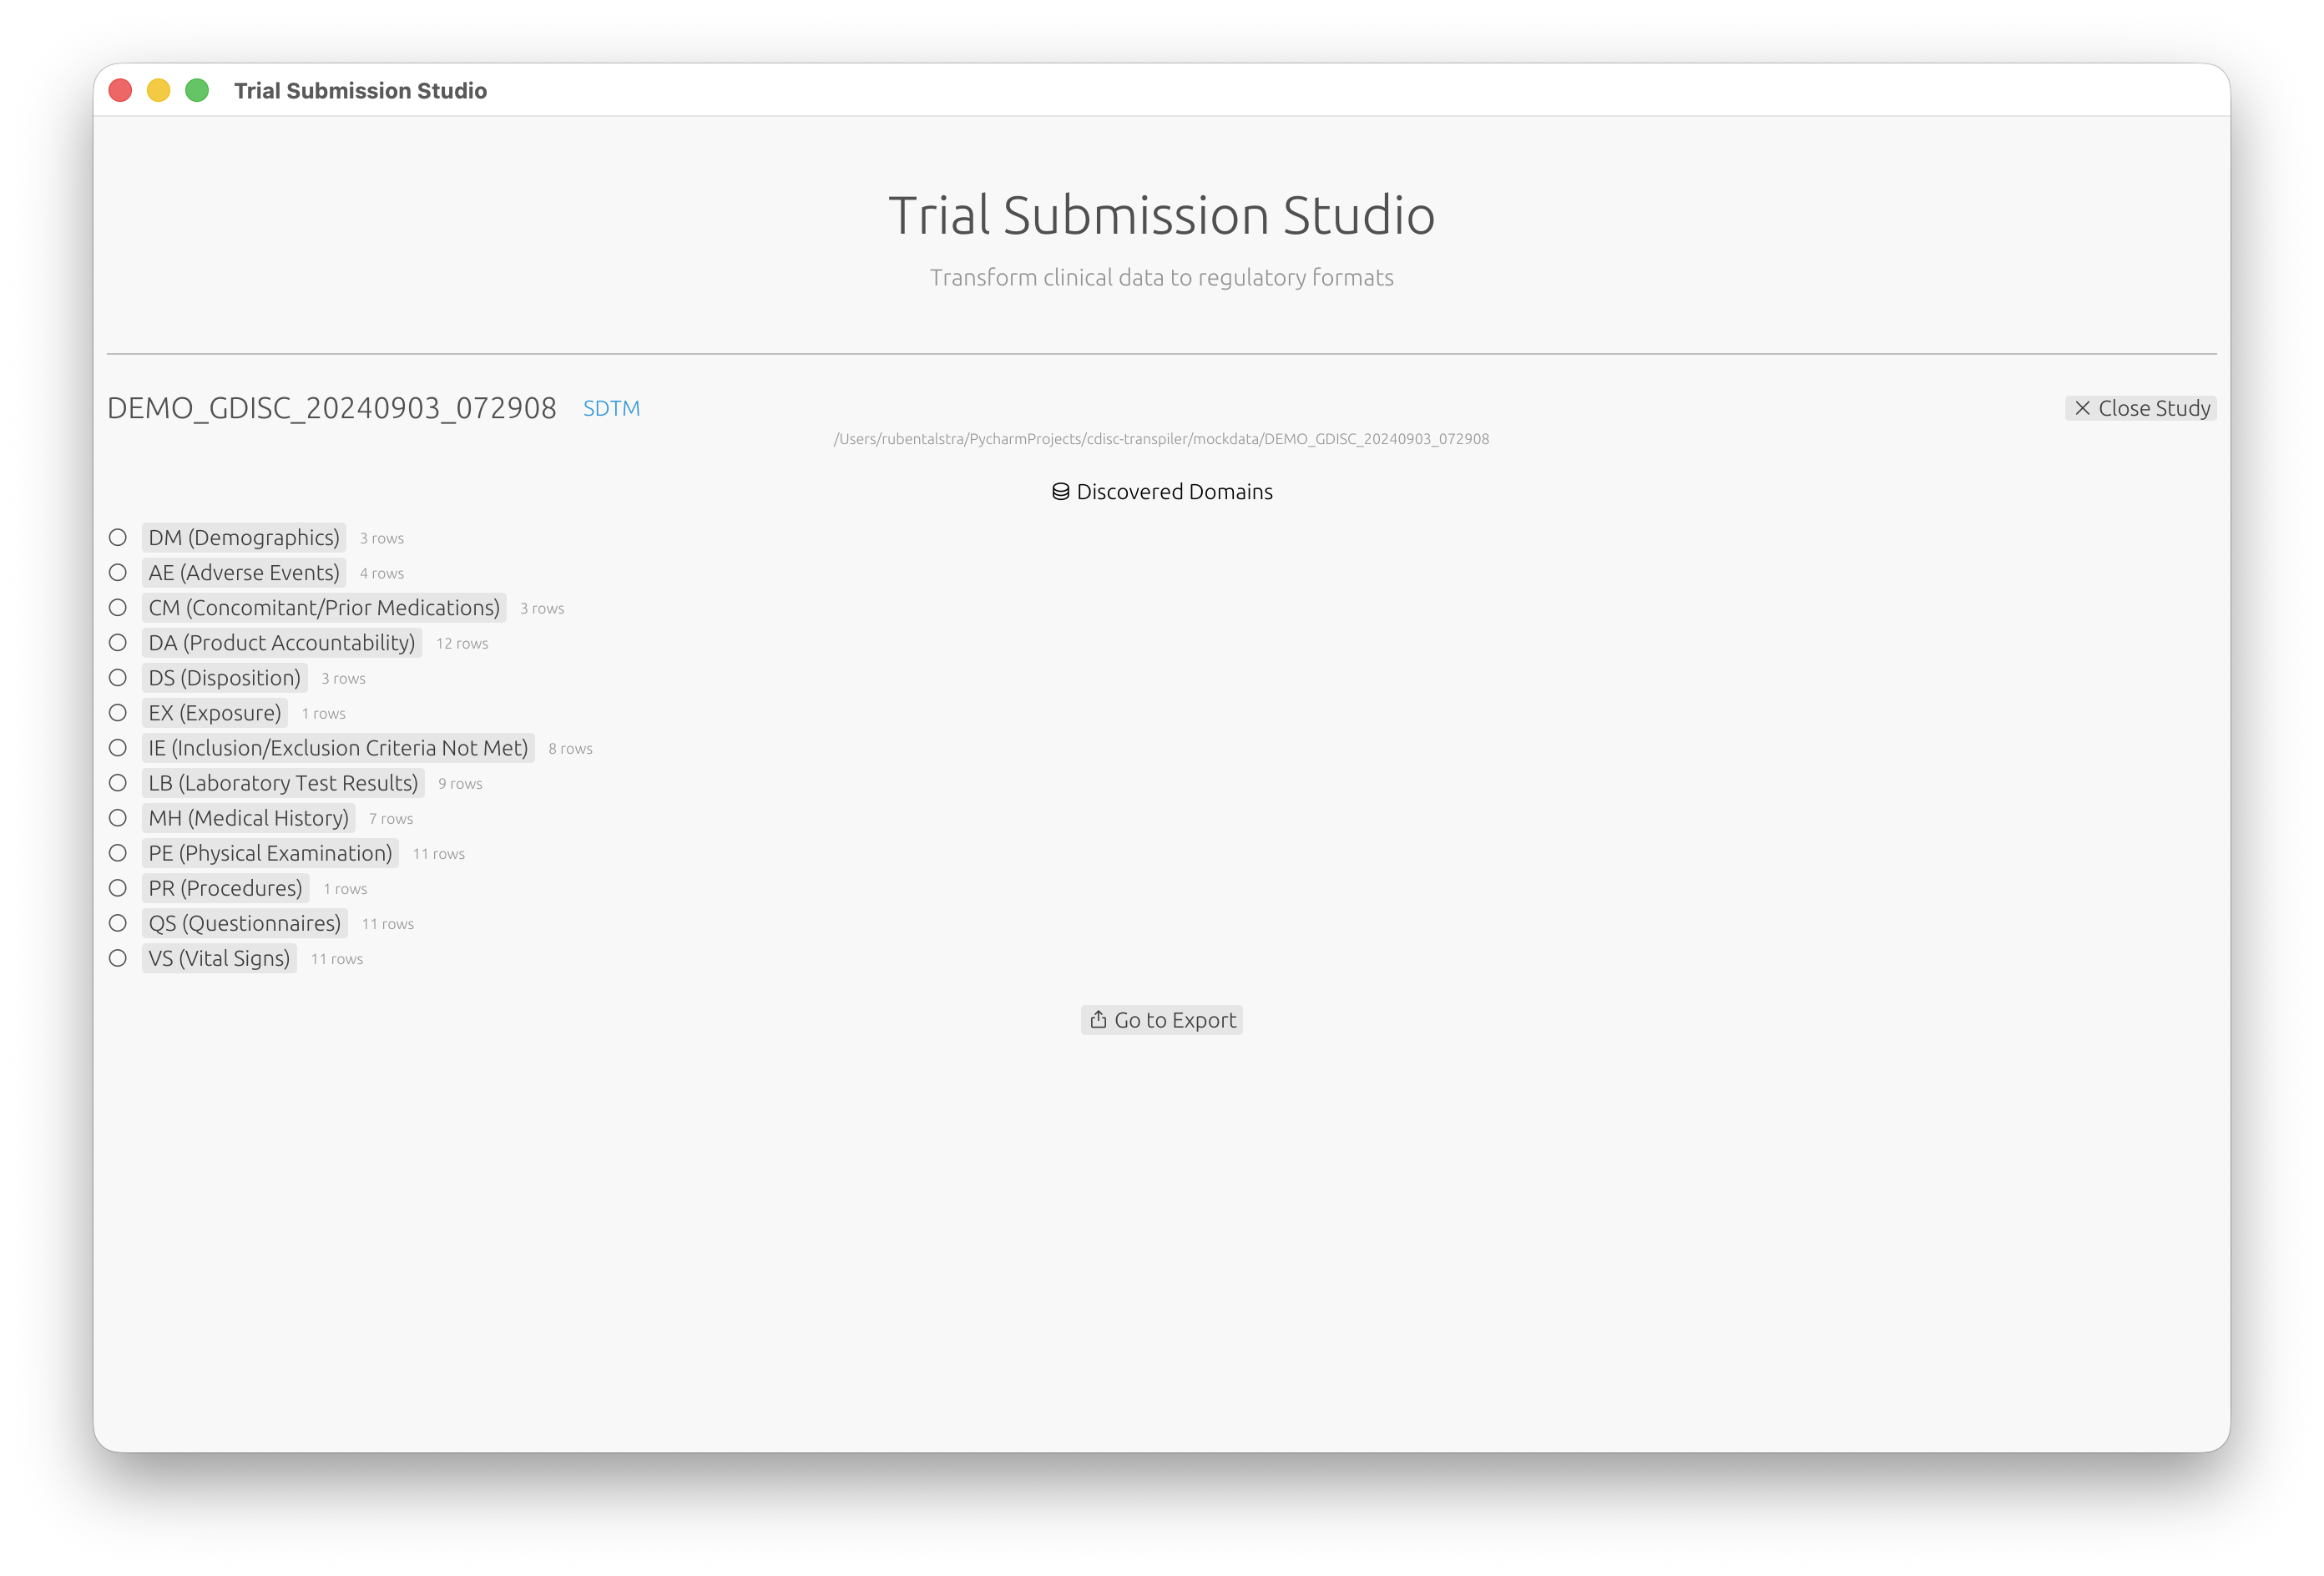
- Review the list of discovered domains (DM, AE, VS, etc.)
- Click on a domain to configure its mappings
Step 4: Map Columns
- Review the suggested column mappings
- For each source column, select the corresponding SDTM variable
- Use the fuzzy matching suggestions to speed up mapping
The mapping interface shows:
- Source Column: Your CSV column name
- Target Variable: The SDTM variable
- Match Score: Confidence of the suggested mapping (e.g., 93% match)
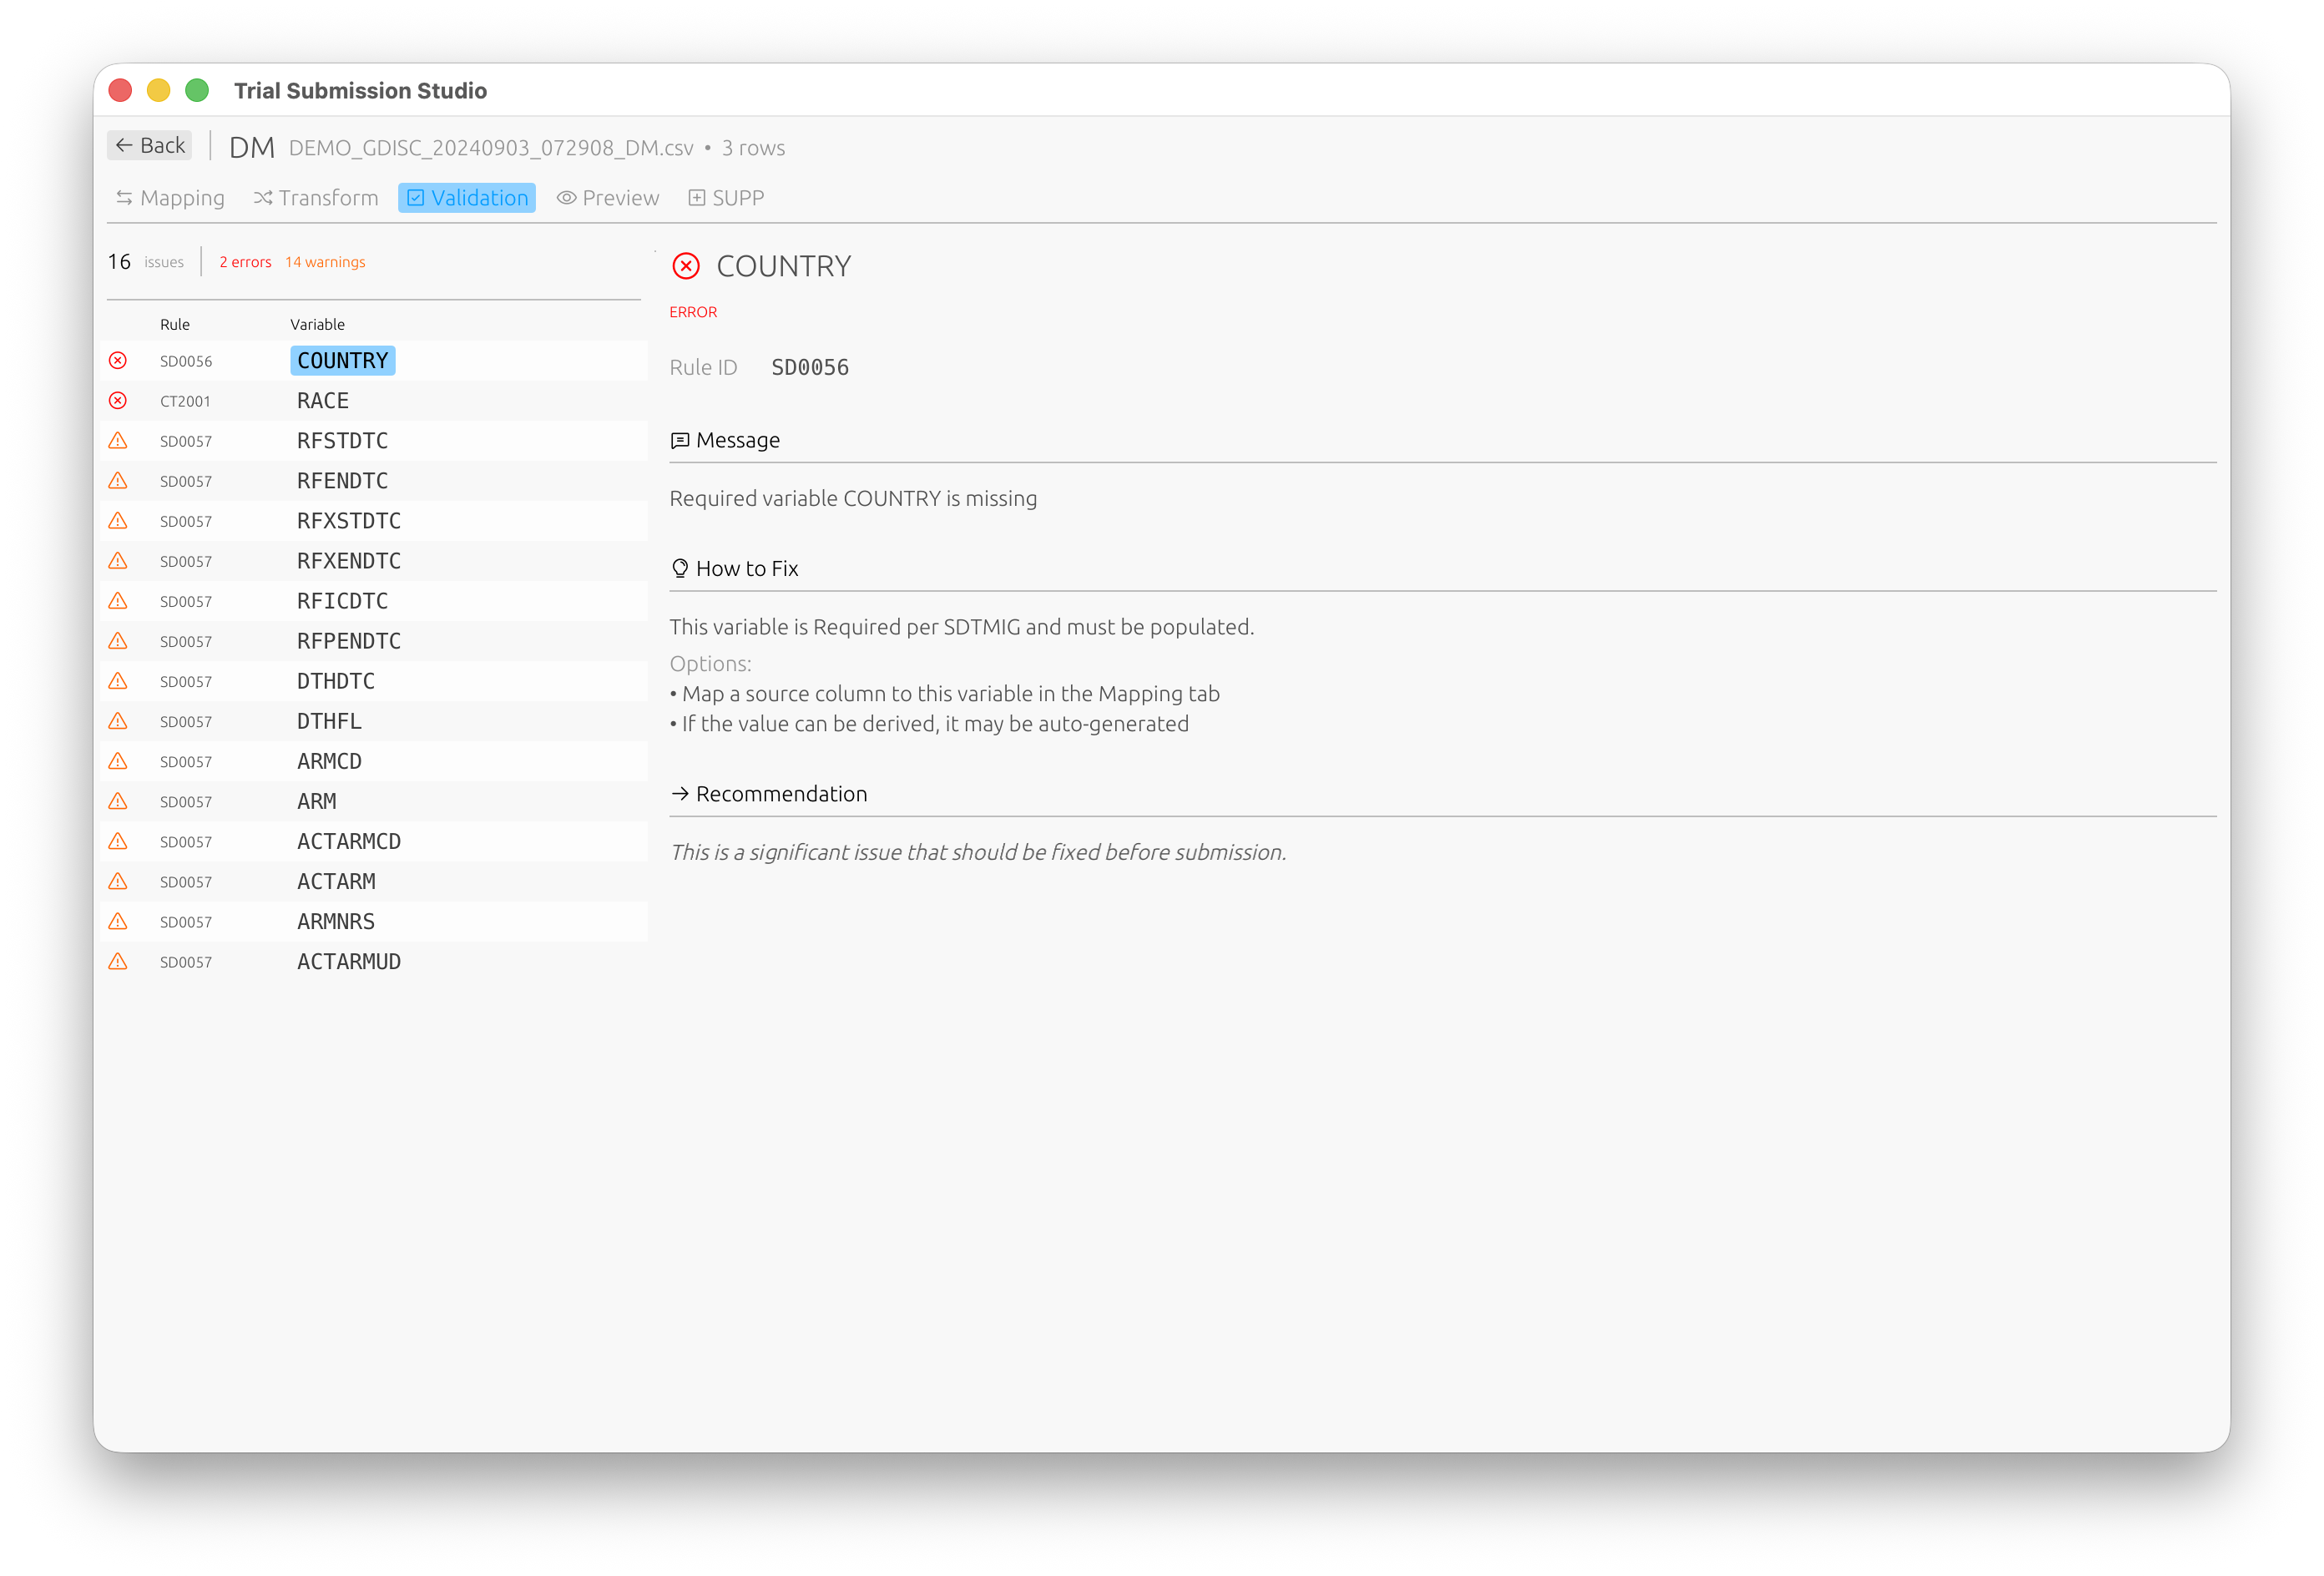
Step 5: Validate
- Switch to the Validation tab to check your data against CDISC rules
- Review any validation messages:
- Errors: Must be fixed before export
- Warnings: Should be reviewed
- Info: Informational messages
Each validation issue includes the rule ID, a description, and suggestions on how to fix it.
Step 6: Export
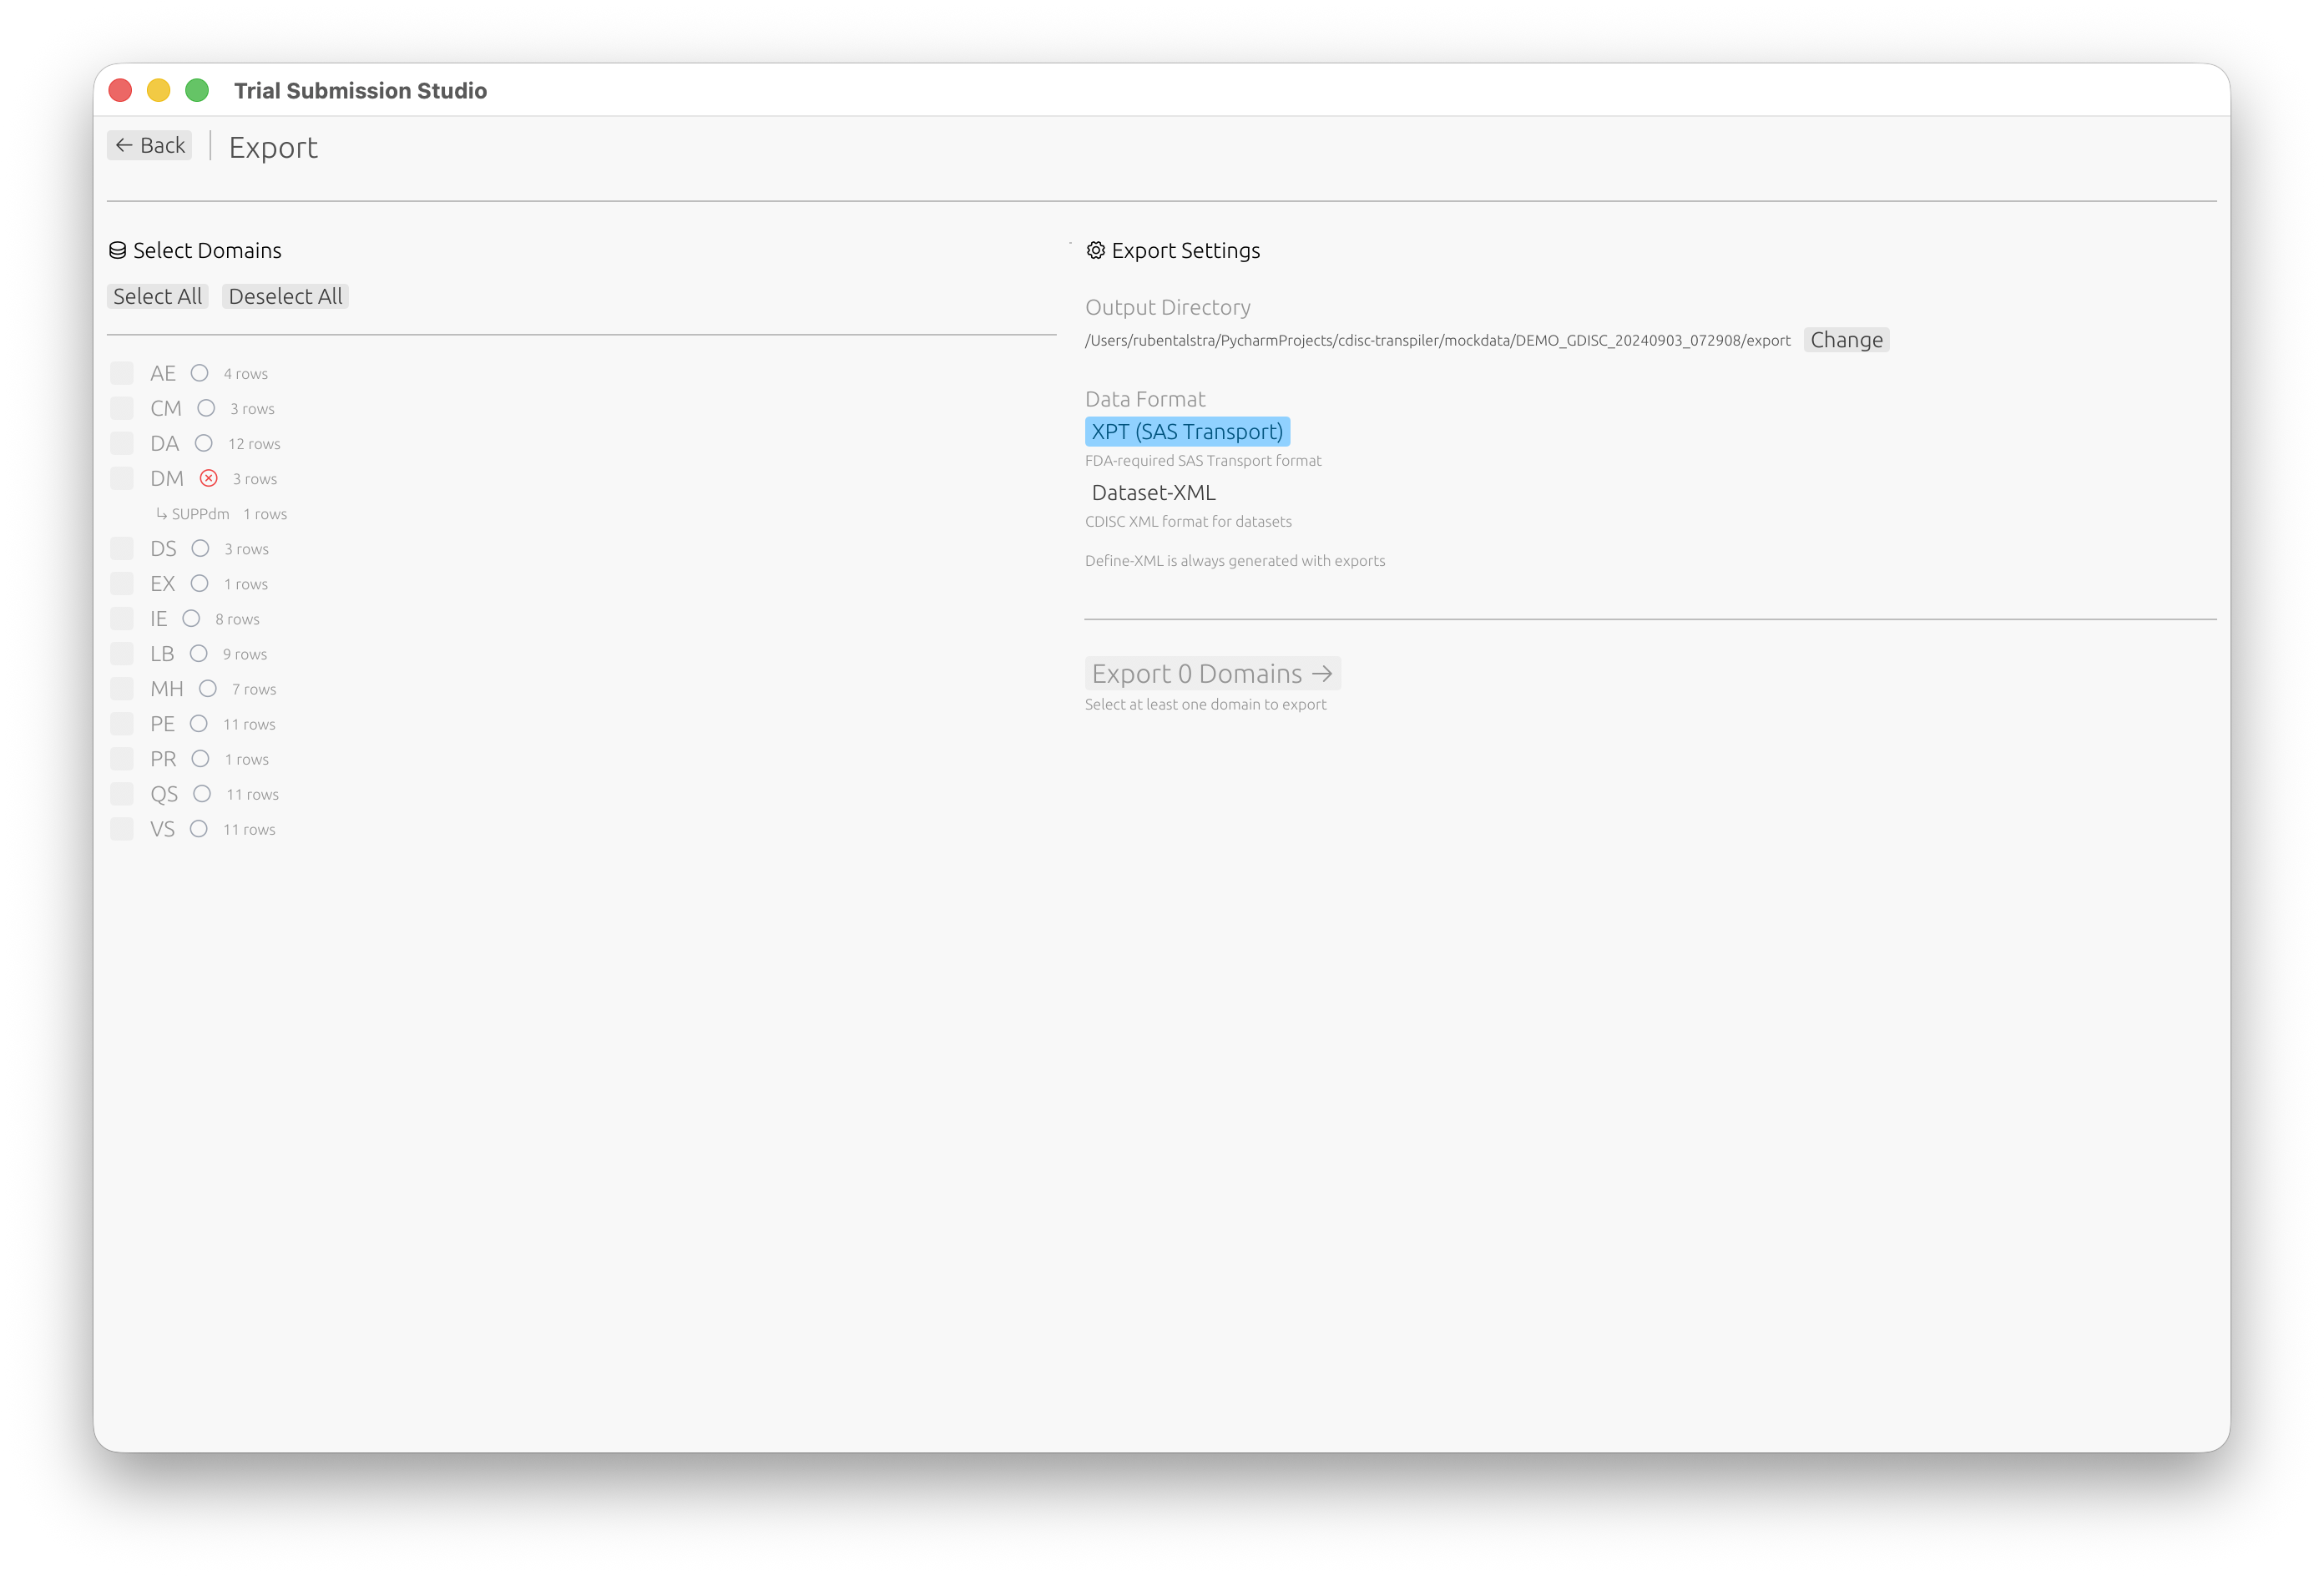
- Click Go to Export or navigate to the Export screen
- Select which domains to export
- Choose your output format:
- XPT (SAS Transport) (FDA standard)
- Dataset-XML (CDISC data exchange)
- Click Export
Next Steps
Now that you’ve completed the basic workflow:
- Interface Overview - Learn about all features
- Column Mapping - Advanced mapping techniques
- Validation - Understanding validation rules
- SDTM Standards - SDTM reference guide
System Requirements
Trial Submission Studio is designed to run on modern desktop systems with minimal resource requirements.
Supported Platforms
| Platform | Architecture | Minimum Version | Status |
|---|---|---|---|
| macOS | Apple Silicon (M1/M2/M3+) | macOS 11.0 (Big Sur) | Supported |
| macOS | Intel (x86_64) | macOS 10.15 (Catalina) | Supported |
| Windows | x86_64 (64-bit) | Windows 10 | Supported |
| Windows | ARM64 | Windows 11 | Supported |
| Linux | x86_64 (64-bit) | Ubuntu 20.04 or equivalent | Supported |
Hardware Requirements
| Component | Minimum | Recommended |
|---|---|---|
| RAM | 4 GB | 8 GB+ |
| Disk Space | 200 MB | 500 MB |
| Display | 1280x720 | 1920x1080+ |
Software Dependencies
Trial Submission Studio is a standalone application with no external dependencies:
- No SAS installation required
- No Java runtime required
- No internet connection required (works fully offline)
- All CDISC standards are embedded in the application
Performance Considerations
Large Datasets
Trial Submission Studio can handle datasets with:
- Hundreds of thousands of rows
- Hundreds of columns
For very large datasets (1M+ rows), consider:
- Ensuring adequate RAM (8GB+)
- Using SSD storage for faster I/O
- Processing data in batches if needed
Memory Usage
Memory usage scales with dataset size. Approximate guidelines:
- Small datasets (<10,000 rows): ~100 MB RAM
- Medium datasets (10,000-100,000 rows): ~500 MB RAM
- Large datasets (100,000+ rows): 1+ GB RAM
Troubleshooting
macOS Gatekeeper
On first launch, macOS may block the application. To resolve:
- Right-click the application
- Select “Open”
- Click “Open” in the dialog
Linux Permissions
Ensure the executable has run permissions:
chmod +x trial-submission-studio
Windows SmartScreen
If Windows SmartScreen blocks the application:
- Click “More info”
- Click “Run anyway”
Next Steps
- Installation - Download and install the application
- Quick Start - Get started in 5 minutes
Building from Source
For developers who want to compile Trial Submission Studio from source code.
Prerequisites
Required
- Rust 1.92+ - Install via rustup
- Git - For cloning the repository
Platform-Specific Dependencies
macOS
No additional dependencies required.
Linux (Ubuntu/Debian)
sudo apt-get install libgtk-3-dev libxdo-dev
Windows
No additional dependencies required.
Clone the Repository
git clone https://github.com/rubentalstra/trial-submission-studio.git
cd trial-submission-studio
Verify Rust Version
rustup show
Ensure you have Rust 1.92 or higher. To update:
rustup update stable
Build
Debug Build (faster compilation)
cargo build
Release Build (optimized, slower compilation)
cargo build --release
Run
Debug
cargo run --package tss-gui
Release
cargo run --release --package tss-gui
Or run the compiled binary directly:
./target/release/tss-gui        # macOS/Linux
.\target\release\tss-gui.exe    # Windows
Run Tests
# All tests
cargo test

# Specific crate
cargo test --package tss-submit

# With output
cargo test -- --nocapture
Run Lints
# Format check
cargo fmt --check

# Clippy lints
cargo clippy -- -D warnings
Project Structure
Trial Submission Studio is organized as a 6-crate Rust workspace:
trial-submission-studio/
├── crates/
│   ├── tss-gui/            # Desktop application (Iced 0.14.0)
│   ├── tss-submit/         # Mapping, normalization, validation, export
│   ├── tss-ingest/         # CSV loading
│   ├── tss-standards/      # CDISC standards loader
│   ├── tss-updater/        # Auto-update functionality
│   └── tss-updater-helper/ # macOS update helper
├── standards/              # Embedded CDISC standards
├── mockdata/               # Test datasets
└── docs/                   # Documentation (this site)
Third-Party Licenses
When adding or updating dependencies, regenerate the licenses file:
# Install cargo-about (one-time)
cargo install cargo-about

# Generate licenses
cargo about generate about.hbs -o THIRD_PARTY_LICENSES.md
IDE Setup
RustRover / IntelliJ IDEA
- Open the project folder
- The Rust plugin will detect the workspace automatically
VS Code
- Install the
rust-analyzerextension - Open the project folder
Next Steps
- Contributing Guide - How to contribute
- Architecture Overview - Understand the codebase
Interface Overview
Trial Submission Studio features a clean, intuitive interface designed for clinical data programmers.
Welcome Screen
When you first launch the application, you’ll see the welcome screen where you can select your target CDISC standard and open a study folder:
Study Overview
After opening a study folder, Trial Submission Studio automatically discovers domains from your source data:
Main Window Layout
The application is organized into several key areas:
┌─────────────────────────────────────────────────────────────┐
│  Menu Bar                                                    │
├─────────────────────────────────────────────────────────────┤
│  Toolbar                                                     │
├──────────────────┬──────────────────────────────────────────┤
│                  │                                           │
│  Navigation      │  Main Content Area                        │
│  Panel           │                                           │
│                  │  - Data Preview                           │
│  - Import        │  - Mapping Interface                      │
│  - Mapping       │  - Validation Results                     │
│  - Validation    │  - Export Options                         │
│  - Export        │                                           │
│                  │                                           │
├──────────────────┴──────────────────────────────────────────┤
│  Status Bar                                                  │
└─────────────────────────────────────────────────────────────┘
Menu Bar
File Menu
- Import CSV - Load source data
- Export - Save to XPT/XML formats
- Recent Files - Quick access to recent projects
- Exit - Close the application
Edit Menu
- Undo/Redo - Reverse or repeat actions
- Preferences - Application settings
Help Menu
- Documentation - Open this documentation
- About - Version and license information
- Third-Party Licenses - Dependency attributions
Toolbar
Quick access to common actions:
- Import - Load CSV file
- Validate - Run validation checks
- Export - Save output files
Navigation Panel
The left sidebar provides step-by-step workflow navigation:
- Import - Load and preview source data
- Domain - Select target SDTM domain
- Mapping - Map columns to variables
- Validation - Review validation results
- Export - Generate output files
Main Content Area
The central area displays context-sensitive content based on the current workflow step:
Import View
- File selection
- Data preview table
- Column type detection
- Schema information
Mapping View
- Source columns list
- Target variables list
- Mapping connections
- Match confidence scores
Validation View
- Validation rule results
- Error/warning/info messages
- Affected rows and columns
- Suggested fixes
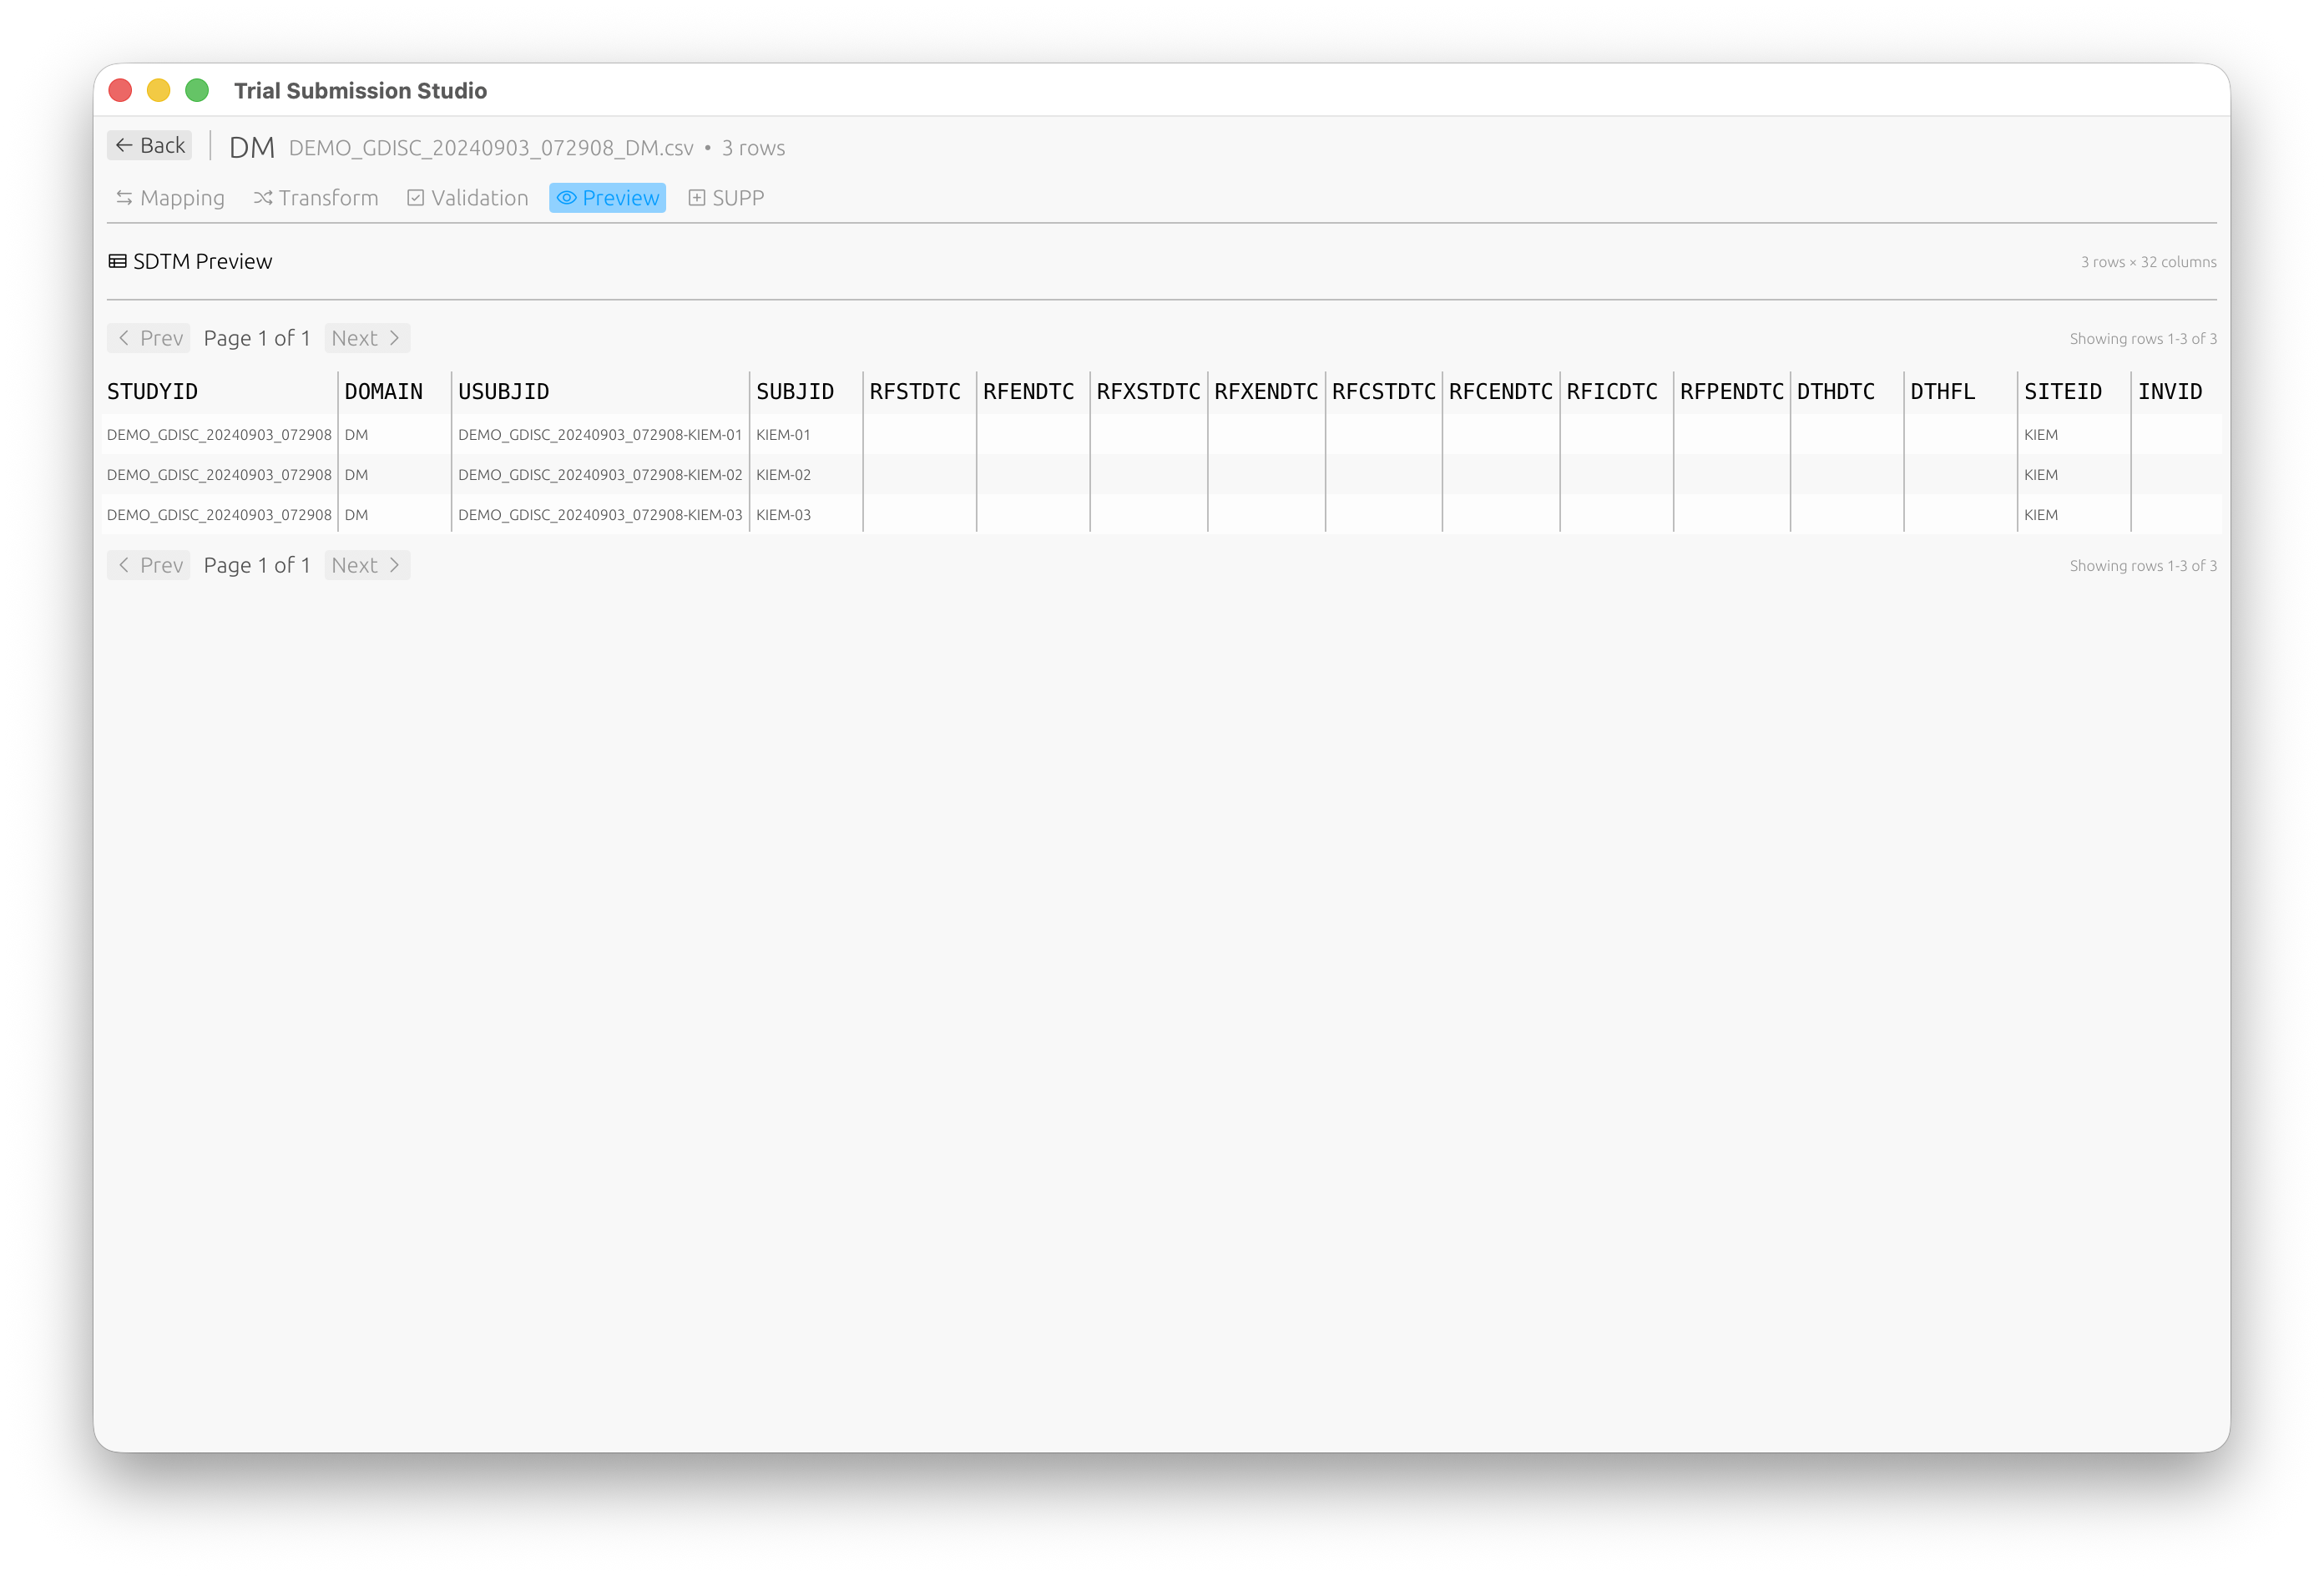
Preview View
Preview your SDTM-compliant data before export:
Export View
- Format selection
- Output options
- File destination
- Progress indicator
Status Bar
The bottom bar displays:
- Current file name
- Row/column counts
- Validation status
- Progress for long operations
Keyboard Shortcuts
| Action | macOS | Windows/Linux |
|---|---|---|
| Import | ⌘O | Ctrl+O |
| Export | ⌘E | Ctrl+E |
| Validate | ⌘R | Ctrl+R |
| Undo | ⌘Z | Ctrl+Z |
| Redo | ⌘⇧Z | Ctrl+Shift+Z |
| Preferences | ⌘, | Ctrl+, |
| Quit | ⌘Q | Alt+F4 |
Themes
Trial Submission Studio supports light and dark themes. Change via: Edit → Preferences → Appearance
Next Steps
- Importing Data - Learn about data import
- Column Mapping - Mapping interface guide
Importing Data
Trial Submission Studio accepts CSV files as input and automatically detects schema information.
Supported Input Format
Currently, Trial Submission Studio supports:
- CSV files (
.csv) - UTF-8 or ASCII encoding
- Comma-separated values
- Headers in first row
Import Methods
Drag and Drop
Simply drag a CSV file from your file manager and drop it onto the application window.
File Menu
- Click File → Import CSV
- Navigate to your file
- Click Open
Toolbar Button
Click the Import button in the toolbar.
Automatic Detection
When you import a file, Trial Submission Studio automatically:
Column Type Detection
Analyzes sample values to determine:
- Numeric - Integer or floating-point numbers
- Date/Time - Various date formats
- Text - Character strings
Domain Suggestion
Based on column names, suggests likely SDTM domains:
USUBJID,AGE,SEX→ Demographics (DM)AETERM,AESTDTC→ Adverse Events (AE)VSTESTCD,VSSTRESN→ Vital Signs (VS)
Date Format Detection
Automatically recognizes common date formats:
- ISO 8601:
2024-01-15 - US format:
01/15/2024 - EU format:
15-01-2024 - With time:
2024-01-15T09:30:00
Data Preview
After import, you’ll see:
Data Grid
- First 100 rows displayed
- Scroll to view more data
- Column headers with detected types
Summary Panel
- Total row count
- Total column count
- File size
- Encoding detected
Column Information
- Column name
- Detected type
- Sample values
- Null count
Handling Issues
Encoding Problems
If you see garbled characters:
- Ensure your file is UTF-8 encoded
- Re-save from your source application with UTF-8 encoding
Missing Headers
If your CSV lacks headers:
- Add a header row to your file
- Re-import
Large Files
For files with millions of rows:
- Import may take longer
- A progress indicator will show status
- Consider splitting into smaller files if needed
Best Practices
-
Clean your data before import
- Remove trailing whitespace
- Standardize date formats
- Check for encoding issues
-
Use descriptive column names
- Helps with automatic mapping suggestions
- Use SDTM-like naming when possible
-
Include all required data
- USUBJID for subject identification
- Domain-specific required variables
Next Steps
- Column Mapping - Map imported columns to SDTM variables
- Validation - Validate your data
Column Mapping
The mapping interface helps you connect your source CSV columns to SDTM variables.
Overview
Column mapping is a critical step that defines how your source data transforms into SDTM-compliant output.
flowchart LR
    subgraph Source[Source CSV]
        S1[SUBJ_ID]
        S2[PATIENT_AGE]
        S3[GENDER]
        S4[VISIT_DATE]
    end

    subgraph Mapping[Fuzzy Matching]
        M[Match<br/>Algorithm]
    end

    subgraph Target[SDTM Variables]
        T1[USUBJID]
        T2[AGE]
        T3[SEX]
        T4[RFSTDTC]
    end

    S1 --> M --> T1
    S2 --> M --> T2
    S3 --> M --> T3
    S4 --> M --> T4
    style M fill: #4a90d9, color: #fff
The Mapping Interface
┌─────────────────────────────────────────────────────────────┐
│ Source Columns          │  Target Variables                 │
├─────────────────────────┼───────────────────────────────────┤
│ SUBJ_ID         ────────│──▶  USUBJID                       │
│ PATIENT_AGE     ────────│──▶  AGE                           │
│ GENDER          ────────│──▶  SEX                           │
│ VISIT_DATE      ────────│──▶  RFSTDTC                       │
│ RACE_DESC       ────────│──▶  RACE                          │
│ [Unmapped]              │     ETHNIC (Required)             │
└─────────────────────────┴───────────────────────────────────┘
Automatic Mapping
Trial Submission Studio uses fuzzy matching to suggest mappings:
How It Works
- Analyzes source column names
- Compares against SDTM variable names
- Calculates similarity scores
- Suggests best matches
Match Confidence
- High (>80%) - Strong name similarity, auto-accepted
- Medium (50-80%) - Review recommended
- Low (<50%) - Manual mapping needed
Example Matches
| Source Column | Suggested Variable | Confidence |
|---|---|---|
SUBJECT_ID | USUBJID | 85% |
AGE | AGE | 100% |
GENDER | SEX | 75% |
VSTESTVAL | VSSTRESN | 70% |
Manual Mapping
To Map a Column
- Click on the source column
- Click on the target variable
- A connection line appears
To Unmap a Column
- Click on the connection line
- Or right-click and select “Remove Mapping”
To Change a Mapping
- Remove the existing mapping
- Create a new mapping
Required vs Optional Variables
Required Variables
Shown with a red indicator. Must be mapped for valid output:
STUDYID- Study identifierDOMAIN- Domain abbreviationUSUBJID- Unique subject identifier
Optional Variables
Shown without indicator. Map if data is available.
Expected Variables
Shown with yellow indicator. Expected for the domain but not strictly required.
Data Type Considerations
The mapping interface warns about type mismatches:
| Warning | Description |
|---|---|
| Type Mismatch | Source is text, target is numeric |
| Length Exceeded | Source values exceed SDTM length limits |
| Format Warning | Date format needs conversion |
Controlled Terminology
For variables with controlled terminology:
- The interface shows valid values
- Warns if source values don’t match
- Suggests value mappings
CT Normalization
The Transform tab allows you to normalize values to CDISC Controlled Terminology:
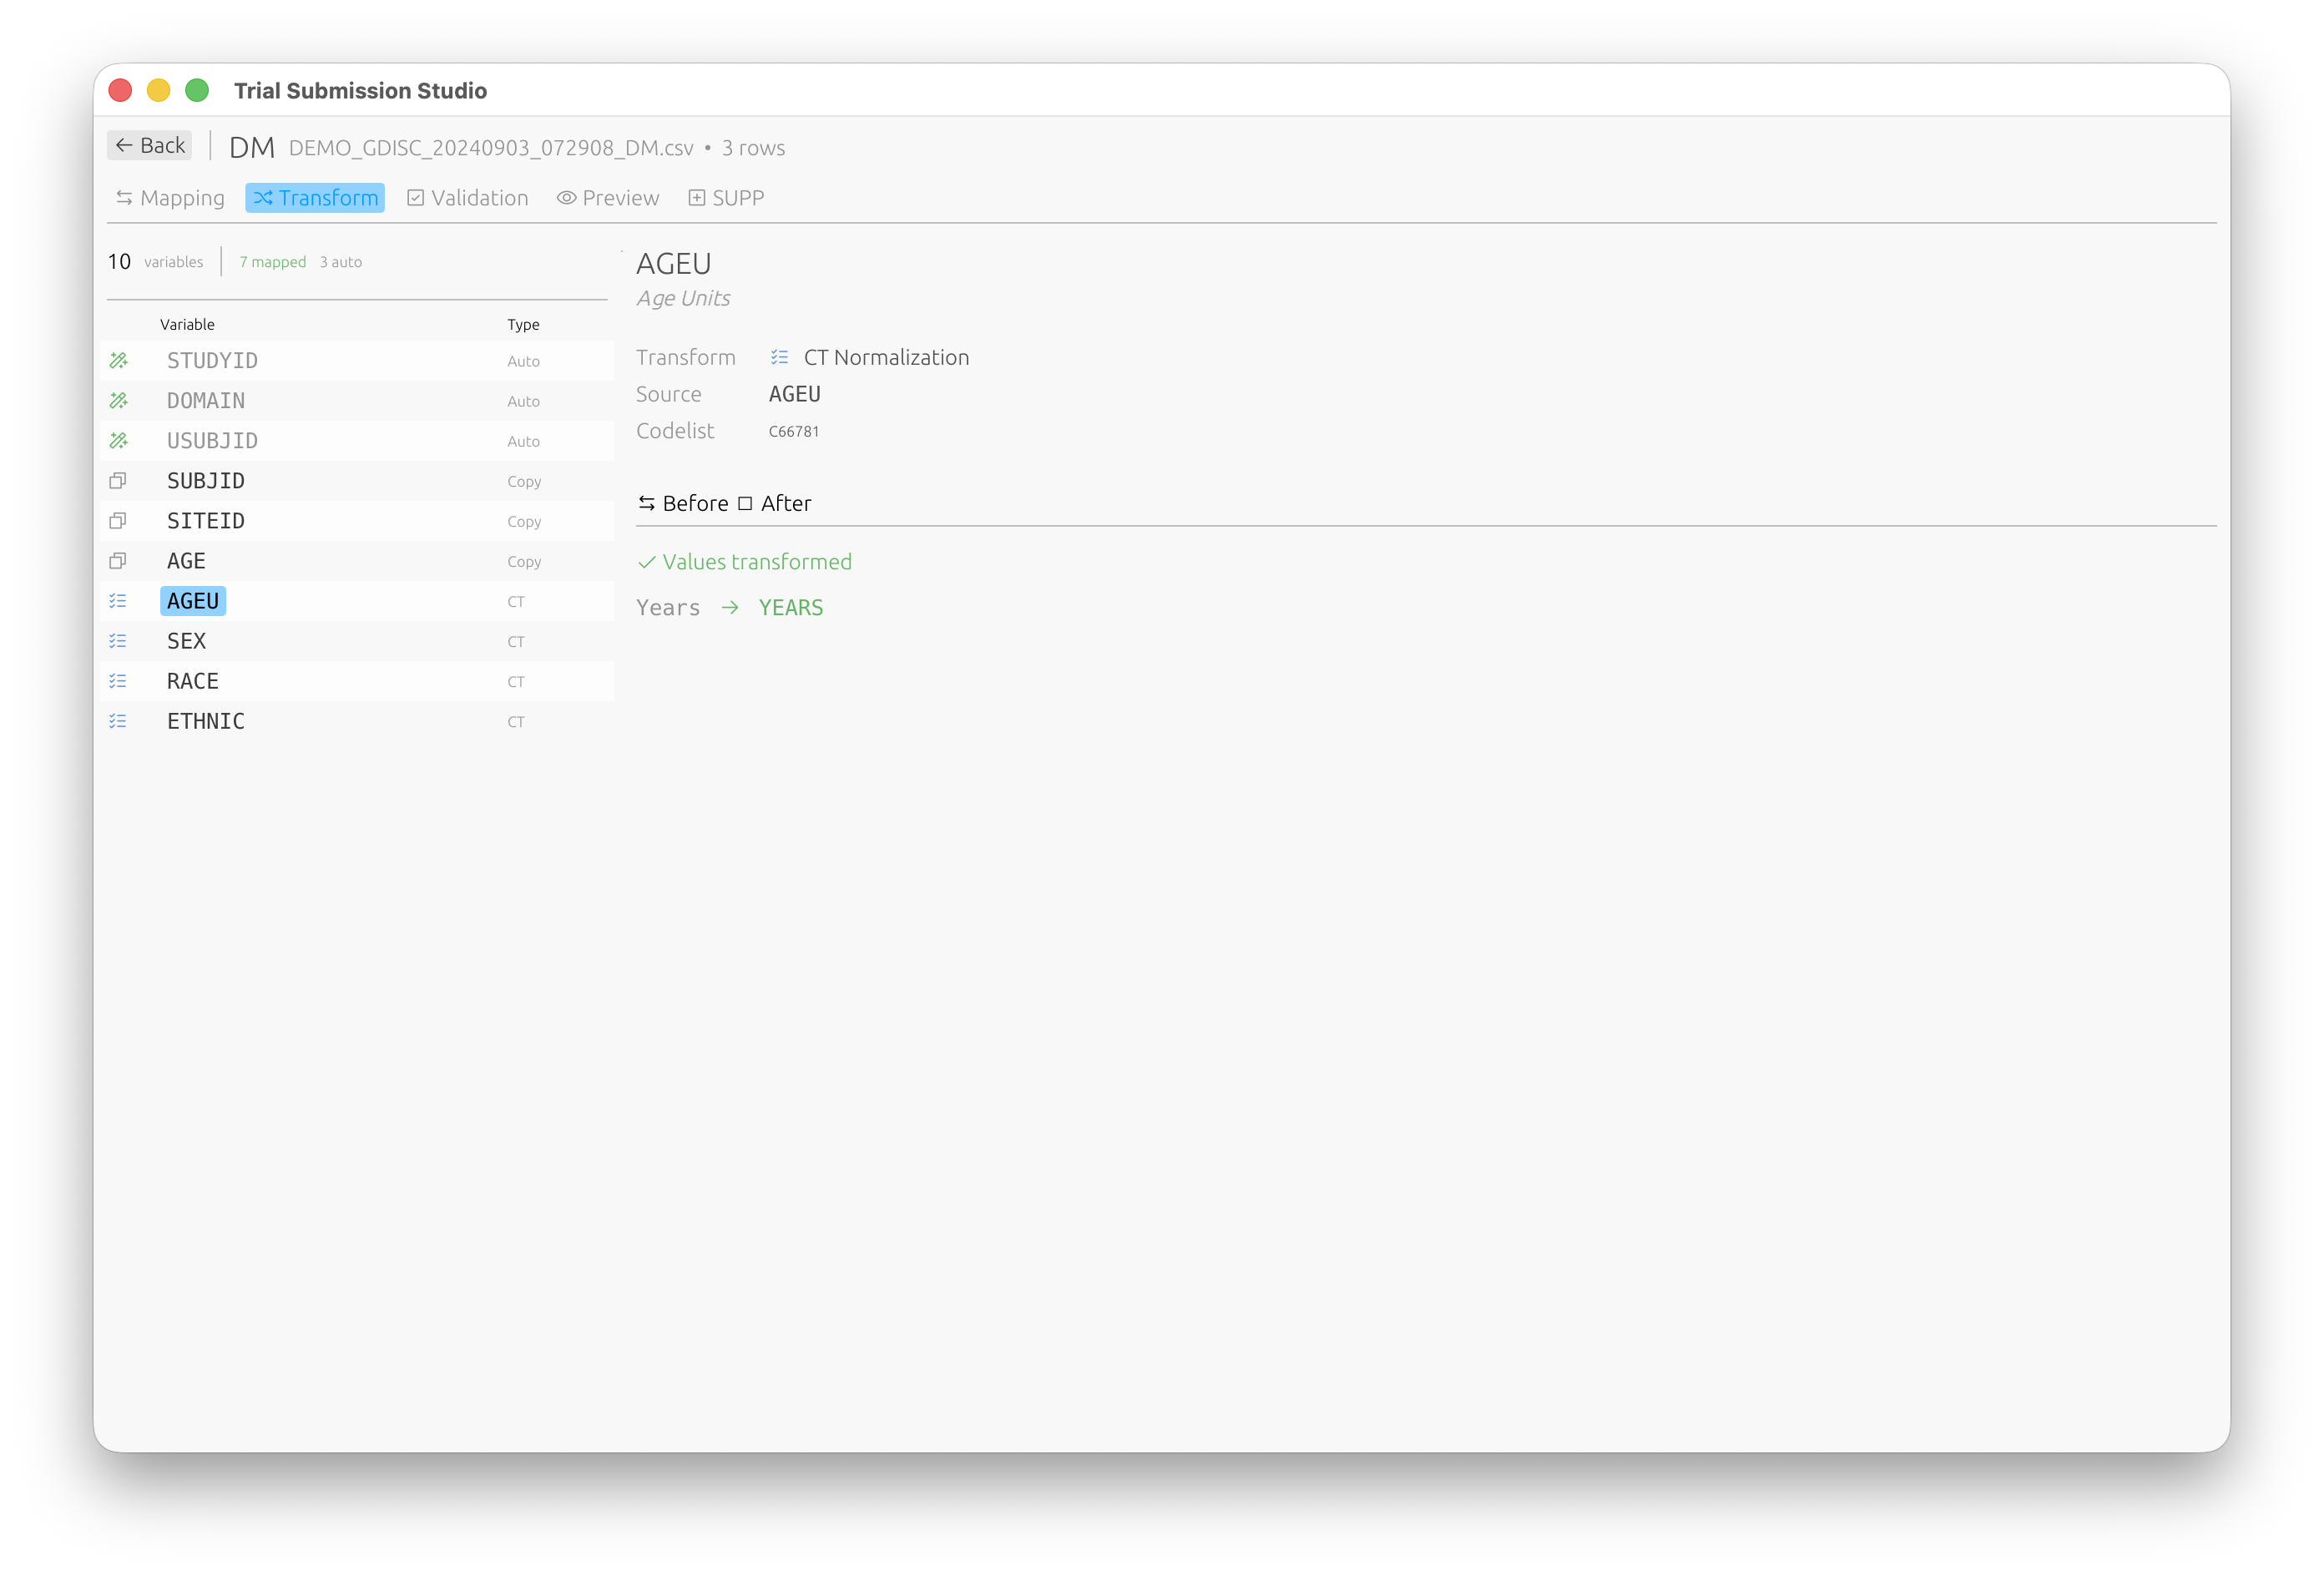
Values are automatically transformed to their standardized form (e.g., “Years” → “YEARS”).
Supplemental Qualifiers (SUPP)
For non-standard variables that need to be captured as supplemental qualifiers, use the SUPP tab:
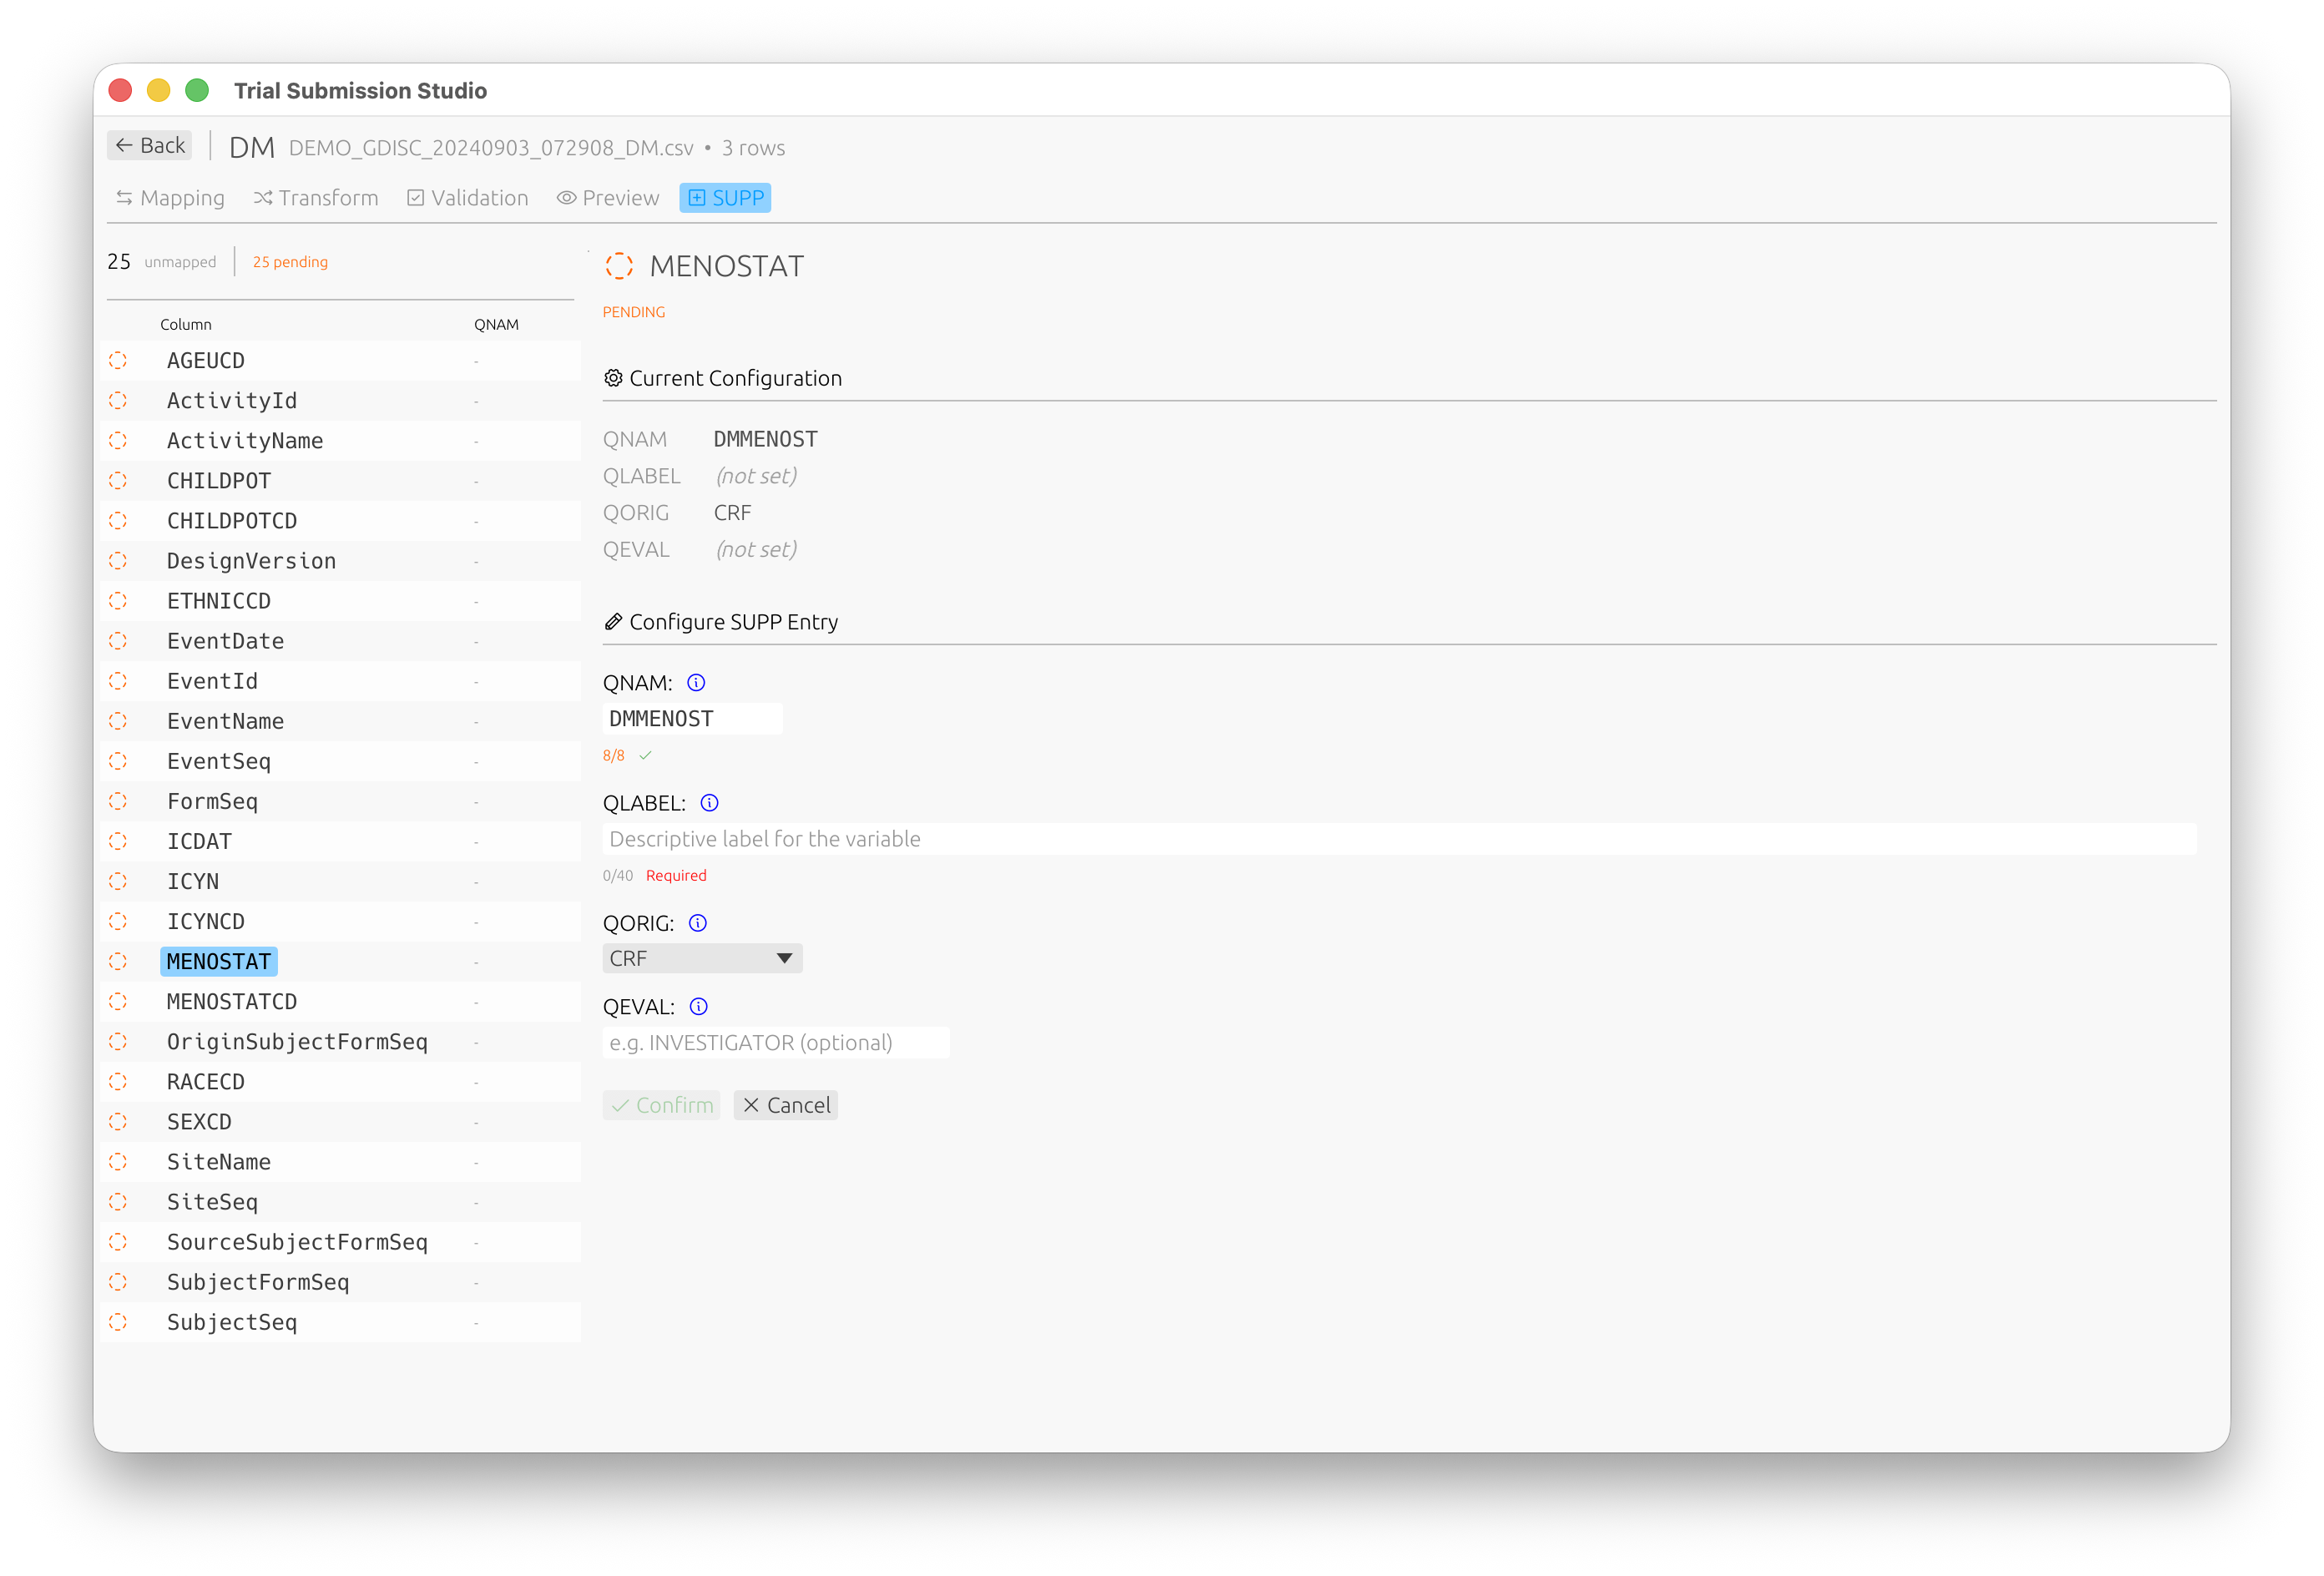
Configure QNAM, QLABEL, QORIG, and QEVAL for each supplemental qualifier variable.
Mapping Templates
Save a Template
- Complete your mappings
- File → Save Mapping Template
- Name your template
Load a Template
- Import your data
- File → Load Mapping Template
- Select the template
- Review and adjust as needed
Best Practices
- Review all automatic mappings - Don’t blindly accept
- Map required variables first - Ensure compliance
- Check controlled terminology - Validate allowed values
- Save templates - Reuse for similar datasets
Next Steps
- Validation - Validate your mappings
- SDTM Variables - Variable reference
Validation
Trial Submission Studio validates your data against CDISC standards before export.
Validation Overview
flowchart LR
    subgraph Input
        DATA[Mapped Data]
    end

    subgraph Checks
        STRUCT[Structure<br/>Required variables]
        CT[Terminology<br/>Codelist values]
        CROSS[Cross-Domain<br/>Consistency]
    end

    subgraph Output
        ERR[Errors]
        WARN[Warnings]
        INFO[Info]
    end

    DATA --> STRUCT --> CT --> CROSS
    STRUCT --> ERR
    CT --> WARN
    CROSS --> INFO
    style ERR fill: #f8d7da, stroke: #721c24
    style WARN fill: #fff3cd, stroke: #856404
    style INFO fill: #d1ecf1, stroke: #0c5460
Validation checks ensure your data:
- Conforms to SDTM structure
- Uses correct controlled terminology
- Meets FDA submission requirements
Running Validation
Automatic Validation
Validation runs automatically when you:
- Complete column mapping
- Make changes to mappings
- Prepare for export
Manual Validation
Click Validate in the toolbar or press Ctrl+R (⌘R on macOS).
Validation Results
Result Categories
| Category | Icon | Description |
|---|---|---|
| Error | Red | Must be fixed before export |
| Warning | Yellow | Should be reviewed |
| Info | Blue | Informational, no action required |
Results Panel
┌─────────────────────────────────────────────────────────────┐
│ Validation Results                           [✓] [⚠] [ℹ]   │
├─────────────────────────────────────────────────────────────┤
│ ❌ SD0001: USUBJID is required but not mapped               │
│    Rows affected: All                                        │
│    Fix: Map a column to USUBJID                             │
├─────────────────────────────────────────────────────────────┤
│ ⚠️ CT0015: Value "M" not in SEX codelist                    │
│    Rows affected: 45, 67, 89                                │
│    Expected: MALE, FEMALE, UNKNOWN                          │
├─────────────────────────────────────────────────────────────┤
│ ℹ️ INFO: 1250 rows will be exported                         │
└─────────────────────────────────────────────────────────────┘
Validation Rules
Structural Rules
| Rule ID | Description |
|---|---|
| SD0001 | Required variable missing |
| SD0002 | Invalid variable name |
| SD0003 | Variable length exceeded |
| SD0004 | Invalid data type |
Controlled Terminology Rules
| Rule ID | Description |
|---|---|
| CT0001 | Value not in codelist |
| CT0002 | Codelist not found |
| CT0003 | Invalid date format |
Cross-Domain Rules
| Rule ID | Description |
|---|---|
| XD0001 | USUBJID not consistent |
| XD0002 | Missing parent record |
| XD0003 | Duplicate keys |
Fixing Validation Errors
Mapping Errors
- Click on the error message
- The relevant mapping is highlighted
- Adjust the mapping or source data
Data Errors
- Note the affected rows
- Correct the source data
- Re-import and re-validate
Terminology Errors
- Review the expected values
- Map source values to controlled terms
- Or update source data to use standard terms
Controlled Terminology Validation
Supported Codelists
Trial Submission Studio includes embedded controlled terminology:
- CDISC CT 2025-09-26 (latest)
- CDISC CT 2025-03-28
- CDISC CT 2024-03-29
Codelist Validation
For variables like SEX, RACE, COUNTRY:
- Source values are checked against valid terms
- Invalid values are flagged
- Suggestions for correct values are provided
Validation Reports
Export Validation Report
- Complete validation
- File → Export Validation Report
- Choose format (PDF, HTML, CSV)
- Save the report
Report Contents
- Summary statistics
- All validation messages
- Affected data rows
- Recommendations
Best Practices
- Validate early and often - Fix issues as you go
- Address errors first - Then warnings
- Document exceptions - If warnings are intentional
- Keep validation reports - For audit trails
Next Steps
- Exporting Data - Export validated data
- Controlled Terminology - CT reference
Exporting Data
After mapping and validation, export your data to CDISC-compliant formats.
Export Formats
Trial Submission Studio supports multiple output formats:
| Format | Version | Description | Use Case |
|---|---|---|---|
| XPT | V5 | SAS Transport (FDA standard) | FDA submissions |
| XPT | V8 | Extended SAS Transport | Longer names/labels |
| Dataset-XML | 1.0 | CDISC XML format | Data exchange |
| Define-XML | 2.1 | Metadata documentation | Submission package |
XPT Export
XPT Version 5 (Default)
The FDA standard format with these constraints:
- Variable names: 8 characters max
- Labels: 40 characters max
- Compatible with SAS V5 Transport
XPT Version 8
Extended format supporting:
- Variable names: 32 characters
- Labels: 256 characters
- Note: Not all systems support V8
Export Steps
- Click Export in the toolbar
- Select XPT V5 or XPT V8
- Choose output location
- Click Save
XPT Options
| Option | Description |
|---|---|
| Include all variables | Export mapped and derived variables |
| Sort by keys | Order rows by key variables |
| Compress | Reduce file size |
Dataset-XML Export
CDISC ODM-based XML format for data exchange.
Features
- Human-readable format
- Full Unicode support
- Metadata included
- Schema validation
Export Steps
- Click Export
- Select Dataset-XML
- Configure options
- Click Save
Define-XML Export
Generate submission metadata documentation.
Define-XML 2.1
- Dataset definitions
- Variable metadata
- Controlled terminology
- Computational methods
- Value-level metadata
Export Steps
- Click Export
- Select Define-XML
- Review metadata
- Click Save
Batch Export
Export multiple domains at once:
- File → Batch Export
- Select domains to export
- Choose format(s)
- Set output directory
- Click Export All
Export Validation
Before export completes, the system verifies:
- All required variables are present
- Data types are correct
- Lengths don’t exceed limits
- Controlled terms are valid
Output Files
File Naming
Default naming convention:
{domain}.xpt- e.g.,dm.xpt,ae.xpt{domain}.xml- for Dataset-XMLdefine.xml- for Define-XML
Checksums
Each export generates:
- SHA256 checksum file (
.sha256) - Useful for submission verification
Quality Checks
Post-Export Verification
- Open the exported file in a viewer
- Verify row counts match
- Check variable order
- Review sample values
External Validation
Consider validating with:
- Pinnacle 21 Community
- SAS (if available)
- Other CDISC validators
Best Practices
- Validate before export - Fix all errors first
- Use XPT V5 for FDA - Standard format
- Generate checksums - For integrity verification
- Test with validators - Confirm compliance
- Keep source files - Maintain audit trail
Troubleshooting
Export Fails
| Issue | Solution |
|---|---|
| Validation errors | Fix errors before export |
| Disk full | Free up space |
| Permission denied | Check write permissions |
| File in use | Close file in other apps |
Output Issues
| Issue | Solution |
|---|---|
| Truncated values | Check length limits |
| Missing data | Verify mappings |
| Wrong encoding | Ensure UTF-8 source |
Next Steps
- Common Workflows - End-to-end examples
- XPT Format - XPT specification
- Define-XML - Define-XML guide
Common Workflows
Step-by-step guides for typical Trial Submission Studio use cases.
Workflow Overview
flowchart LR
    subgraph "1. Import"
        A[Load CSV]
    end

    subgraph "2. Configure"
        B[Select Domain]
        C[Map Columns]
    end

    subgraph "3. Quality"
        D[Handle CT]
        E[Validate]
    end

    subgraph "4. Output"
        F[Export XPT]
    end

    A --> B --> C --> D --> E --> F
    E -.->|Fix Issues| C
    style A fill: #e8f4f8, stroke: #333
    style F fill: #d4edda, stroke: #333
Workflow 1: Demographics (DM) Domain
Transform demographics source data to SDTM DM domain.
Source Data Example
SUBJECT_ID,AGE,SEX,RACE,ETHNIC,COUNTRY,SITE_ID
SUBJ001,45,Male,WHITE,NOT HISPANIC,USA,101
SUBJ002,38,Female,ASIAN,NOT HISPANIC,USA,102
SUBJ003,52,Male,BLACK,HISPANIC,USA,101
Steps
-
Import the CSV
- File → Import CSV
- Select your demographics file
-
Select DM Domain
- Click on “Domain Selection”
- Choose “DM - Demographics”
-
Map Columns
Source Target Notes SUBJECT_ID USUBJID Subject identifier AGE AGE Age in years SEX SEX Maps to controlled terminology RACE RACE Controlled terminology ETHNIC ETHNIC Controlled terminology COUNTRY COUNTRY ISO 3166 codes SITE_ID SITEID Site identifier -
Handle Controlled Terminology
- “Male” → “M” (or keep if using extensible CT)
- “Female” → “F”
- Review RACE and ETHNIC values
-
Validate
- Click Validate
- Address any errors
-
Export
- Export → XPT V5
- Save as
dm.xpt
Workflow 2: Adverse Events (AE) Domain
Transform adverse event data to SDTM AE domain.
Source Data Example
SUBJECT_ID,AE_TERM,START_DATE,END_DATE,SEVERITY,SERIOUS
SUBJ001,Headache,2024-01-15,2024-01-17,MILD,N
SUBJ001,Nausea,2024-02-01,,MODERATE,N
SUBJ002,Rash,2024-01-20,2024-01-25,SEVERE,Y
Steps
-
Import CSV
-
Select AE Domain
-
Map Columns
Source Target Notes SUBJECT_ID USUBJID AE_TERM AETERM Verbatim term START_DATE AESTDTC Start date END_DATE AEENDTC End date (can be blank) SEVERITY AESEV Controlled terminology SERIOUS AESER Y/N -
Derive Required Variables
- AESEQ (sequence number) - auto-generated
- AEDECOD (dictionary term) - if available
-
Validate and Export
Workflow 3: Vital Signs (VS) Domain
Transform vital signs measurements to SDTM VS domain.
Source Data Example
SUBJECT_ID,VISIT,TEST,RESULT,UNIT,DATE
SUBJ001,BASELINE,SYSBP,120,mmHg,2024-01-10
SUBJ001,BASELINE,DIABP,80,mmHg,2024-01-10
SUBJ001,WEEK 4,SYSBP,118,mmHg,2024-02-07
Steps
-
Import CSV
-
Select VS Domain
-
Map Columns
Source Target Notes SUBJECT_ID USUBJID VISIT VISIT Visit name TEST VSTESTCD Test code RESULT VSSTRESN Numeric result UNIT VSSTRESU Result unit DATE VSDTC Collection date -
Map Test Codes
- SYSBP → Systolic Blood Pressure
- DIABP → Diastolic Blood Pressure
-
Validate and Export
Workflow 4: Batch Processing
Process multiple domains from one source file.
Source Data
A comprehensive dataset with columns for multiple domains.
Steps
- Import the source file
- Process each domain
- Filter relevant columns
- Map to domain variables
- Validate
- Batch Export
- File → Batch Export
- Select all processed domains
- Export to output folder
Workflow 5: Re-processing with Template
Use a saved mapping template for similar data.
Steps
-
First Time Setup
- Import sample data
- Create mappings
- Save template: File → Save Mapping Template
-
Subsequent Processing
- Import new data (same structure)
- Load template: File → Load Mapping Template
- Review and adjust if needed
- Validate and export
Tips for All Workflows
Before You Start
- Review source data quality
- Identify required variables
- Prepare controlled terminology mappings
During Processing
- Validate after each major step
- Document any decisions
- Keep notes on exceptions
After Export
- Verify output files
- Run external validation
- Archive source and output files
Next Steps
- Troubleshooting - Common issues
- SDTM Domains - Domain reference
Troubleshooting
Common issues and their solutions when using Trial Submission Studio.
Import Issues
File Won’t Import
| Symptom | Cause | Solution |
|---|---|---|
| “Invalid file format” | Not a CSV file | Ensure file is CSV format |
| “Encoding error” | Non-UTF8 encoding | Re-save as UTF-8 |
| “No data found” | Empty file or wrong delimiter | Check file contents |
| “Parse error” | Malformed CSV | Fix CSV structure |
Data Appears Garbled
Cause: Encoding mismatch
Solution:
- Open the file in a text editor
- Save with UTF-8 encoding
- Re-import
Missing Columns
Cause: Header row issues
Solution:
- Verify first row contains headers
- Check for BOM (byte order mark) issues
- Remove hidden characters
Mapping Issues
No Suggested Mappings
Cause: Column names don’t match SDTM variables
Solution:
- Manually map columns
- Consider renaming source columns
- Create a mapping template for reuse
Wrong Automatic Mappings
Cause: Fuzzy matching misidentified variables
Solution:
- Review all automatic mappings
- Manually correct incorrect mappings
- Adjust match confidence threshold in settings
Can’t Map Required Variable
Cause: Source data missing required information
Solution:
- Add the missing data to source file
- Derive from other columns if possible
- Consult with data manager
Validation Issues
Too Many Errors
Cause: Data quality issues or incorrect mappings
Solution:
- Address errors in priority order
- Fix mapping issues first
- Clean source data if needed
- Re-validate after each fix
Controlled Terminology Errors
Cause: Values don’t match CDISC CT
Solution:
- Review expected values in the error message
- Map source values to standard terms
- Update source data if appropriate
Date Format Errors
Cause: Non-ISO date formats
Solution:
- Convert dates to ISO 8601 format (YYYY-MM-DD)
- Or use partial dates where appropriate (YYYY-MM, YYYY)
Export Issues
Export Fails
| Error | Cause | Solution |
|---|---|---|
| “Validation errors exist” | Unresolved errors | Fix all errors first |
| “Permission denied” | No write access | Check folder permissions |
| “Disk full” | Insufficient space | Free up disk space |
| “File in use” | File open elsewhere | Close file in other apps |
Truncated Data in XPT
Cause: Values exceed XPT limits
Solution:
- XPT V5: Max 200 chars per variable
- Check variable lengths before export
- Consider using XPT V8 for longer values
Missing Variables in Output
Cause: Variables not mapped or derived
Solution:
- Verify all required mappings
- Check if derived variables were created
- Review export settings
Performance Issues
Slow Import
Cause: Large file size
Solution:
- Allow time for large files
- Consider splitting into smaller files
- Close other applications
- Increase available RAM
Application Freezes
Cause: Processing large datasets
Solution:
- Wait for operation to complete
- Check progress indicator
- If unresponsive after 5+ minutes, restart
- Process smaller datasets
High Memory Usage
Cause: Large dataset in memory
Solution:
- Close unused files
- Process one domain at a time
- Restart application to free memory
Application Issues
Application Won’t Start
macOS:
# If blocked by Gatekeeper
xattr -d com.apple.quarantine /Applications/Trial\ Submission\ Studio.app
Linux:
# Ensure executable permission
chmod +x trial-submission-studio
Windows:
- Run as administrator
- Check antivirus isn’t blocking
Crashes on Startup
Solution:
- Delete configuration files:
- macOS:
~/Library/Application Support/trial-submission-studio/ - Windows:
%APPDATA%\trial-submission-studio\ - Linux:
~/.config/trial-submission-studio/
- macOS:
- Reinstall the application
Settings Not Saved
Cause: Permission issues
Solution:
- Ensure write access to config directory
- Run application with appropriate permissions
Getting Help
Collect Information
Before reporting an issue, gather:
- Application version (Help → About)
- Operating system and version
- Steps to reproduce
- Error messages (screenshots)
- Sample data (anonymized)
Report an Issue
- Check existing issues
- Create a new issue
- Include collected information
Community Support
Quick Reference
Keyboard Shortcuts for Recovery
| Action | Windows/Linux | macOS |
|---|---|---|
| Force quit | Alt+F4 | ⌘Q |
| Cancel operation | Esc | Esc |
| Undo | Ctrl+Z | ⌘Z |
Log Files
Application logs are located at:
- macOS:
~/Library/Logs/trial-submission-studio/ - Windows:
%LOCALAPPDATA%\trial-submission-studio\logs\ - Linux:
~/.local/share/trial-submission-studio/logs/
Include relevant log excerpts when reporting issues.
CDISC Standards Overview
Trial Submission Studio supports CDISC (Clinical Data Interchange Standards Consortium) standards for regulatory submissions.
What is CDISC?
CDISC develops global data standards that streamline clinical research and enable connections to healthcare. These standards are required by regulatory agencies including the FDA and PMDA.
Standards Hierarchy
flowchart TD
    CDISC[CDISC Standards]
    CDISC --> SDTM[SDTM]
    CDISC --> ADAM[ADaM]
    CDISC --> SEND[SEND]
    CDISC --> CT[Controlled Terminology]

    SDTM --> IG34[IG v3.4]
    ADAM --> IG13[IG v1.3]
    SEND --> IG311[IG v3.1.1]

    style CDISC fill:#4a90d9,color:#fff
    style SDTM fill:#50c878,color:#fff
    style ADAM fill:#f5a623,color:#fff
    style SEND fill:#9b59b6,color:#fff
Supported Standards
Currently Implemented
| Standard | Version | Status |
|---|---|---|
| SDTM-IG | 3.4 | Supported |
| Controlled Terminology | 2024-2025 | Supported |
Planned Support
| Standard | Version | Status |
|---|---|---|
| ADaM-IG | 1.3 | Planned |
| SEND-IG | 3.1.1 | Planned |
SDTM (Study Data Tabulation Model)
SDTM is the standard structure for submitting study data to regulatory authorities.
Key Concepts
- Domains: Logical groupings of data (e.g., Demographics, Adverse Events)
- Variables: Individual data elements within domains
- Controlled Terminology: Standardized values for specific variables
Learn More
Controlled Terminology
CDISC Controlled Terminology (CT) provides standardized values for SDTM variables.
Embedded Versions
Trial Submission Studio includes the following CT packages:
- CDISC CT 2025-09-26 (latest)
- CDISC CT 2025-03-28
- CDISC CT 2024-03-29
Learn More
ADaM (Analysis Data Model)
ADaM is the standard for analysis-ready datasets derived from SDTM.
Note
ADaM support is planned for a future release.
SEND (Standard for Exchange of Nonclinical Data)
SEND is SDTM for nonclinical (animal) studies.
Note
SEND support is planned for a future release.
FDA Requirements
Electronic Submissions
The FDA requires CDISC standards for:
- New Drug Applications (NDA)
- Biologics License Applications (BLA)
- Abbreviated New Drug Applications (ANDA)
Study Data Technical Conformance Guide
Trial Submission Studio aligns with FDA’s Study Data Technical Conformance Guide requirements:
- XPT V5 format
- Define-XML 2.1
- Controlled Terminology validation
Resources
Official CDISC Resources
FDA Resources
Next Steps
- SDTM Introduction - Dive into SDTM
- Controlled Terminology - CT reference
SDTM Introduction
The Study Data Tabulation Model (SDTM) is the standard for organizing and formatting human clinical trial data for submission to regulatory authorities.
Purpose
SDTM provides:
- Consistent structure for clinical trial data
- Standardized naming conventions
- Regulatory compliance with FDA requirements
- Interoperability between systems and organizations
Key Concepts
Domains
SDTM organizes data into domains - logical groupings of related observations:
| Category | Examples |
|---|---|
| Special Purpose | DM (Demographics), CO (Comments), SE (Subject Elements), SV (Subject Visits) |
| Interventions | CM (Concomitant Meds), EX (Exposure), SU (Substance Use) |
| Events | AE (Adverse Events), DS (Disposition), MH (Medical History) |
| Findings | LB (Labs), VS (Vital Signs), EG (ECG), PE (Physical Exam) |
Variables
Each domain contains variables - individual data elements:
| Type | Description | Examples |
|---|---|---|
| Identifier | Subject/study identification | STUDYID, USUBJID, DOMAIN |
| Topic | Focus of the observation | AETERM, VSTEST, LBTEST |
| Timing | When observation occurred | AESTDTC, VSDTC, VISITNUM |
| Qualifier | Additional context | AESEV, VSPOS, LBORRES |
Controlled Terminology
Many variables require values from controlled terminology (CT):
- Standardized value lists
- Ensures consistency across studies
- Required for regulatory submissions
SDTM Structure
flowchart TB
    subgraph "SDTM Domain Classes"
        direction TB
        SP[Special Purpose<br/>DM, CO, SE, SV]
        INT[Interventions<br/>CM, EX, SU]
        EVT[Events<br/>AE, DS, MH]
        FIND[Findings<br/>LB, VS, EG, PE]
    end

    subgraph "Variable Types"
        ID[Identifiers<br/>STUDYID, USUBJID]
        TOPIC[Topic Variables<br/>--TERM, --TEST]
        TIMING[Timing Variables<br/>--STDTC, --ENDTC]
        QUAL[Qualifiers<br/>--SEV, --RES]
    end

    SP --> ID
    INT --> ID
    EVT --> ID
    FIND --> ID
    ID --> TOPIC
    TOPIC --> TIMING
    TIMING --> QUAL
    style SP fill: #4a90d9, color: #fff
    style INT fill: #50c878, color: #fff
    style EVT fill: #f5a623, color: #fff
    style FIND fill: #9b59b6, color: #fff
General Observation Classes
- Interventions: Treatments applied to subjects
- Events: Occurrences during study participation
- Findings: Observations and test results
Variable Roles
| Role | Purpose | Example |
|---|---|---|
| Identifier | Link records across domains | USUBJID |
| Topic | Describe the observation | AETERM |
| Timing | Capture when | AESTDTC |
| Qualifier | Provide context | AESEV |
| Rule | Link to analysis rules | (via Define-XML) |
Working with SDTM in Trial Submission Studio
Import Flow
- Load source CSV data
- Select target SDTM domain
- Map source columns to SDTM variables
- Handle controlled terminology
- Validate against SDTM rules
- Export to XPT format
Variable Requirements
- Required: Must be present and populated
- Expected: Should be present if applicable
- Permissible: Allowed but not required
Best Practices
- Map identifiers first: STUDYID, DOMAIN, USUBJID
- Use controlled terminology: For variables requiring CT
- Follow naming conventions: Variable names, labels
- Validate early: Catch issues before export
SDTM Versions
Trial Submission Studio currently supports:
- SDTM-IG 3.4 (current FDA standard)
Version History
| Version | Release | Notes |
|---|---|---|
| 3.4 | 2021 | Current FDA standard |
| 3.3 | 2018 | |
| 3.2 | 2013 | |
| 3.1.2 | 2008 |
Next Steps
- SDTM Domains - Domain reference
- SDTM Variables - Variable details
- Validation Rules - Compliance checking
- Controlled Terminology - CT reference
SDTM Domains
SDTM organizes clinical trial data into domains based on the type of observation.
Domain Classification
flowchart TD
    subgraph "SDTM Domains"
        direction TB
        SPE[Special Purpose]
        INT[Interventions]
        EVT[Events]
        FND[Findings]
    end

    SPE --> DM[DM - Demographics]
    SPE --> TA[TA - Trial Arms]
    SPE --> TS[TS - Trial Summary]

    INT --> CM[CM - Medications]
    INT --> EX[EX - Exposure]
    INT --> PR[PR - Procedures]

    EVT --> AE[AE - Adverse Events]
    EVT --> MH[MH - Medical History]
    EVT --> DS[DS - Disposition]

    FND --> LB[LB - Lab Results]
    FND --> VS[VS - Vital Signs]
    FND --> EG[EG - ECG Results]

    style SPE fill:#4a90d9,color:#fff
    style INT fill:#50c878,color:#fff
    style EVT fill:#f5a623,color:#fff
    style FND fill:#9b59b6,color:#fff
Domain Categories
Special Purpose Domains
Core structural domains required for all submissions.
| Domain | Name | Description |
|---|---|---|
| DM | Demographics | Subject demographic information |
| CO | Comments | Free-text comments |
| SE | Subject Elements | Subject milestones |
| SV | Subject Visits | Visits for each subject |
| TA | Trial Arms | Planned study arms |
| TD | Trial Disease | Disease descriptions |
| TE | Trial Elements | Planned protocol elements |
| TI | Trial Inclusion/Exclusion | Eligibility criteria |
| TS | Trial Summary | Study-level parameters |
| TV | Trial Visits | Planned visits |
Interventions Domains
Treatments and substances given to or used by subjects.
| Domain | Name | Description |
|---|---|---|
| CM | Concomitant Medications | Non-study medications |
| EC | Exposure as Collected | Exposure data as collected |
| EX | Exposure | Study treatment exposure |
| PR | Procedures | Non-study procedures |
| SU | Substance Use | Tobacco, alcohol, etc. |
Events Domains
Discrete occurrences during study participation.
| Domain | Name | Description |
|---|---|---|
| AE | Adverse Events | All adverse events |
| CE | Clinical Events | Non-adverse clinical events |
| DS | Disposition | Subject status at milestones |
| DV | Protocol Deviations | Protocol violations |
| HO | Healthcare Encounters | Hospitalizations, ER visits |
| MH | Medical History | Prior conditions |
Findings Domains
Observations and measurements.
| Domain | Name | Description |
|---|---|---|
| DA | Drug Accountability | Drug dispensing/return |
| DD | Death Details | Cause of death details |
| EG | ECG Results | Electrocardiogram data |
| FT | Functional Tests | Functional assessments |
| IE | Inclusion/Exclusion | Subject eligibility |
| IS | Immunogenicity Specimen | Sample assessments |
| LB | Lab Results | Laboratory tests |
| MB | Microbiology Specimen | Microbiology samples |
| MI | Microscopic Findings | Histopathology |
| MK | Musculoskeletal | Musculoskeletal findings |
| MO | Morphology | Imaging morphology |
| MS | Microbiology Susceptibility | Antibiotic susceptibility |
| NV | Nervous System | Neurological findings |
| OE | Ophthalmology | Eye exam results |
| PC | Pharmacokinetics Concentrations | Drug concentrations |
| PE | Physical Exam | Physical examination |
| PP | PK Parameters | Pharmacokinetic parameters |
| QS | Questionnaires | PRO/questionnaire data |
| RE | Respiratory | Pulmonary function |
| RP | Reproductive | Reproductive findings |
| RS | Disease Response | Tumor response |
| SC | Subject Characteristics | Additional demographics |
| SS | Subject Status | Subject enrollment status |
| TR | Tumor/Lesion Results | Tumor measurements |
| TU | Tumor/Lesion Identification | Tumor identification |
| UR | Urinary System | Urological findings |
| VS | Vital Signs | Vital sign measurements |
Common Domain Details
DM - Demographics
Required for all studies. Contains one record per subject.
Key Variables:
- USUBJID (Unique Subject ID)
- AGE, AGEU (Age and units)
- SEX, RACE, ETHNIC
- ARM, ARMCD (Study arm)
- RFSTDTC, RFENDTC (Reference dates)
- COUNTRY, SITEID
AE - Adverse Events
Captures all adverse events during the study.
Key Variables:
- AETERM (Verbatim term)
- AEDECOD (Dictionary-coded term)
- AESTDTC, AEENDTC (Start/end dates)
- AESEV (Severity)
- AESER (Serious)
- AEREL (Relationship to treatment)
- AEOUT (Outcome)
VS - Vital Signs
Captures vital sign measurements.
Key Variables:
- VSTESTCD, VSTEST (Test code/name)
- VSORRES, VSSTRESC, VSSTRESN (Results)
- VSORRESU, VSSTRESU (Units)
- VSPOS (Position)
- VSDTC (Date/time)
- VISITNUM, VISIT
LB - Laboratory Results
Captures laboratory test results.
Key Variables:
- LBTESTCD, LBTEST (Test code/name)
- LBORRES, LBSTRESC, LBSTRESN (Results)
- LBORRESU, LBSTRESU (Units)
- LBSPEC (Specimen type)
- LBDTC (Date/time)
- LBNRIND (Reference range indicator)
Custom Domains
For data not fitting standard domains, create custom domains:
- Two-letter code starting with X, Y, or Z
- Follow general observation class rules
- Document in Define-XML
Next Steps
- SDTM Variables - Variable reference
- Validation Rules - Domain validation
SDTM Variables
Variables are the individual data elements within SDTM domains.
Variable Categories
Identifier Variables
Identify the study, subject, and domain.
| Variable | Label | Description |
|---|---|---|
| STUDYID | Study Identifier | Unique study ID |
| DOMAIN | Domain Abbreviation | Two-letter domain code |
| USUBJID | Unique Subject ID | Unique across all studies |
| SUBJID | Subject ID | Subject ID within study |
| SITEID | Study Site Identifier | Site number |
Topic Variables
Describe what was observed.
| Domain | Variable | Description |
|---|---|---|
| AE | AETERM | Adverse event term |
| CM | CMTRT | Medication name |
| LB | LBTEST | Lab test name |
| VS | VSTEST | Vital sign test |
Timing Variables
Capture when observations occurred.
| Variable | Label | Description |
|---|---|---|
| –DTC | Date/Time | ISO 8601 date/time |
| –STDTC | Start Date/Time | Start of observation |
| –ENDTC | End Date/Time | End of observation |
| –DY | Study Day | Study day number |
| VISITNUM | Visit Number | Numeric visit identifier |
| VISIT | Visit Name | Visit label |
Qualifier Variables
Provide additional context.
| Type | Examples | Description |
|---|---|---|
| Grouping | –CAT, –SCAT | Category, subcategory |
| Result | –ORRES, –STRESC | Original/standard result |
| Record | –SEQ, –GRPID | Sequence, grouping |
| Synonym | –DECOD, –MODIFY | Coded/modified terms |
Variable Naming Conventions
Prefix Pattern
Most variables use a domain-specific prefix:
AE+TERM=AETERMVS+TESTCD=VSTESTCDLB+ORRES=LBORRES
Common Suffixes
| Suffix | Meaning | Example |
|---|---|---|
--TESTCD | Test Code | VSTESTCD, LBTESTCD |
--TEST | Test Name | VSTEST, LBTEST |
--ORRES | Original Result | VSORRES, LBORRES |
--ORRESU | Original Units | VSORRESU, LBORRESU |
--STRESC | Standardized Result (Char) | VSSTRESC |
--STRESN | Standardized Result (Num) | VSSTRESN |
--STRESU | Standardized Units | VSSTRESU |
--STAT | Status | VSSTAT (NOT DONE) |
--REASND | Reason Not Done | VSREASND |
--LOC | Location | VSLOC |
--DTC | Date/Time | VSDTC, AESTDTC |
Data Types
Character Variables
- Text values
- Max length: 200 characters (XPT V5)
- Example: AETERM, VSTEST
Numeric Variables
- Integer or floating-point
- Example: AGE, VSSTRESN, LBSTRESN
Date/Time Variables
ISO 8601 format:
- Full:
2024-01-15T09:30:00 - Date only:
2024-01-15 - Partial:
2024-01,2024
Variable Requirements
Required Variables
Must be present and populated for every record.
| Domain | Required Variables |
|---|---|
| All | STUDYID, DOMAIN, USUBJID |
| DM | RFSTDTC, RFENDTC, SITEID, ARM, ARMCD |
| AE | AETERM, AEDECOD, AESTDTC |
| VS | VSTESTCD, VSTEST, VSORRES, VSDTC |
Expected Variables
Should be present when applicable.
| Domain | Expected Variables |
|---|---|
| AE | AEENDTC, AESEV, AESER, AEREL |
| VS | VSSTRESN, VSSTRESU, VISITNUM |
Permissible Variables
Can be included if relevant data exists.
Controlled Terminology
Variables requiring controlled terminology:
| Variable | Codelist |
|---|---|
| SEX | Sex |
| RACE | Race |
| ETHNIC | Ethnicity |
| COUNTRY | Country |
| AESEV | Severity |
| AESER | No Yes Response |
| VSTESTCD | Vital Signs Test Code |
| LBTESTCD | Lab Test Code |
Variable Metadata
Label
40 characters max (XPT V5):
- Descriptive text
- Example: “Adverse Event Reported Term”
Length
Define appropriate length for each variable:
- Consider actual data values
- XPT V5 max: 200 characters
Order
Maintain consistent variable ordering:
- Identifier variables
- Topic variables
- Qualifier variables
- Timing variables
Next Steps
- Validation Rules - Variable validation
- Controlled Terminology - CT values
SDTM Validation Rules
Trial Submission Studio validates data against SDTM implementation guide rules.
Validation Categories
Structural Validation
Checks data structure and format.
| Rule ID | Description | Severity |
|---|---|---|
| SD0001 | Required variable missing | Error |
| SD0002 | Invalid variable name | Error |
| SD0003 | Variable length exceeded | Error |
| SD0004 | Invalid data type | Error |
| SD0005 | Duplicate records | Warning |
| SD0006 | Invalid domain code | Error |
Content Validation
Checks data values and relationships.
| Rule ID | Description | Severity |
|---|---|---|
| CT0001 | Value not in controlled terminology | Error |
| CT0002 | Invalid date format | Error |
| CT0003 | Date out of valid range | Warning |
| CT0004 | Numeric value out of range | Warning |
| CT0005 | Missing required value | Error |
Cross-Record Validation
Checks relationships between records.
| Rule ID | Description | Severity |
|---|---|---|
| XR0001 | USUBJID not in DM | Error |
| XR0002 | Duplicate key values | Error |
| XR0003 | Missing parent record | Warning |
| XR0004 | Inconsistent dates across domains | Warning |
Common Validation Rules
Identifier Rules
STUDYID
- Must be present in all records
- Must be consistent across domains
- Cannot be null or empty
USUBJID
- Must be present in all records
- Must exist in DM domain
- Must be unique per subject
DOMAIN
- Must match the domain abbreviation
- Must be uppercase
- Must be 2 characters
Date/Time Rules
–DTC Variables
- Must follow ISO 8601 format
- Supported formats:
YYYY-MM-DDTHH:MM:SSYYYY-MM-DDYYYY-MMYYYY
Date Ranges
- End date cannot precede start date
- Study dates should be within study period
Controlled Terminology Rules
SEX
Valid values:
M(Male)F(Female)U(Unknown)UNDIFFERENTIATED
AESEV
Valid values:
MILDMODERATESEVERE
AESER
Valid values:
Y(Yes)N(No)
Validation Report
Error Summary
┌─────────────────────────────────────────────────────────────┐
│ Validation Summary                                          │
├─────────────────────────────────────────────────────────────┤
│ Errors:   5                                                 │
│ Warnings: 12                                                │
│ Info:     3                                                 │
├─────────────────────────────────────────────────────────────┤
│ Domain: DM                                                  │
│   - 2 Errors                                                │
│   - 3 Warnings                                              │
│                                                             │
│ Domain: AE                                                  │
│   - 3 Errors                                                │
│   - 9 Warnings                                              │
└─────────────────────────────────────────────────────────────┘
Error Details
Each error includes:
- Rule ID: Unique identifier
- Severity: Error/Warning/Info
- Description: What’s wrong
- Location: Affected rows/columns
- Suggestion: How to fix
Fixing Validation Issues
Mapping Issues
- Verify correct source column is mapped
- Check data type compatibility
- Ensure all required variables are mapped
Data Issues
- Review affected rows
- Correct values in source data
- Re-import and re-validate
Terminology Issues
- Check expected values in codelist
- Map source values to standard terms
- Use value-level mapping if needed
Custom Validation
Severity Overrides
Some warnings can be suppressed if intentional:
- Review the warning
- Document the reason
- Mark as reviewed (if applicable)
Adding Context
For validation reports:
- Add comments explaining exceptions
- Document data collection differences
- Note protocol-specific variations
Best Practices
-
Validate incrementally
- After initial mapping
- After each significant change
- Before final export
-
Address errors first
- Errors block export
- Warnings should be reviewed
- Info messages are FYI
-
Document exceptions
- Why a warning is acceptable
- Protocol-specific reasons
- Historical data limitations
-
Review validation reports
- Keep for audit trail
- Share with data management
- Include in submission package
Next Steps
- Controlled Terminology - Valid values
- Exporting Data - Export after validation
Controlled Terminology
CDISC Controlled Terminology (CT) provides standardized values for SDTM variables.
Overview
Controlled Terminology ensures:
- Consistency across studies and organizations
- Interoperability between systems
- Regulatory compliance with FDA requirements
Embedded CT Packages
Trial Submission Studio includes the following CT versions:
| Version | Release Date | Status |
|---|---|---|
| 2024-12-20 | December 2024 | Current |
| 2024-09-27 | September 2024 | Supported |
| 2024-06-28 | June 2024 | Supported |
Common Codelists
SEX (C66731)
| Code | Decoded Value |
|---|---|
| M | MALE |
| F | FEMALE |
| U | UNKNOWN |
| UNDIFFERENTIATED | UNDIFFERENTIATED |
RACE (C74457)
| Decoded Value |
|---|
| AMERICAN INDIAN OR ALASKA NATIVE |
| ASIAN |
| BLACK OR AFRICAN AMERICAN |
| NATIVE HAWAIIAN OR OTHER PACIFIC ISLANDER |
| WHITE |
| MULTIPLE |
| NOT REPORTED |
| UNKNOWN |
ETHNIC (C66790)
| Decoded Value |
|---|
| HISPANIC OR LATINO |
| NOT HISPANIC OR LATINO |
| NOT REPORTED |
| UNKNOWN |
COUNTRY (C66729)
ISO 3166-1 alpha-3 country codes:
- USA, CAN, GBR, DEU, FRA, JPN, etc.
AESEV (C66769) - Severity
| Decoded Value |
|---|
| MILD |
| MODERATE |
| SEVERE |
AESER (C66742) - Serious
| Code | Decoded Value |
|---|---|
| Y | Y |
| N | N |
NY (C66742) - No Yes Response
| Code | Decoded Value |
|---|---|
| Y | Y |
| N | N |
VSTESTCD (C66741) - Vital Signs Test Codes
| Code | Decoded Value |
|---|---|
| BMI | Body Mass Index |
| DIABP | Diastolic Blood Pressure |
| HEIGHT | Height |
| HR | Heart Rate |
| PULSE | Pulse Rate |
| RESP | Respiratory Rate |
| SYSBP | Systolic Blood Pressure |
| TEMP | Temperature |
| WEIGHT | Weight |
LBTESTCD - Lab Test Codes
Common examples:
| Code | Description |
|---|---|
| ALB | Albumin |
| ALT | Alanine Aminotransferase |
| AST | Aspartate Aminotransferase |
| BILI | Bilirubin |
| BUN | Blood Urea Nitrogen |
| CREAT | Creatinine |
| GLUC | Glucose |
| HGB | Hemoglobin |
| PLAT | Platelet Count |
| WBC | White Blood Cell Count |
Extensible vs Non-Extensible
Non-Extensible Codelists
Values must exactly match the codelist:
- SEX
- COUNTRY
- Unit codelists
Extensible Codelists
Additional values allowed with sponsor definition:
- RACE (can add study-specific values)
- Some test codes
Using CT in Trial Submission Studio
Automatic Validation
When you map variables with controlled terminology:
- Values are checked against the codelist
- Non-matching values are flagged
- Suggestions are provided
Value Mapping
For source values not in CT format:
- Create value-level mappings
- Map “Male” → “M”, “Female” → “F”
- Apply consistently
CT Version Selection
- Go to Settings → Controlled Terminology
- Select the appropriate CT version
- Validation uses selected version
Handling CT Errors
Value Not in Codelist
Error: “Value ‘XYZ’ not found in codelist”
Solutions:
- Check spelling/case
- Find the correct CT value
- Map source value to CT value
- For extensible codelists, document new value
Common Mappings
| Source Value | CT Value |
|---|---|
| Male | M |
| Female | F |
| Yes | Y |
| No | N |
| Caucasian | WHITE |
| African American | BLACK OR AFRICAN AMERICAN |
Updating CT
New CT versions are released quarterly by CDISC. To use newer versions:
- Check for Trial Submission Studio updates
- New CT is included in app updates
- Select version in settings
Resources
Official References
Next Steps
- SDTM Variables - Variables requiring CT
- Validation - CT validation in practice
ADaM (Preview)
The Analysis Data Model (ADaM) defines standards for analysis-ready datasets.
Note
ADaM support is planned for a future release of Trial Submission Studio.
What is ADaM?
ADaM (Analysis Data Model) provides:
- Standards for analysis datasets
- Derived from SDTM data
- Ready for statistical analysis
- Required for FDA submissions
ADaM vs SDTM
| Aspect | SDTM | ADaM |
|---|---|---|
| Purpose | Data tabulation | Data analysis |
| Timing | Raw data collection | Derived for analysis |
| Structure | Observation-based | Analysis-ready |
| Audience | Data managers | Statisticians |
ADaM Dataset Types
ADSL - Subject-Level Analysis Dataset
One record per subject containing:
- Demographics
- Treatment information
- Key baseline characteristics
- Analysis flags
BDS - Basic Data Structure
Vertical structure for:
- Laboratory data (ADLB)
- Vital signs (ADVS)
- Efficacy parameters
OCCDS - Occurrence Data Structure
For event data:
- Adverse events (ADAE)
- Concomitant medications (ADCM)
Other Structures
- Time-to-Event (ADTTE)
- Medical History (ADMH)
Planned Features
When ADaM support is added, Trial Submission Studio will provide:
ADaM Generation
- Derive ADSL from DM and other SDTM domains
- Create BDS datasets from SDTM findings
- Generate OCCDS from events domains
ADaM Validation
- Check ADaM IG compliance
- Validate traceability to SDTM
- Verify required variables
ADaM Export
- Export to XPT format
- Generate Define-XML for ADaM
- Include in submission package
Current Workarounds
Until ADaM support is available:
-
Export SDTM first
- Use Trial Submission Studio for SDTM
- Generate XPT files
-
Derive ADaM externally
- Use SAS or R
- Apply ADaM derivation rules
- Generate analysis datasets
-
Validate separately
- Use external validation tools
- Check ADaM compliance
Timeline
ADaM support is on our roadmap. Priority features:
- ADSL generation
- BDS for VS and LB
- OCCDS for AE
Resources
CDISC ADaM Resources
Stay Updated
- Check the Roadmap for updates
- Watch the GitHub repository for releases
SEND (Preview)
The Standard for Exchange of Nonclinical Data (SEND) extends SDTM for animal studies.
Note
SEND support is planned for a future release of Trial Submission Studio.
What is SEND?
SEND (Standard for Exchange of Nonclinical Data) provides:
- Standardized format for nonclinical (animal) study data
- Based on SDTM structure
- Required for FDA nonclinical submissions
- Supports toxicology and pharmacology studies
SEND vs SDTM
| Aspect | SDTM | SEND |
|---|---|---|
| Subjects | Human | Animal |
| Studies | Clinical trials | Nonclinical studies |
| Domains | Clinical domains | Nonclinical domains |
| Requirements | NDA, BLA | IND, NDA (nonclinical) |
SEND Domains
Special Purpose
| Domain | Name |
|---|---|
| DM | Demographics |
| DS | Disposition |
| TA | Trial Arms |
| TE | Trial Elements |
| TS | Trial Summary |
| TX | Trial Sets |
Findings
| Domain | Name |
|---|---|
| BW | Body Weight |
| BG | Body Weight Gain |
| CL | Clinical Observations |
| DD | Death Diagnosis |
| FW | Food/Water Consumption |
| LB | Laboratory Results |
| MA | Macroscopic Findings |
| MI | Microscopic Findings |
| OM | Organ Measurements |
| PC | Pharmacokinetic Concentrations |
| PP | Pharmacokinetic Parameters |
| TF | Tumor Findings |
| VS | Vital Signs |
Interventions
| Domain | Name |
|---|---|
| EX | Exposure |
Key Differences from SDTM
Subject Identification
- USUBJID format differs for animals
- Species and strain information required
- Group/cage identification
Domain-Specific Variables
SEND includes nonclinical-specific variables:
- Species, strain, sex
- Dose group information
- Study day calculations
- Sacrifice/necropsy data
Controlled Terminology
SEND uses specific CT:
- Animal species
- Strain/substrain
- Route of administration (nonclinical)
- Specimen types
Planned Features
When SEND support is added, Trial Submission Studio will provide:
SEND Import/Mapping
- Support nonclinical data formats
- Map to SEND domains
- Handle group-level data
SEND Validation
- SEND-IG compliance checking
- Nonclinical-specific rules
- Controlled terminology for SEND
SEND Export
- XPT V5 format
- Define-XML for SEND
- Submission-ready packages
Current Workarounds
Until SEND support is available:
-
Manual Mapping
- Use current SDTM workflow
- Manually adjust for SEND differences
- Export to XPT
-
External Tools
- Use specialized nonclinical tools
- Validate with SEND validators
SEND Versions
| Version | Description |
|---|---|
| SEND 3.1.1 | Current FDA standard |
| SEND 3.1 | Previous version |
| SEND 3.0 | Initial release |
Resources
CDISC SEND Resources
FDA Resources
Stay Updated
XPT (SAS Transport) Format
XPT is the FDA-standard format for regulatory data submissions.
Overview
The SAS Transport Format (XPT) is:
- Required by FDA for electronic submissions
- A platform-independent binary format
- Compatible with SAS and other tools
- The de facto standard for clinical data exchange
XPT Versions
Trial Submission Studio supports two XPT versions:
XPT Version 5 (FDA Standard)
| Characteristic | Limit |
|---|---|
| Variable name length | 8 characters |
| Variable label length | 40 characters |
| Record length | 8,192 bytes |
| Numeric precision | 8 bytes (IEEE) |
Use for: FDA submissions, regulatory requirements
XPT Version 8 (Extended)
| Characteristic | Limit |
|---|---|
| Variable name length | 32 characters |
| Variable label length | 256 characters |
| Record length | 131,072 bytes |
| Numeric precision | 8 bytes (IEEE) |
Use for: Internal use, longer names needed
File Structure
Header Records
XPT files contain metadata headers:
- Library header (first record)
- Member header (dataset info)
- Namestr records (variable definitions)
Data Records
- Fixed-width records
- Packed binary format
- IEEE floating-point numbers
Creating XPT Files
Export Steps
- Complete data mapping
- Run validation
- Click Export → XPT
- Select version (V5 or V8)
- Choose output location
- Click Save
Export Options
| Option | Description |
|---|---|
| Version | V5 (default) or V8 |
| Sort by keys | Order records by key variables |
| Include metadata | Dataset label, variable labels |
XPT Constraints
Variable Names
V5 Requirements:
- Maximum 8 characters
- Start with letter or underscore
- Alphanumeric and underscore only
- Uppercase recommended
V8 Requirements:
- Maximum 32 characters
- Same character restrictions
Variable Labels
V5: 40 characters max V8: 256 characters max
Data Values
Character variables:
- V5: Max 200 bytes per value
- Trailing spaces trimmed
- Missing = blank
Numeric variables:
- 8-byte IEEE format
- 28 SAS missing value codes supported (.A through .Z, ._)
- Precision: ~15 significant digits
Numeric Precision
IEEE to SAS Conversion
Trial Submission Studio handles:
- IEEE 754 double precision
- SAS missing value encoding
- Proper byte ordering
Missing Values
SAS/XPT supports 28 missing value codes:
| Code | Meaning |
|---|---|
. | Standard missing |
.A - .Z | Special missing A-Z |
._ | Underscore missing |
Validation Before Export
Automatic Checks
- Variable name lengths
- Label lengths
- Data type compatibility
- Value length limits
Common Issues
| Issue | Solution |
|---|---|
| Name too long | Use V8 or rename |
| Label truncated | Shorten label |
| Value too long | Truncate or split |
Post-Export Verification
Recommended Steps
- Check file size - Matches expected data volume
- Open in viewer - Verify structure
- Validate with external tools - Pinnacle 21, SAS
- Compare row counts - Match source data
External Validation
Consider validating with:
- Pinnacle 21 Community (free)
- SAS Universal Viewer
- Other XPT readers
FDA Submission Requirements
Required Format
- XPT Version 5 for FDA submissions
- Define-XML 2.1 for metadata
- Appropriate file naming (lowercase domain codes)
File Naming Convention
dm.xpt- Demographicsae.xpt- Adverse Eventsvs.xpt- Vital Signs- (lowercase domain abbreviation)
Dataset Limits
| Constraint | Limit |
|---|---|
| File size | 5 GB (practical limit) |
| Variables per dataset | No formal limit |
| Records per dataset | No formal limit |
Technical Details
Byte Order
- XPT uses big-endian byte order
- Trial Submission Studio handles conversion automatically
Character Encoding
- ASCII-compatible
- Extended ASCII for special characters
- UTF-8 source data converted appropriately
Record Blocking
- 80-byte logical records
- Blocked for efficiency
- Headers use fixed-format records
Next Steps
- Dataset-XML - Alternative export format
- Define-XML - Metadata documentation
- Exporting Data - Export guide
Dataset-XML Format
Dataset-XML is a CDISC standard XML format for clinical data exchange.
Overview
Dataset-XML provides:
- Human-readable data format
- Full Unicode support
- Embedded metadata
- Alternative to XPT binary format
When to Use Dataset-XML
| Use Case | Recommendation |
|---|---|
| FDA submission | Use XPT (required) |
| Internal data exchange | Dataset-XML works well |
| Archive/audit trail | Good for documentation |
| Non-SAS environments | Easier integration |
| Full character support | Unicode capable |
Format Structure
ODM Container
Dataset-XML is based on CDISC ODM (Operational Data Model):
<?xml version="1.0" encoding="UTF-8"?>
<ODM xmlns="http://www.cdisc.org/ns/odm/v1.3"
     xmlns:data="http://www.cdisc.org/ns/Dataset-XML/v1.0"
     FileType="Snapshot">
    <ClinicalData StudyOID="..." MetaDataVersionOID="...">
        <SubjectData SubjectKey="...">
            <StudyEventData StudyEventOID="...">
                <ItemGroupData ItemGroupOID="DM">
                    <ItemData ItemOID="STUDYID">ABC123</ItemData>
                    <ItemData ItemOID="USUBJID">ABC123-001</ItemData>
                    <!-- More items -->
                </ItemGroupData>
            </StudyEventData>
        </SubjectData>
    </ClinicalData>
</ODM>
Key Elements
| Element | Description |
|---|---|
ODM | Root container |
ClinicalData | Study data container |
SubjectData | Per-subject data |
ItemGroupData | Domain records |
ItemData | Individual values |
Creating Dataset-XML
Export Steps
- Complete data mapping
- Run validation
- Click Export → Dataset-XML
- Configure options
- Choose output location
- Click Save
Export Options
| Option | Description |
|---|---|
| Include metadata | Embed variable definitions |
| Pretty print | Format XML for readability |
| Compress | Reduce file size |
| Single file | One file vs. file per domain |
Dataset-XML vs XPT
| Aspect | Dataset-XML | XPT |
|---|---|---|
| Format | Text (XML) | Binary |
| Readability | Human-readable | Requires tools |
| Size | Larger | Smaller |
| Unicode | Full support | Limited |
| FDA submission | Accepted | Required |
| Integration | Easier | SAS-focused |
Advantages
Human Readable
- Open in any text editor
- Easily inspectable
- Good for debugging
Full Unicode
- International characters
- Special symbols
- No character limitations
Self-Describing
- Metadata embedded
- Schema validation
- No external dependencies
Platform Independent
- Standard XML format
- Any programming language
- No proprietary tools needed
Limitations
File Size
- Larger than binary XPT
- Compression recommended for large datasets
FDA Preference
- FDA prefers XPT for submissions
- Dataset-XML accepted but less common
Processing Overhead
- XML parsing slower than binary
- More memory for large files
Validation
Schema Validation
Dataset-XML can be validated against:
- CDISC Dataset-XML schema
- ODM schema
- Custom validation rules
Common Checks
- Well-formed XML
- Valid element structure
- Data type conformance
- Required elements present
Working with Dataset-XML
Reading Files
Dataset-XML can be read by:
- Any XML parser
- CDISC-compatible tools
- Statistical software with XML support
Converting to Other Formats
From Dataset-XML, you can convert to:
- XPT (for FDA submission)
- CSV (for analysis)
- Database tables
Technical Details
Encoding
- UTF-8 (default and recommended)
- UTF-16 supported
- Encoding declared in XML header
Namespaces
xmlns="http://www.cdisc.org/ns/odm/v1.3"
        xmlns:data="http://www.cdisc.org/ns/Dataset-XML/v1.0"
File Extension
.xmlfor Dataset-XML files- Optionally:
domain.xml(e.g.,dm.xml)
Next Steps
- XPT Format - FDA standard format
- Define-XML - Metadata documentation
- Exporting Data - Export guide
Define-XML 2.1
Define-XML provides metadata documentation for CDISC datasets.
Overview
Define-XML is:
- Required for FDA electronic submissions
- Describes dataset structure and content
- Documents variable definitions
- Provides value-level metadata
What Define-XML Contains
Dataset Metadata
- Dataset names and descriptions
- Domain structure
- Keys and sort order
- Dataset locations
Variable Metadata
- Variable names and labels
- Data types and lengths
- Origin information
- Controlled terminology references
Value-Level Metadata
- Specific value definitions
- Conditional logic
- Derivation methods
Computational Methods
- Derivation algorithms
- Imputation rules
- Analysis methods
Define-XML 2.1 Structure
Root Element
<?xml version="1.0" encoding="UTF-8"?>
<ODM xmlns="http://www.cdisc.org/ns/odm/v1.3"
     xmlns:def="http://www.cdisc.org/ns/def/v2.1"
     ODMVersion="1.3.2"
     FileType="Snapshot"
     FileOID="DEFINE-XML-EXAMPLE">
Key Components
| Component | Description |
|---|---|
Study | Study-level information |
MetaDataVersion | Metadata container |
ItemGroupDef | Dataset definitions |
ItemDef | Variable definitions |
CodeList | Controlled terminology |
MethodDef | Computational methods |
CommentDef | Comments and notes |
Creating Define-XML
Automatic Generation
Trial Submission Studio generates Define-XML from:
- Mapped datasets
- Variable definitions
- Controlled terminology
- Validation rules
Export Steps
- Complete all domain mappings
- Run validation
- Click Export → Define-XML
- Review generated metadata
- Add comments/methods if needed
- Click Save
Generated Content
The exported Define-XML includes:
| Element | Source |
|---|---|
| Dataset definitions | From mapped domains |
| Variable definitions | From SDTM standards |
| Origins | From mapping configuration |
| Codelists | From controlled terminology |
Define-XML Elements
ItemGroupDef (Datasets)
<ItemGroupDef OID="IG.DM"
              Name="DM"
              Repeating="No"
              Domain="DM"
              def:Structure="One record per subject"
              def:Class="SPECIAL PURPOSE">
    <Description>
        <TranslatedText xml:lang="en">Demographics</TranslatedText>
    </Description>
    <ItemRef ItemOID="IT.DM.STUDYID" OrderNumber="1" Mandatory="Yes"/>
    <!-- More ItemRefs -->
</ItemGroupDef>
ItemDef (Variables)
<ItemDef OID="IT.DM.USUBJID"
         Name="USUBJID"
         DataType="text"
         Length="50"
         def:Origin="CRF">
    <Description>
        <TranslatedText xml:lang="en">Unique Subject Identifier</TranslatedText>
    </Description>
</ItemDef>
CodeList (Controlled Terminology)
<CodeList OID="CL.SEX"
          Name="Sex"
          DataType="text">
    <CodeListItem CodedValue="M">
        <Decode>
            <TranslatedText xml:lang="en">Male</TranslatedText>
        </Decode>
    </CodeListItem>
    <CodeListItem CodedValue="F">
        <Decode>
            <TranslatedText xml:lang="en">Female</TranslatedText>
        </Decode>
    </CodeListItem>
</CodeList>
Variable Origins
Define-XML documents where data comes from:
| Origin | Description |
|---|---|
| CRF | Case Report Form |
| Derived | Calculated from other data |
| Assigned | Assigned by sponsor |
| Protocol | From study protocol |
| eDT | Electronic data transfer |
Customizing Define-XML
Adding Comments
Add explanatory comments for:
- Complex derivations
- Data collection notes
- Exception documentation
Computational Methods
Document derivation algorithms:
- Formulas
- Conditions
- Source variables
Value-Level Metadata
For variables with parameter-dependent definitions:
- Different units by test
- Conditional codelists
- Test-specific origins
Validation
Schema Validation
Define-XML is validated against:
- CDISC Define-XML 2.1 schema
- Stylesheet rendering rules
Common Issues
| Issue | Solution |
|---|---|
| Missing required elements | Add required metadata |
| Invalid references | Check OID references |
| Codelist mismatches | Verify CT alignment |
FDA Requirements
Submission Package
define.xml- Metadata filedefine.pdf- Rendered stylesheet (optional)- Referenced XPT datasets
Naming Convention
- File:
define.xml(lowercase) - Location: Study root folder
Stylesheet
Include the CDISC stylesheet for rendering:
<?xml-stylesheet type="text/xsl" href="define2-1.xsl"?>
Best Practices
- Generate early - Create Define-XML as you build datasets
- Review carefully - Verify all metadata is accurate
- Document derivations - Explain complex logic
- Test rendering - View with stylesheet before submission
- Validate - Use Define-XML validators
Next Steps
- XPT Format - Data file format
- Dataset-XML - Alternative data format
- Exporting Data - Export guide
Architecture Overview
Trial Submission Studio is built as a modular Rust workspace with 6 specialized crates.
Design Philosophy
Core Principles
- Separation of Concerns - Each crate has a single responsibility
- Deterministic Output - Reproducible results for regulatory compliance
- Offline Operation - All standards embedded, no network dependencies
- Type Safety - Rust’s type system prevents data errors
Key Design Decisions
- Pure Functions - Mapping and validation logic is side-effect free
- Embedded Standards - CDISC data bundled in binary
- No External APIs - Works without internet connection
- Auditable - Clear data lineage and transformations
Workspace Structure
trial-submission-studio/
├── Cargo.toml              # Workspace configuration
├── crates/
│   ├── tss-gui/            # Desktop application (Iced 0.14.0)
│   ├── tss-submit/         # Mapping, normalization, validation, export
│   ├── tss-ingest/         # CSV loading
│   ├── tss-standards/      # CDISC standards loader
│   ├── tss-updater/        # App update mechanism
│   └── tss-updater-helper/ # macOS bundle swap helper
├── standards/              # Embedded CDISC data
├── mockdata/               # Test datasets
└── docs/                   # This documentation
Crate Dependency Graph
flowchart TD
    subgraph Application
        GUI[tss-gui<br/>Iced 0.14.0]
    end

    subgraph "Core Pipeline"
        SUBMIT[tss-submit]
        subgraph modules[tss-submit modules]
            MAP[map/]
            NORM[normalize/]
            VAL[validate/]
            EXP[export/]
        end
    end

    subgraph Support
        INGEST[tss-ingest]
        STANDARDS[tss-standards]
    end

    subgraph Update
        UPDATER[tss-updater]
        HELPER[tss-updater-helper]
    end

    subgraph External
        XPT[xportrs<br/>crates.io]
    end

    GUI --> SUBMIT
    GUI --> INGEST
    GUI --> STANDARDS
    GUI --> UPDATER
    SUBMIT --> STANDARDS
    SUBMIT --> XPT
    UPDATER -.-> HELPER
    INGEST --> STANDARDS

    style GUI fill:#4a90d9,color:#fff
    style SUBMIT fill:#50c878,color:#fff
    style STANDARDS fill:#f5a623,color:#fff
    style XPT fill:#9b59b6,color:#fff
Crate Responsibilities
| Crate | Purpose | Key Dependencies |
|---|---|---|
| tss-gui | Desktop application | Iced 0.14.0 |
| tss-submit | Mapping, normalization, validation, export | rapidfuzz, xportrs, quick-xml |
| tss-ingest | CSV loading | csv, polars |
| tss-standards | CDISC standards loader | serde, serde_json |
| tss-updater | App updates | reqwest |
| tss-updater-helper | macOS bundle swap | (macOS-only) |
Data Flow
Import to Export Pipeline
flowchart LR
    subgraph Input
        CSV[CSV File]
    end

    subgraph "tss-submit"
        MAP[map/]
        NORM[normalize/]
        VAL[validate/]
        EXP[export/]
    end

    subgraph Output
        XPT[XPT V5/V8]
        XML[Dataset-XML]
        DEFINE[Define-XML 2.1]
    end

    CSV --> MAP
    MAP --> NORM
    NORM --> VAL
    VAL --> EXP
    EXP --> XPT
    EXP --> XML
    EXP --> DEFINE

    style CSV fill:#e8f4f8
    style XPT fill:#d4edda
    style XML fill:#d4edda
    style DEFINE fill:#d4edda
Pipeline Stages
| Stage | Module | Purpose |
|---|---|---|
| 1. Map | tss-submit/map/ | Fuzzy column-to-variable mapping with confidence scoring |
| 2. Normalize | tss-submit/normalize/ | Data transformation (datetime, CT, studyday, duration) |
| 3. Validate | tss-submit/validate/ | CDISC conformance checking (CT, required, dates, datatypes) |
| 4. Export | tss-submit/export/ | Output generation (XPT via xportrs, Dataset-XML, Define-XML) |
Standards Integration
flowchart TB
    subgraph "Embedded CDISC Data"
        SDTM[SDTM-IG 3.4]
        CT[Controlled Terminology]
        DOMAINS[Domain Definitions]
    end

    STANDARDS[tss-standards]
    SDTM --> STANDARDS
    CT --> STANDARDS
    DOMAINS --> STANDARDS
    STANDARDS --> SUBMIT[tss-submit]
    STANDARDS --> INGEST[tss-ingest]
    style STANDARDS fill:#50c878,color:#fff
Key Technologies
Core Stack
| Component | Technology |
|---|---|
| Language | Rust 1.92+ |
| GUI Framework | Iced 0.14.0 (Elm architecture) |
| Data Processing | Polars |
| Serialization | Serde |
| Testing | Insta, Proptest |
External Crates
| Purpose | Crate |
|---|---|
| Fuzzy matching | rapidfuzz |
| XML processing | quick-xml |
| XPT handling | xportrs |
| Logging | tracing |
| HTTP client | reqwest |
GUI Architecture
Trial Submission Studio uses Iced 0.14.0 with the Elm architecture pattern:
flowchart LR
    subgraph "Elm Architecture"
        View["View<br/>(render UI)"]
        Message["Message<br/>(user action)"]
        Update["Update<br/>(handle message)"]
        State["State<br/>(app data)"]
    end

    View --> Message
    Message --> Update
    Update --> State
    State --> View

    style View fill:#4a90d9,color:#fff
    style State fill:#50c878,color:#fff
Key GUI components:
- State types:
ViewState,Study,DomainState,Settings - Message enums:
Message->HomeMessage,DomainEditorMessage,DialogMessage - View functions: Organized by screen (
home/,domain_editor/,dialog/) - Theme: Clinical-style theming with custom color palette
Embedded Data
Standards Directory
standards/
├── sdtm/
│   └── ig/v3.4/
│       ├── Datasets.csv         # Domain definitions
│       ├── Variables.csv        # Variable metadata
│       ├── metadata.toml        # Version info
│       └── chapters/            # IG chapter documentation
├── adam/
│   └── ig/v1.3/
│       ├── DataStructures.csv   # ADaM structures
│       ├── Variables.csv        # Variable metadata
│       └── metadata.toml
├── send/
│   └── ig/v3.1.1/
│       ├── Datasets.csv         # SEND domains
│       ├── Variables.csv        # Variable metadata
│       └── metadata.toml
├── terminology/
│   ├── 2024-03-29/              # CT release date
│   │   ├── SDTM_CT_*.csv
│   │   ├── SEND_CT_*.csv
│   │   └── ADaM_CT_*.csv
│   ├── 2025-03-28/
│   └── 2025-09-26/              # Latest CT
├── validation/
│   ├── sdtm/Rules.csv           # SDTM validation rules
│   ├── adam/Rules.csv           # ADaM validation rules
│   └── send/Rules.csv           # SEND validation rules
└── xsl/
    ├── define2-0-0.xsl          # Define-XML stylesheets
    └── define2-1.xsl
Testing Strategy
Test Types
| Type | Purpose | Crates |
|---|---|---|
| Unit | Function-level | All |
| Integration | Cross-crate | tss-gui |
| Snapshot | Output stability | tss-submit/export |
| Property | Edge cases | tss-submit/map, tss-submit/validate |
Test Data
Mock datasets in mockdata/ for:
- Various domain types
- Edge cases
- Validation testing
Next Steps
- Crate Documentation - Individual crate details
- Design Decisions - Architectural choices
- Contributing - Development guide
tss-gui
The desktop application crate providing the graphical user interface using Iced 0.14.0.
Overview
tss-gui is the main entry point for Trial Submission Studio, built with the Iced GUI framework following the Elm architecture pattern. It provides a clinical-style desktop interface for transforming clinical trial data into FDA-compliant formats.
Responsibilities
- Application window and layout
- User interaction handling via message passing
- Navigation between workflow steps
- Data visualization
- File dialogs and system integration
- Multi-window dialog management
Dependencies
[dependencies]
# Iced GUI framework (Elm architecture)
iced = { version = "0.14.0", features = [
    "tokio",     # Async runtime for Task::perform
    "image",     # Image loading (PNG icons)
    "svg",       # SVG rendering for icons
    "markdown",  # Markdown widget (changelogs)
    "lazy",      # Lazy widget rendering
    "advanced",  # Advanced widget capabilities
] }
iced_fonts = { version = "0.3.0", features = ["lucide"] }

# File dialogs
rfd = "0.17"

# System integration
directories = "6.0"
open = "5.3"

# Path dependencies
tss-ingest = { path = "../tss-ingest" }
tss-standards = { path = "../tss-standards" }
tss-submit = { path = "../tss-submit" }
tss-updater = { path = "../tss-updater" }
Architecture
Elm Architecture Pattern
Trial Submission Studio follows Iced’s Elm architecture:
flowchart LR
    subgraph "Elm Architecture"
        View["View<br/>(render UI)"]
        Message["Message<br/>(user action)"]
        Update["Update<br/>(handle message)"]
        State["State<br/>(app data)"]
    end

    View --> Message
    Message --> Update
    Update --> State
    State --> View

    style View fill:#4a90d9,color:#fff
    style State fill:#50c878,color:#fff
Key principles:
- State is the single source of truth
- All state changes happen through messages in
update() - Views are pure functions of state
- Async operations use
Task, not channels
Module Structure
tss-gui/
├── src/
│   ├── main.rs              # Entry point
│   ├── lib.rs               # Library root
│   ├── app/
│   │   ├── mod.rs           # App struct with new(), update(), view()
│   │   └── handler/         # Message handlers by category
│   ├── state/
│   │   ├── mod.rs           # AppState root container
│   │   ├── view_state.rs    # ViewState, EditorTab, filters
│   │   ├── study.rs         # Study data structure
│   │   ├── domain_state.rs  # DomainState, mappings, SUPP
│   │   └── settings.rs      # User preferences (persisted)
│   ├── message/
│   │   ├── mod.rs           # Root Message enum
│   │   ├── home.rs          # HomeMessage
│   │   ├── domain_editor.rs # DomainEditorMessage
│   │   ├── dialog.rs        # DialogMessage (About, Settings, etc.)
│   │   ├── export.rs        # ExportMessage
│   │   └── menu.rs          # MenuMessage
│   ├── view/
│   │   ├── mod.rs           # View router
│   │   ├── home/            # Home/welcome screen views
│   │   ├── domain_editor/   # Domain editor tabs (mapping, validation, etc.)
│   │   ├── dialog/          # Dialog windows (about, settings, update)
│   │   └── export.rs        # Export view
│   ├── component/
│   │   ├── mod.rs           # Reusable UI components
│   │   ├── data_grid.rs     # Virtual scrolling data table
│   │   ├── toast.rs         # Toast notifications
│   │   └── ...
│   ├── theme/
│   │   ├── mod.rs           # Clinical-style theming
│   │   ├── colors.rs        # Color palette
│   │   └── styles.rs        # Widget styles
│   ├── menu/
│   │   ├── mod.rs           # Menu system
│   │   ├── macos/           # Native macOS menu (muda)
│   │   └── desktop/         # In-app menu (Windows/Linux)
│   └── service/
│       └── ...              # Background services
└── assets/
    ├── icon.svg
    └── icon.png
Application Entry Point
The application uses Iced 0.14.0’s builder pattern:
fn main() -> iced::Result {
    iced::application(App::new, App::update, App::view)
        .title(App::title)
        .theme(App::theme)
        .subscription(App::subscription)
        .settings(settings)
        .run_with(|| App::init())
}
State Management
Root State
#![allow(unused)]
fn main() {
pub struct AppState {
    /// Current view and its associated UI state
    pub view: ViewState,

    /// Loaded study data (None when no study is open)
    pub study: Option<Study>,

    /// User settings (persisted to disk)
    pub settings: Settings,

    /// CDISC Controlled Terminology registry
    pub terminology: Option<TerminologyRegistry>,

    /// Current error message to display (transient)
    pub error: Option<String>,

    /// Whether a background task is running
    pub is_loading: bool,

    /// Tracks open dialog windows
    pub dialog_windows: DialogWindows,

    /// Active toast notification
    pub toast: Option<ToastState>,
}
}
View State
#![allow(unused)]
fn main() {
pub enum ViewState {
    /// Home/welcome screen
    Home { /* pagination, filters */ },

    /// Domain editor with tabs
    DomainEditor {
        domain: String,
        tab: EditorTab,
        mapping_ui: MappingUiState,
        normalization_ui: NormalizationUiState,
        validation_ui: ValidationUiState,
        preview_ui: PreviewUiState,
        supp_ui: SuppUiState,
    },

    /// Export view
    Export(ExportViewState),
}

pub enum EditorTab {
    Mapping,
    Normalization,
    Validation,
    Preview,
    Supp,
}
}
View Hierarchy
flowchart TD
    App[App]

    subgraph Views
        Home[Home View]
        DomainEditor[Domain Editor]
        Export[Export View]
    end

    subgraph "Domain Editor Tabs"
        Mapping[Mapping Tab]
        Normalization[Normalization Tab]
        Validation[Validation Tab]
        Preview[Preview Tab]
        Supp[SUPP Tab]
    end

    subgraph Dialogs
        About[About Dialog]
        Settings[Settings Dialog]
        Update[Update Dialog]
        ThirdParty[Third Party Dialog]
    end

    App --> Views
    DomainEditor --> Mapping
    DomainEditor --> Normalization
    DomainEditor --> Validation
    DomainEditor --> Preview
    DomainEditor --> Supp
    App -.-> Dialogs
Message System
Hierarchical Messages
#![allow(unused)]
fn main() {
pub enum Message {
    // Navigation
    Navigate(ViewState),
    SetWorkflowMode(WorkflowMode),

    // View-specific messages
    Home(HomeMessage),
    DomainEditor(DomainEditorMessage),
    Export(ExportMessage),

    // Dialogs
    Dialog(DialogMessage),

    // Menu
    MenuAction(MenuAction),

    // Background task results
    StudyLoaded(Result<(Study, TerminologyRegistry), String>),
    PreviewReady { domain: String, result: Result<DataFrame, String> },
    ValidationComplete { domain: String, report: ValidationReport },
    UpdateCheckComplete(Result<Option<UpdateInfo>, String>),

    // Global events
    KeyPressed(Key, Modifiers),
    FolderSelected(Option<PathBuf>),
    Toast(ToastMessage),
}
}
Message Flow Example
sequenceDiagram
    participant User
    participant View
    participant Update
    participant State
    participant Task

    User->>View: Clicks "Load Study"
    View->>Update: Message::Home(LoadStudy(path))
    Update->>State: state.is_loading = true
    Update->>Task: Task::perform(load_study())
    Task-->>Update: Message::StudyLoaded(result)
    Update->>State: state.study = Some(study)
    State->>View: Re-render with study data
Key Components
Data Grid
Custom virtual-scrolling widget for large datasets:
#![allow(unused)]
fn main() {
// Features:
// - Virtual scrolling for performance
// - Column sorting
// - Row selection
// - Type-aware formatting (dates, numbers)
// - Alternating row colors
}
Toast Notifications
Non-blocking notifications for user feedback:
#![allow(unused)]
fn main() {
pub struct ToastState {
    pub message: String,
    pub level: ToastLevel,  // Success, Info, Warning, Error
    pub progress: Option<f32>,
}
}
Multi-Window Dialogs
Dialogs open as separate windows (Iced multi-window support):
#![allow(unused)]
fn main() {
pub struct DialogWindows {
    pub about: Option<window::Id>,
    pub settings: Option<(window::Id, SettingsCategory)>,
    pub update: Option<(window::Id, UpdateState)>,
    pub third_party: Option<(window::Id, ThirdPartyState)>,
    pub export_progress: Option<(window::Id, ExportProgressState)>,
}
}
Configuration
Settings Storage
User preferences stored in:
- macOS:
~/Library/Application Support/Trial Submission Studio/ - Windows:
%APPDATA%\Trial Submission Studio\ - Linux:
~/.config/trial-submission-studio/
Configurable Options
#![allow(unused)]
fn main() {
pub struct Settings {
    pub recent_studies: Vec<RecentStudy>,
    pub default_export_dir: Option<PathBuf>,
    pub workflow_type: WorkflowType,
    pub ig_version: SdtmIgVersion,
    pub xpt_version: XptVersion,
    pub export_format: ExportFormat,
    // Display settings, validation settings, etc.
}
}
Platform-Specific Features
macOS
- Native menu bar via
mudacrate - Sparkle-style updates via
tss-updater-helper - App bundle support
Windows/Linux
- In-app menu bar
- Standard installer/package updates
Running
# Development
cargo run --package tss-gui

# Release
cargo run --release --package tss-gui
Testing
cargo test --package tss-gui
Testing focuses on:
- State transitions
- Message handling
- Data transformations
- Integration with other crates
See Also
- Architecture Overview - System architecture
- tss-submit - Core pipeline
- Design Decisions - Why Iced?
- Interface Overview - User guide
tss-submit
Core submission preparation crate with mapping, normalization, validation, and export.
Overview
tss-submit is the central processing crate that implements the complete 4-stage pipeline for transforming source data into FDA-compliant CDISC formats. It consolidates all data transformation logic into a single, cohesive module structure.
Architecture
Module Structure
tss-submit/
├── src/
│   ├── lib.rs              # Crate root, re-exports
│   ├── map/                # Column-to-variable mapping
│   │   ├── mod.rs
│   │   ├── error.rs        # Mapping errors
│   │   ├── score.rs        # Fuzzy scoring engine
│   │   └── state.rs        # Mapping state management
│   ├── normalize/          # Data transformation
│   │   ├── mod.rs
│   │   ├── error.rs        # Normalization errors
│   │   ├── types.rs        # Rule definitions
│   │   ├── inference.rs    # Rule inference from metadata
│   │   ├── executor.rs     # Pipeline execution
│   │   ├── preview.rs      # Preview dataframe building
│   │   └── normalization/  # Transform implementations
│   │       ├── ct.rs       # Controlled terminology
│   │       ├── datetime.rs # ISO 8601 dates
│   │       ├── duration.rs # ISO 8601 durations
│   │       ├── numeric.rs  # Numeric formatting
│   │       └── studyday.rs # Study day calculation
│   ├── validate/           # CDISC conformance
│   │   ├── mod.rs
│   │   ├── issue.rs        # Issue types and severity
│   │   ├── report.rs       # Validation report
│   │   ├── util.rs         # Helper utilities
│   │   ├── rules/          # Rule categories
│   │   └── checks/         # Validation checks
│   │       ├── ct.rs       # Controlled terminology
│   │       ├── required.rs # Required variables
│   │       ├── expected.rs # Expected variables
│   │       ├── datatype.rs # Data types
│   │       ├── dates.rs    # Date formats
│   │       ├── sequence.rs # Sequence uniqueness
│   │       ├── length.rs   # Field lengths
│   │       └── identifier.rs # Identifier nulls
│   └── export/             # Output generation
│       ├── mod.rs
│       ├── common.rs       # Shared utilities
│       ├── types.rs        # Domain frame types
│       ├── xpt.rs          # XPT V5/V8 format
│       ├── dataset_xml.rs  # Dataset-XML format
│       └── define_xml.rs   # Define-XML 2.1
Pipeline Flow
flowchart LR
    CSV[Source CSV] --> MAP[map/]
    MAP --> NORM[normalize/]
    NORM --> VAL[validate/]
    VAL --> EXP[export/]

    EXP --> XPT[XPT V5/V8]
    EXP --> XML[Dataset-XML]
    EXP --> DEF[Define-XML 2.1]

    subgraph "tss-submit"
        MAP
        NORM
        VAL
        EXP
    end

    style CSV fill:#e8f4f8
    style XPT fill:#d4edda
    style XML fill:#d4edda
    style DEF fill:#d4edda
Dependencies
[dependencies]
anyhow = "1"
chrono = "0.4"
polars = { version = "0.46", features = ["lazy", "csv"] }
quick-xml = "0.37"
rapidfuzz = "0.5"
regex = "1.12"
serde = { version = "1", features = ["derive"] }
thiserror = "2"
tracing = "0.1"
xportrs = "0.3"

tss-standards = { path = "../tss-standards" }
Module: map/
Fuzzy column-to-variable mapping with confidence scoring.
Design Philosophy
- Simple: Pure Jaro-Winkler scoring with minimal adjustments
- Explainable: Score breakdowns show why a match scored as it did
- Session-only: No persistence, mappings live for the session duration
- Centralized: GUI calls this module for scoring instead of reimplementing
Key Types
#![allow(unused)]
fn main() {
pub enum VariableStatus {
    Unmapped,      // No suggestion or mapping
    Suggested,     // Auto-suggestion available
    Accepted,      // User accepted a mapping
}

pub struct ColumnScore {
    pub column: String,
    pub score: f64,
    pub components: Vec<ScoreComponent>,
}

pub struct MappingState {
    // Manages all mappings for a domain session
}
}
API Usage
#![allow(unused)]
fn main() {
use tss_submit::map::{MappingState, VariableStatus};

// Create mapping state with auto-suggestions
let mut state = MappingState::new(domain, "STUDY01", &columns, hints, 0.6);

// Check and accept mappings
match state.status("USUBJID") {
    VariableStatus::Suggested => {
        state.accept_suggestion("USUBJID").unwrap();
    }
    VariableStatus::Unmapped => {
        state.accept_manual("USUBJID", "SUBJECT_ID").unwrap();
    }
    _ => {}
}

// Get all scores for dropdown sorting
let scores = state.scorer().score_all_for_variable("AETERM", &available_cols);
}
Module: normalize/
Data-driven, variable-level normalization for SDTM compliance.
Design Principles
- Metadata-driven: All normalization types inferred from Variable metadata
- SDTM-compliant: Follows SDTMIG v3.4 rules for dates, CT, sequences
- Stateless functions: Pure functions for easy testing and composition
- Error preservation: On normalization failure, preserve original value + log
Normalization Types
| Type | Description | Example |
|---|---|---|
DateTime | ISO 8601 datetime | 2024-01-15 → 2024-01-15T00:00:00 |
ControlledTerminology | CT codelist mapping | male → M |
Duration | ISO 8601 duration | 2 weeks → P14D |
StudyDay | Calculate –DY | Reference date to study day |
Numeric | Numeric formatting | Precision and rounding |
API Usage
#![allow(unused)]
fn main() {
use tss_submit::normalize::{
    infer_normalization_rules,
    execute_normalization,
    NormalizationContext
};

// Infer rules from SDTM metadata
let pipeline = infer_normalization_rules(&domain);

// Create execution context
let context = NormalizationContext::new("CDISC01", "AE")
    .with_mappings(mappings);

// Execute normalizations
let result_df = execute_normalization(&source_df, &pipeline, &context)?;
}
Module: validate/
Comprehensive CDISC conformance checking.
Validation Checks
flowchart TD
    subgraph Checks
        CT[Controlled Terminology]
        REQ[Required Variables]
        EXP[Expected Variables]
        TYPE[Data Types]
        DATE[Date Formats]
        SEQ[Sequence Uniqueness]
        LEN[Field Lengths]
        ID[Identifier Nulls]
    end

    subgraph Severity
        ERR[Error]
        WARN[Warning]
        INFO[Info]
    end

    CT --> ERR
    REQ --> ERR
    EXP --> WARN
    TYPE --> ERR
    DATE --> WARN
    SEQ --> ERR
    LEN --> WARN
    ID --> ERR

    style ERR fill:#ef4444,color:#fff
    style WARN fill:#f59e0b,color:#fff
    style INFO fill:#3b82f6,color:#fff
| Check | Description | Severity |
|---|---|---|
| Controlled Terminology | Values match CT codelists | Error |
| Required Variables | Req variables present and populated | Error |
| Expected Variables | Exp variables present | Warning |
| Data Types | Num columns contain numeric data | Error |
| Date Formats | ISO 8601 compliance | Warning |
| Sequence Uniqueness | –SEQ unique per USUBJID | Error |
| Field Lengths | Character field limits | Warning |
| Identifier Nulls | ID variables have no nulls | Error |
API Usage
#![allow(unused)]
fn main() {
use tss_submit::validate::{validate_domain, Issue, Severity};

// Validate a domain
let report = validate_domain(&domain, &df, ct_registry.as_ref());

// Process issues
for issue in &report.issues {
    match issue.severity() {
        Severity::Error => eprintln!("ERROR: {}", issue.message()),
        Severity::Warning => eprintln!("WARN: {}", issue.message()),
        Severity::Info => println!("INFO: {}", issue.message()),
    }
}

// Check if exportable
if report.has_errors() {
    println!("Cannot export: {} errors found", report.error_count());
}
}
Module: export/
Multi-format output generation for FDA submissions.
Supported Formats
| Format | Description | Use Case |
|---|---|---|
| XPT V5/V8 | SAS Transport format | Primary FDA submission |
| Dataset-XML | CDISC Dataset-XML | Data exchange |
| Define-XML 2.1 | Metadata documentation | Submission documentation |
API Usage
#![allow(unused)]
fn main() {
use tss_submit::export::{
    write_xpt_outputs,
    write_dataset_xml_outputs,
    write_define_xml,
    DomainFrame,
};

// Prepare domain data
let domains: Vec<DomainFrame> = vec![
    DomainFrame::new("DM", dm_df),
    DomainFrame::new("AE", ae_df),
];

// Export to XPT
write_xpt_outputs(&domains, output_dir)?;

// Export to Dataset-XML
let xml_options = DatasetXmlOptions::default();
write_dataset_xml_outputs(&domains, output_dir, &xml_options)?;

// Export Define-XML
let define_options = DefineXmlOptions::new("STUDY01", "1.0");
write_define_xml(&domains, &define_options, output_path)?;
}
Error Handling
Each module has dedicated error types:
#![allow(unused)]
fn main() {
// Mapping errors
pub enum MappingError {
    VariableNotFound(String),
    ColumnNotFound(String),
    AlreadyMapped(String),
}

// Normalization errors
pub enum NormalizationError {
    InvalidDate(String),
    InvalidCodelist(String, String),
    MissingContext(String),
}

// Validation uses Issue + Severity (not errors)
}
Testing
# Run all tss-submit tests
cargo test --package tss-submit

# Run specific module tests
cargo test --package tss-submit map::
cargo test --package tss-submit normalize::
cargo test --package tss-submit validate::
cargo test --package tss-submit export::
See Also
- Architecture Overview - System architecture
- Column Mapping - User guide
- Validation - User guide
- Exporting Data - User guide
- tss-standards - Standards loader
tss-ingest
CSV ingestion and schema detection crate.
Overview
tss-ingest handles loading source data files and detecting their schema.
Responsibilities
- CSV file parsing
- Schema detection (types, formats)
- Domain suggestion
- Data preview generation
Dependencies
[dependencies]
csv = "1.3"
polars = { version = "0.46", features = ["lazy", "csv"] }
encoding_rs = "0.8"
tss-standards = { path = "../tss-standards" }
Architecture
Module Structure
tss-ingest/
├── src/
│   ├── lib.rs
│   ├── reader.rs        # CSV reading
│   ├── schema.rs        # Schema detection
│   ├── types.rs         # Type inference
│   ├── domain.rs        # Domain suggestion
│   └── preview.rs       # Data preview
Schema Detection
Type Inference
#![allow(unused)]
fn main() {
pub enum InferredType {
    Integer,
    Float,
    Date(String),      // With format pattern
    DateTime(String),
    Boolean,
    Text,
}
}
Detection Algorithm
- Sample first N rows
- For each column:
- Try parsing as integer
- Try parsing as float
- Try common date formats
- Default to text
Date Format Detection
| Pattern | Example |
|---|---|
%Y-%m-%d | 2024-01-15 |
%m/%d/%Y | 01/15/2024 |
%d-%m-%Y | 15-01-2024 |
%Y-%m-%dT%H:%M:%S | 2024-01-15T09:30:00 |
API
Loading a File
#![allow(unused)]
fn main() {
use tss_ingest::{CsvReader, IngestOptions};

let options = IngestOptions {
encoding: Some("utf-8"),
sample_rows: 1000,
..Default::default ()
};

let result = CsvReader::read("data.csv", options) ?;
println!("Rows: {}", result.row_count);
println!("Columns: {:?}", result.schema.columns);
}
Schema Result
#![allow(unused)]
fn main() {
pub struct IngestResult {
    pub data: DataFrame,
    pub schema: DetectedSchema,
    pub suggested_domain: Option<String>,
    pub warnings: Vec<IngestWarning>,
}

pub struct DetectedSchema {
    pub columns: Vec<ColumnInfo>,
}

pub struct ColumnInfo {
    pub name: String,
    pub inferred_type: InferredType,
    pub null_count: usize,
    pub sample_values: Vec<String>,
}
}
Domain Suggestion
Based on column names, suggest likely SDTM domain:
| Column Patterns | Suggested Domain |
|---|---|
| USUBJID, AGE, SEX | DM |
| AETERM, AESTDTC | AE |
| VSTESTCD, VSORRES | VS |
| LBTESTCD, LBORRES | LB |
#![allow(unused)]
fn main() {
pub fn suggest_domain(columns: &[String]) -> Option<String> {
    // Pattern matching logic
}
}
Error Handling
Common Issues
| Issue | Handling |
|---|---|
| Encoding error | Try alternative encodings |
| Parse error | Mark as text, warn user |
| Empty file | Return error |
| No header | Require user action |
Testing
cargo test --package tss-ingest
Test Files
Located in mockdata/:
- Various CSV formats
- Different encodings
- Edge cases
See Also
- Importing Data - User guide
- tss-submit - Data transformation and validation
tss-standards
CDISC standards data loader crate.
Overview
tss-standards loads and provides access to embedded CDISC standard definitions.
Responsibilities
- Load SDTM-IG definitions
- Load controlled terminology
- Provide domain/variable metadata
- Version management
Dependencies
[dependencies]
serde = { version = "1", features = ["derive"] }
serde_json = "1"
include_dir = "0.7"
polars = { version = "0.46", features = ["lazy", "csv"] }
Architecture
Module Structure
tss-standards/
├── src/
│   ├── lib.rs
│   ├── loader.rs         # Data loading
│   ├── sdtm.rs           # SDTM definitions
│   ├── terminology.rs    # Controlled terminology
│   └── cache.rs          # In-memory caching
Embedded Data
Standards are embedded at compile time:
#![allow(unused)]
fn main() {
use include_dir::{include_dir, Dir};

static STANDARDS_DIR: Dir = include_dir!("$CARGO_MANIFEST_DIR/../standards");
}
Data Structures
SDTM Definitions
#![allow(unused)]
fn main() {
pub struct SdtmIg {
    pub version: String,
    pub domains: Vec<DomainDefinition>,
}

pub struct DomainDefinition {
    pub code: String,           // e.g., "DM"
    pub name: String,           // e.g., "Demographics"
    pub class: DomainClass,
    pub structure: String,
    pub variables: Vec<VariableDefinition>,
}

pub struct VariableDefinition {
    pub name: String,
    pub label: String,
    pub data_type: DataType,
    pub core: Core,             // Required/Expected/Permissible
    pub codelist: Option<String>,
    pub description: String,
}
}
Controlled Terminology
#![allow(unused)]
fn main() {
pub struct ControlledTerminology {
    pub version: String,
    pub codelists: Vec<Codelist>,
}

pub struct Codelist {
    pub code: String,           // e.g., "C66731"
    pub name: String,           // e.g., "Sex"
    pub extensible: bool,
    pub terms: Vec<Term>,
}

pub struct Term {
    pub code: String,
    pub value: String,
    pub synonyms: Vec<String>,
}
}
API
Loading Standards
#![allow(unused)]
fn main() {
use tss_standards::Standards;

// Load with specific versions
let standards = Standards::load(
SdtmVersion::V3_4,
CtVersion::V2024_12_20,
) ?;

// Get domain definition
let dm = standards.get_domain("DM") ?;

// Get codelist
let sex = standards.get_codelist("SEX") ?;
}
Querying
#![allow(unused)]
fn main() {
// Get required variables for domain
let required = standards.required_variables("DM");

// Check if value is in codelist
let valid = standards.is_valid_term("SEX", "M");

// Get variable definition
let var = standards.get_variable("DM", "USUBJID") ?;
}
Embedded Data Format
SDTM JSON
{
  "version": "3.4",
  "domains": [
    {
      "code": "DM",
      "name": "Demographics",
      "class": "SPECIAL_PURPOSE",
      "structure": "One record per subject",
      "variables": [
        {
          "name": "STUDYID",
          "label": "Study Identifier",
          "dataType": "Char",
          "core": "Required"
        }
      ]
    }
  ]
}
CT JSON
{
  "version": "2024-12-20",
  "codelists": [
    {
      "code": "C66731",
      "name": "Sex",
      "extensible": false,
      "terms": [
        {
          "code": "C16576",
          "value": "F"
        },
        {
          "code": "C20197",
          "value": "M"
        }
      ]
    }
  ]
}
Caching
Standards are cached in memory after first load:
#![allow(unused)]
fn main() {
lazy_static! {
    static ref STANDARDS_CACHE: RwLock<Option<Standards>> = RwLock::new(None);
}
}
Testing
cargo test --package tss-standards
Test Categories
- JSON parsing
- Version loading
- Query accuracy
- Missing data handling
See Also
- CDISC Standards - Standards overview
- Controlled Terminology - CT details
- tss-submit - Uses standards for validation
tss-updater
Application update mechanism crate.
Overview
tss-updater checks for and applies application updates from GitHub releases.
Responsibilities
- Check for new versions
- Download updates
- Verify checksums
- Apply updates (platform-specific)
Dependencies
[dependencies]
reqwest = { version = "0.12", features = ["json"] }
semver = "1"
serde = { version = "1", features = ["derive"] }
serde_json = "1"
sha2 = "0.10"
Architecture
Module Structure
tss-updater/
├── src/
│   ├── lib.rs
│   ├── checker.rs       # Version checking
│   ├── downloader.rs    # Download handling
│   ├── verifier.rs      # Checksum verification
│   └── installer.rs     # Update installation
Update Flow
┌─────────────────┐
│ Check Version   │
│ (GitHub API)    │
└────────┬────────┘
         │ New version?
         ▼
┌─────────────────┐
│ Download Asset  │
│ (Release file)  │
└────────┬────────┘
         │
         ▼
┌─────────────────┐
│ Verify Checksum │
│ (SHA256)        │
└────────┬────────┘
         │
         ▼
┌─────────────────┐
│ Install Update  │
│ (Platform)      │
└─────────────────┘
API
Checking for Updates
#![allow(unused)]
fn main() {
use tss_updater::{UpdateChecker, UpdateInfo};

let checker = UpdateChecker::new("rubentalstra", "Trial-Submission-Studio");

match checker.check_for_updates(current_version)? {
Some(update) => {
println ! ("New version available: {}", update.version);
println ! ("Release notes: {}", update.notes);
}
None => {
println ! ("You're up to date!");
}
}
}
Update Info
#![allow(unused)]
fn main() {
pub struct UpdateInfo {
    pub version: Version,
    pub notes: String,
    pub download_url: String,
    pub checksum_url: String,
    pub published_at: DateTime<Utc>,
}
}
Downloading
#![allow(unused)]
fn main() {
use tss_updater::Downloader;

let downloader = Downloader::new();
let progress_callback = | percent| {
println ! ("Download: {}%", percent);
};

downloader.download( & update.download_url, & temp_path, progress_callback) ?;
}
Verification
#![allow(unused)]
fn main() {
use tss_updater::Verifier;

let verifier = Verifier::new();
let expected_hash = verifier.fetch_checksum( & update.checksum_url) ?;

if verifier.verify_file( & temp_path, & expected_hash)? {
println ! ("Checksum verified!");
} else {
return Err(UpdateError::ChecksumMismatch);
}
}
Platform-Specific Installation
macOS
Uses tss-updater-helper for atomic bundle swap:
- Download new app bundle to temp directory
- Spawn
tss-updater-helperwith config - Main app exits
- Helper performs atomic swap and relaunches
See tss-updater-helper for details.
Windows
- Extract to temp location
- Schedule replacement on restart
- Restart application
Linux
- Extract new binary
- Replace existing binary
- Restart application
Security
HTTPS Only
All connections use HTTPS:
- GitHub API
- Release downloads
- Checksum files
Checksum Verification
SHA256 checksums verified before installation.
Signed Releases
(Future) Code signing verification for releases.
Configuration
Update Settings
#![allow(unused)]
fn main() {
pub struct UpdateConfig {
    pub check_on_startup: bool,
    pub auto_download: bool,
    pub prerelease: bool,  // Include prereleases
}
}
Default Behavior
- Check on startup (with delay)
- Notify user, don’t auto-install
- Stable releases only
Error Handling
#![allow(unused)]
fn main() {
#[derive(Error, Debug)]
pub enum UpdateError {
    #[error("Network error: {0}")]
    Network(#[from] reqwest::Error),

    #[error("Checksum mismatch")]
    ChecksumMismatch,

    #[error("Installation failed: {0}")]
    InstallFailed(String),
}
}
Testing
cargo test --package tss-updater
Test Strategy
- Mock HTTP responses
- Checksum calculation tests
- Version comparison tests
See Also
- Architecture Overview - System design
- tss-gui - UI integration
- tss-updater-helper - macOS update helper
tss-updater-helper
macOS update helper binary for app bundle swapping.
Overview
tss-updater-helper is a minimal helper binary that performs the actual app bundle swap during updates on macOS. It is spawned by the main application after downloading an update, allowing the main app to exit while the update is applied.
This crate is macOS-only - on other platforms, it compiles to a no-op binary that exits immediately.
Why a Separate Binary?
On macOS, applications are distributed as .app bundles (directories). The main application cannot replace itself while running because:
- The executable is locked by the OS while running
- Bundle contents may be memory-mapped
- Code signing requires atomic bundle replacement
The helper binary solves this by:
- Running as a separate process
- Waiting for the parent app to exit
- Performing the swap atomically
- Relaunching the updated app
Architecture
Module Structure
tss-updater-helper/
├── src/
│   ├── main.rs          # Entry point, orchestration
│   ├── config.rs        # JSON config parsing
│   ├── launch.rs        # Parent wait, app relaunch
│   ├── log.rs           # File-based logging
│   ├── quarantine.rs    # Remove macOS quarantine
│   ├── signature.rs     # Code signature verification
│   ├── status.rs        # Status file for feedback
│   └── swap.rs          # Atomic bundle swap
Update Flow
sequenceDiagram
    participant App as Main App
    participant Helper as tss-updater-helper
    participant FS as File System

    App->>FS: Download new .app to temp
    App->>FS: Write config JSON
    App->>Helper: Spawn with config path
    App->>App: Exit

    Helper->>Helper: Wait for parent exit
    Helper->>FS: Remove quarantine attribute
    Helper->>Helper: Verify code signature
    Helper->>FS: current.app → backup.app
    Helper->>FS: new.app → current.app
    Helper->>FS: Write status file
    Helper->>App: Relaunch via open command
    Helper->>FS: Delete backup.app
Dependencies
[target.'cfg(target_os = "macos")'.dependencies]
chrono = "0.4"
serde = { version = "1", features = ["derive"] }
serde_json = "1"
The crate has no dependencies on non-macOS platforms.
Configuration
The helper receives configuration via a JSON file (not stdin, to avoid race conditions):
#![allow(unused)]
fn main() {
pub struct HelperConfig {
    pub new_app_path: PathBuf,      // Path to downloaded .app
    pub current_app_path: PathBuf,   // Path to current .app
    pub parent_pid: u32,             // PID to wait for
    pub version: String,             // New version string
    pub previous_version: String,    // Current version string
}
}
Example config file:
{
  "new_app_path": "/tmp/TSS-update/Trial Submission Studio.app",
  "current_app_path": "/Applications/Trial Submission Studio.app",
  "parent_pid": 12345,
  "version": "0.1.0",
  "previous_version": "0.0.9"
}
Process Steps
1. Wait for Parent Exit
#![allow(unused)]
fn main() {
pub fn wait_for_parent(pid: u32) {
    // Poll until process no longer exists
    while process_exists(pid) {
        std::thread::sleep(Duration::from_millis(100));
    }
}
}
2. Remove Quarantine
Downloaded files on macOS have a quarantine attribute that triggers Gatekeeper. The helper removes this:
#![allow(unused)]
fn main() {
pub fn remove_quarantine(path: &Path) -> Result<()> {
    Command::new("xattr")
        .args(["-rd", "com.apple.quarantine"])
        .arg(path)
        .output()?;
    Ok(())
}
}
3. Verify Code Signature
Before replacing the current app, verify the new bundle is properly signed:
#![allow(unused)]
fn main() {
pub fn verify_signature(path: &Path) -> Result<()> {
    let output = Command::new("codesign")
        .args(["--verify", "--deep", "--strict"])
        .arg(path)
        .output()?;

    if !output.status.success() {
        return Err(anyhow!("Code signature verification failed"));
    }
    Ok(())
}
}
4. Atomic Bundle Swap
The swap is performed atomically to prevent corruption:
#![allow(unused)]
fn main() {
pub fn swap_bundles(new: &Path, current: &Path) -> Result<SwapResult> {
    let backup = current.with_extension("app.backup");

    // Move current → backup
    fs::rename(current, &backup)?;

    // Move new → current
    fs::rename(new, current)?;

    Ok(SwapResult { backup_path: backup })
}
}
5. Status File
A status file is written for the relaunched app to display feedback:
#![allow(unused)]
fn main() {
pub struct UpdateStatus {
    pub success: bool,
    pub version: String,
    pub previous_version: String,
    pub error: Option<String>,
    pub log_path: PathBuf,
    pub timestamp: DateTime<Utc>,
}
}
Location: ~/Library/Application Support/Trial Submission Studio/update-status.json
6. Relaunch
The app is relaunched using macOS open command:
#![allow(unused)]
fn main() {
pub fn relaunch(app_path: &Path) -> Result<()> {
    Command::new("open")
        .arg("-a")
        .arg(app_path)
        .spawn()?;
    Ok(())
}
}
Logging
All operations are logged to a file for debugging:
~/Library/Logs/Trial Submission Studio/update-helper.log
Example log output:
[2024-01-15T10:30:00Z] Trial Submission Studio Update Helper started
[2024-01-15T10:30:00Z] Config file: /tmp/tss-update-config.json
[2024-01-15T10:30:00Z] Config loaded: HelperConfig { ... }
[2024-01-15T10:30:00Z] Paths validated
[2024-01-15T10:30:01Z] Parent process 12345 exited
[2024-01-15T10:30:01Z] Quarantine attribute removed
[2024-01-15T10:30:01Z] Code signature valid, Team ID: XXXXXXXXXX
[2024-01-15T10:30:02Z] Bundle swap complete, backup at: /Applications/Trial Submission Studio.app.backup
[2024-01-15T10:30:02Z] Status file written
[2024-01-15T10:30:02Z] Application relaunch command sent
[2024-01-15T10:30:02Z] Update complete!
Error Handling
On failure, the helper:
- Writes a failure status file with error details
- Does NOT attempt rollback (backup preserved for manual recovery)
- Logs the error
- Exits with non-zero code
The relaunched app reads the status file and displays appropriate feedback.
Building
# Build for current platform
cargo build --package tss-updater-helper --release

# The binary is only functional on macOS
# On other platforms, it compiles but exits immediately
Integration with tss-updater
The tss-updater crate spawns this helper during the update process:
#![allow(unused)]
fn main() {
// In tss-updater
let config_path = write_config_file(&config)?;

Command::new(helper_path)
    .arg(&config_path)
    .spawn()?;

// Parent app exits here
std::process::exit(0);
}
Security Considerations
- Code signing: New bundles must pass
codesign --verify - Quarantine removal: Only performed on verified bundles
- Atomic swap: Prevents partial/corrupted installations
- Backup preservation: Allows manual rollback if needed
- Logging: Full audit trail for debugging
See Also
- tss-updater - Main update logic
- Architecture Overview - System architecture
Design Decisions
Key architectural decisions and their rationale.
Why Rust?
Chosen: Rust
Rationale:
- Memory safety without garbage collection
- Performance comparable to C/C++
- Type system catches errors at compile time
- Cross-platform compilation to native binaries
- Growing ecosystem for data processing
Alternatives Considered
| Language | Pros | Cons |
|---|---|---|
| Python | Familiar, many libraries | Performance, distribution |
| Java | Cross-platform, mature | JVM dependency, startup time |
| C++ | Performance | Memory safety, complexity |
| Go | Simple, fast compilation | Less expressive types |
Why Iced for GUI?
Chosen: Iced 0.14.0
Rationale:
- Elm architecture - Predictable state management with unidirectional data flow
- Pure Rust - No FFI complexity, native performance
- Cross-platform - macOS, Windows, Linux
- Type-safe messages - Compile-time guarantees for all user interactions
- Async-first - Built-in
Tasksystem for background operations - Multi-window - Native support for dialog windows
Architecture Benefits
flowchart LR
    subgraph "Elm Architecture"
        View["View<br/>(render UI)"]
        Message["Message<br/>(user action)"]
        Update["Update<br/>(handle message)"]
        State["State<br/>(app data)"]
    end

    View --> Message
    Message --> Update
    Update --> State
    State --> View

    style View fill:#4a90d9,color:#fff
    style State fill:#50c878,color:#fff
The Elm architecture ensures:
- State is the single source of truth
- All state changes flow through
update() - Views are pure functions of state
- Easy debugging and testing
Alternatives Considered
| Framework | Pros | Cons |
|---|---|---|
| egui | Simple immediate mode, rapid prototyping | Harder state management at scale, no multi-window |
| Tauri | Web tech, flexible | Bundle size, two languages (Rust + JS) |
| GTK-rs | Native look | Platform differences, complex bindings |
| Qt | Mature, rich | License complexity, C++ bindings |
Why Polars for Data?
Chosen: Polars
Rationale:
- Performance - Lazy evaluation, parallelism
- Rust native - No Python dependency
- DataFrame API - Familiar for data work
- Memory efficient - Arrow-based
Alternatives Considered
| Library | Pros | Cons |
|---|---|---|
| ndarray | Low-level control | More manual work |
| Arrow | Standard format | Less DataFrame features |
| Custom | Full control | Development time |
Why Embed Standards?
Chosen: Embedded CDISC data
Rationale:
- Offline operation - No network dependency
- Deterministic - Consistent across runs
- Fast - No API latency
- Regulatory - Audit trail
Alternatives Considered
| Approach | Pros | Cons |
|---|---|---|
| API-based | Always current | Network required, latency |
| Download on demand | Smaller binary | Caching complexity |
| Plugin system | Flexible | Distribution complexity |
Workspace Architecture
Chosen: Multi-crate workspace
Rationale:
- Separation of concerns - Clear boundaries
- Parallel compilation - Faster builds
- Selective testing - Test only changed crates
- Reusability - Crates can be used independently
Crate Boundaries
| Crate | Principle |
|---|---|
| tss-gui | UI only, delegates all processing to other crates |
| tss-submit | Core pipeline (map, normalize, validate, export) |
| tss-ingest | CSV parsing only, no transformation logic |
| tss-standards | Pure data loading, no transformation logic |
| tss-updater | Update mechanism, no UI dependencies |
| tss-updater-helper | macOS-only binary, minimal dependencies |
Data Processing Pipeline
Chosen: Lazy evaluation with checkpoints
Rationale:
- Memory efficiency - Don’t load all data at once
- Performance - Optimize query plans
- Transparency - User sees intermediate results
- Recoverability - Can resume from checkpoints
Pipeline Stages
flowchart LR
    subgraph Stage1[Import]
        I1[CSV File]
        I2[Schema Detection]
    end

    subgraph Stage2[Map]
        M1[Column Matching]
        M2[Type Conversion]
    end

    subgraph Stage3[Validate]
        V1[Structure Rules]
        V2[CT Validation]
        V3[Cross-Domain]
    end

    subgraph Stage4[Export]
        E1[XPT Generation]
        E2[XML Output]
    end

    I1 --> I2 --> M1 --> M2 --> V1 --> V2 --> V3 --> E1
    V3 --> E2
    V1 -.->|Errors| M1
    V2 -.->|Warnings| M1
    style I1 fill: #e8f4f8, stroke: #333
    style E1 fill: #d4edda, stroke: #333
    style E2 fill: #d4edda, stroke: #333
Validation Strategy
Chosen: Multi-level validation
Rationale:
- Early feedback - Catch issues during mapping
- Complete checking - Full validation before export
- Severity levels - Error vs. warning vs. info
- Actionable - Clear fix suggestions
Validation Levels
flowchart TB
    subgraph "Validation Layers"
        direction TB
        L1[Schema Validation<br/>File structure, encoding]
        L2[Mapping Validation<br/>Variable compatibility, types]
        L3[Content Validation<br/>CDISC compliance, CT checks]
        L4[Output Validation<br/>Format conformance, checksums]
    end

    IMPORT[Import] --> L1
    L1 --> MAP[Map]
    MAP --> L2
    L2 --> TRANSFORM[Transform]
    TRANSFORM --> L3
    L3 --> EXPORT[Export]
    EXPORT --> L4
    L4 --> OUTPUT[Output Files]
    L1 -.->|Schema Error| IMPORT
    L2 -.->|Type Mismatch| MAP
    L3 -.->|CT Error| TRANSFORM
    style L1 fill: #ffeeba, stroke: #333
    style L2 fill: #ffeeba, stroke: #333
    style L3 fill: #ffeeba, stroke: #333
    style L4 fill: #ffeeba, stroke: #333
    style OUTPUT fill: #d4edda, stroke: #333
| Level | When | Purpose |
|---|---|---|
| Schema | Import | File structure |
| Mapping | Map step | Variable compatibility |
| Content | Pre-export | CDISC compliance |
| Output | Export | Format conformance |
Error Handling
Chosen: Result types with context
Rationale:
- No panics - Graceful error handling
- Context - Where and why errors occurred
- Recovery - Allow user to fix and continue
- Logging - Full trace for debugging
Error Categories
| Category | Handling |
|---|---|
| User error | Display message, allow retry |
| Data error | Show affected rows, suggest fix |
| System error | Log, display generic message |
| Bug | Log with context, fail gracefully |
File Format Choices
XPT V5 as Default
Rationale:
- FDA requirement for submissions
- Maximum compatibility
- Well-documented format
XPT V8 as Option
Rationale:
- Longer variable names
- Larger labels
- Future-proofing
Security Considerations
Data Privacy
- No cloud - All processing local
- No telemetry - No usage data collection
- No network - Works fully offline
Code Security
- Dependency audit - Regular
cargo audit - Minimal dependencies - Reduce attack surface
- Memory safety - Rust’s guarantees
Performance Goals
Target Metrics
| Operation | Target |
|---|---|
| Import 100K rows | < 2 seconds |
| Validation | < 5 seconds |
| Export to XPT | < 3 seconds |
| Application startup | < 1 second |
Optimization Strategies
- Lazy evaluation
- Parallel processing
- Memory mapping for large files
- Incremental validation
Future Considerations
Extensibility
The architecture supports future additions:
- New CDISC standards (ADaM, SEND)
- Additional output formats
- Plugin system (potential)
- CLI interface (potential)
Backward Compatibility
- Configuration format versioning
- Data migration paths
- Deprecation warnings
Next Steps
- Architecture Overview - System structure
- Crate Documentation - Component details
Contributing: Getting Started
Thank you for your interest in contributing to Trial Submission Studio!
Ways to Contribute
Code Contributions
- Bug fixes
- New features
- Performance improvements
- Documentation updates
Non-Code Contributions
- Bug reports
- Feature requests
- Documentation improvements
- Testing and feedback
- Helping other users
Before You Start
Prerequisites
- Rust 1.92+ - Install via rustup
- Git - For version control
- Basic familiarity with Rust programming
- (Optional) Understanding of CDISC SDTM standards
Read the Documentation
Familiarize yourself with:
Finding Issues to Work On
GitHub Issues
- Check GitHub Issues
- Look for labels:
good-first-issue- Great for newcomershelp-wanted- We’d love assistancebug- Known issues to fixenhancement- New features
Claiming an Issue
- Find an issue you want to work on
- Comment on the issue expressing interest
- Wait for maintainer feedback before starting
- Fork the repository
- Create a branch and start working
Contribution Workflow
Overview
flowchart LR
    A["Find Issue"] --> B["Comment"]
    B --> C["Fork"]
    C --> D["Branch"]
    D --> E["Code"]
    E --> F["Test"]
    F --> G["PR"]

    style A fill:#4a90d9,color:#fff
    style G fill:#50c878,color:#fff
Detailed Steps
- Find an issue (or create one)
- Comment to claim it
- Fork the repository
- Clone your fork
- Create a branch (
feature/my-featureorfix/my-fix) - Make changes
- Test your changes
- Commit with conventional commit messages
- Push to your fork
- Create a Pull Request
Communication
Where to Discuss
- GitHub Issues - Bug reports, feature requests
- GitHub Discussions - Questions, ideas, general discussion
- Pull Requests - Code review discussion
Guidelines
- Be respectful and constructive
- Assume good intentions
- Welcome newcomers
- Focus on the code, not the person
Code of Conduct
Please read and follow our Code of Conduct.
Key points:
- Be respectful and inclusive
- Welcome newcomers
- Focus on constructive feedback
- Assume good intentions
Getting Help
Stuck on Something?
- Check existing documentation
- Search GitHub Issues/Discussions
- Ask in GitHub Discussions
- Open an issue with your question
Review Process
After submitting a PR:
- Automated checks run (CI)
- Maintainer reviews code
- Address any feedback
- Maintainer merges when ready
Recognition
Contributors are recognized in:
- GitHub contributor list
- Release notes (for significant contributions)
- THIRD_PARTY_LICENSES.md (if adding dependencies)
Next Steps
- Development Setup - Set up your environment
- Coding Standards - Code style guide
- Testing - Testing guidelines
- Pull Requests - PR guidelines
Development Setup
Set up your development environment for contributing to Trial Submission Studio.
Prerequisites
Required
| Tool | Version | Purpose |
|---|---|---|
| Rust | 1.92+ | Programming language |
| Git | Any recent | Version control |
Optional
| Tool | Purpose |
|---|---|
| cargo-about | License generation |
| cargo-watch | Auto-rebuild on changes |
Step 1: Fork and Clone
Fork on GitHub
- Go to Trial Submission Studio
- Click “Fork” in the top right
- Select your account
Clone Your Fork
git clone https://github.com/YOUR_USERNAME/trial-submission-studio.git
cd trial-submission-studio
Add Upstream Remote
git remote add upstream https://github.com/rubentalstra/Trial-Submission-Studio.git
Step 2: Install Rust
Using rustup
curl --proto '=https' --tlsv1.2 -sSf https://sh.rustup.rs | sh
Verify Installation
rustup show
Expected output should show Rust 1.92 or higher.
Install Required Toolchain
rustup toolchain install stable
rustup component add rustfmt clippy
Step 3: Platform Dependencies
macOS
No additional dependencies required.
Linux (Ubuntu/Debian)
sudo apt-get update
sudo apt-get install -y libgtk-3-dev libxdo-dev
Windows
No additional dependencies required.
Step 4: Build the Project
Debug Build
cargo build
Release Build
cargo build --release
Check Build
cargo check
Step 5: Run the Application
cargo run --package tss-gui
Step 6: Run Tests
# All tests
cargo test

# Specific crate
cargo test --package tss-submit

# With output
cargo test -- --nocapture
Step 7: Run Lints
# Format check
cargo fmt --check

# Apply formatting
cargo fmt

# Clippy lints
cargo clippy -- -D warnings
IDE Setup
RustRover / IntelliJ IDEA
- Open the project folder
- Rust plugin auto-detects workspace
- Configure run configuration for
tss-gui
VS Code
- Install
rust-analyzerextension - Open the project folder
- Extension auto-configures
Recommended VS Code Extensions
- rust-analyzer
- Even Better TOML
- Error Lens
- GitLens
Project Structure
trial-submission-studio/
├── Cargo.toml              # Workspace config
├── crates/                 # All crates
│   ├── tss-gui/            # Main application (Iced 0.14.0)
│   ├── tss-submit/         # Mapping, normalization, validation, export
│   ├── tss-ingest/         # CSV loading
│   ├── tss-standards/      # CDISC standards loader
│   ├── tss-updater/        # Auto-update functionality
│   └── tss-updater-helper/ # macOS update helper
├── standards/              # Embedded CDISC data
├── mockdata/               # Test data
└── docs/                   # Documentation
Development Workflow
Create Feature Branch
git checkout main
git pull upstream main
git checkout -b feature/my-feature
Make Changes
- Edit code
- Run tests:
cargo test - Run lints:
cargo clippy - Format:
cargo fmt
Commit Changes
git add .
git commit -m "feat: add my feature"
Push and Create PR
git push origin feature/my-feature
Then create PR on GitHub.
Useful Commands
| Command | Purpose |
|---|---|
cargo build | Build debug |
cargo build --release | Build release |
cargo test | Run all tests |
cargo test --package X | Test specific crate |
cargo clippy | Run linter |
cargo fmt | Format code |
cargo doc --open | Generate docs |
cargo run -p tss-gui | Run application |
Troubleshooting
Build Fails
- Ensure Rust 1.92+:
rustup update stable - Clean build:
cargo clean && cargo build - Check dependencies:
cargo fetch
Tests Fail
- Run with output:
cargo test -- --nocapture - Run specific test:
cargo test test_name - Check test data in
mockdata/
GUI Won’t Start
- Check platform dependencies installed
- Try release build:
cargo run --release -p tss-gui - Check logs for errors
Next Steps
- Coding Standards - Style guide
- Testing - Testing guide
- Architecture - Understand the codebase
Coding Standards
Code style and quality guidelines for Trial Submission Studio.
Rust Style
Formatting
Use rustfmt for all code formatting:
# Check formatting
cargo fmt --check

# Apply formatting
cargo fmt
Linting
All code must pass Clippy with no warnings:
cargo clippy -- -D warnings
Naming Conventions
Crates
- Lowercase with hyphens:
tss-submit,tss-ingest - Prefix with
tss-for project crates
Modules
- Lowercase with underscores:
column_mapping.rs - Keep names short but descriptive
Functions
#![allow(unused)]
fn main() {
// Good - descriptive, snake_case
fn calculate_similarity(source: &str, target: &str) -> f64

// Good - verb-noun pattern
fn validate_domain(data: &DataFrame) -> Vec<ValidationResult>

// Avoid - too abbreviated
fn calc_sim(s: &str, t: &str) -> f64
}
Types
#![allow(unused)]
fn main() {
// Good - PascalCase, descriptive
struct ValidationResult {
    ...
}
enum DomainClass {...}

// Good - clear trait naming
trait ValidationRule { ... }
}
Constants
#![allow(unused)]
fn main() {
// Good - SCREAMING_SNAKE_CASE
const MAX_VARIABLE_LENGTH: usize = 8;
const DEFAULT_CONFIDENCE_THRESHOLD: f64 = 0.8;
}
Code Organization
File Structure
#![allow(unused)]
fn main() {
// 1. Module documentation
//! Module description

// 2. Imports (grouped)
use std::collections::HashMap;

use serde::{Deserialize, Serialize};

use crate::model::Variable;

// 3. Constants
const DEFAULT_VALUE: i32 = 0;

// 4. Type definitions
pub struct MyStruct {
    ...
}

// 5. Implementations
impl MyStruct { ... }

// 6. Functions
pub fn my_function() { ... }

// 7. Tests (at bottom or in separate file)
#[cfg(test)]
mod tests {
    ...
}
}
Import Organization
Group imports in this order:
- Standard library
- External crates
- Internal crates
- Current crate modules
#![allow(unused)]
fn main() {
use std::path::Path;

use polars::prelude::*;
use serde::Serialize;

use tss_model::Variable;

use crate::mapping::Mapping;
}
Error Handling
Use Result Types
#![allow(unused)]
fn main() {
// Good - explicit error handling
pub fn parse_file(path: &Path) -> Result<Data, ParseError> {
    let content = std::fs::read_to_string(path)?;
    parse_content(&content)
}

// Avoid - panicking on errors
pub fn parse_file(path: &Path) -> Data {
    let content = std::fs::read_to_string(path).unwrap(); // Don't do this
    parse_content(&content).expect("parse failed") // Or this
}
}
Custom Error Types
#![allow(unused)]
fn main() {
use thiserror::Error;

#[derive(Error, Debug)]
pub enum ValidationError {
    #[error("Missing required variable: {0}")]
    MissingVariable(String),

    #[error("Invalid value '{value}' for {variable}")]
    InvalidValue { variable: String, value: String },
}
}
Error Context
#![allow(unused)]
fn main() {
// Good - add context to errors
fs::read_to_string(path)
.map_err( | e| ParseError::FileRead {
path: path.to_path_buf(),
source: e,
}) ?;
}
Documentation
Public Items
All public items must be documented:
#![allow(unused)]
fn main() {
/// Validates data against SDTM rules.
///
/// # Arguments
///
/// * `data` - The DataFrame to validate
/// * `domain` - Target SDTM domain code
///
/// # Returns
///
/// Vector of validation results
///
/// # Example
///
/// ```
/// let results = validate(&data, "DM")?;
/// ```
pub fn validate(data: &DataFrame, domain: &str) -> Result<Vec<ValidationResult>> {
    // ...
}
}
Module Documentation
#![allow(unused)]
fn main() {
//! CSV ingestion and schema detection.
//!
//! This module provides functionality for loading CSV files
//! and automatically detecting their schema.
}
Testing
Test Organization
#![allow(unused)]
fn main() {
#[cfg(test)]
mod tests {
    use super::*;

    #[test]
    fn test_basic_case() {
        // Arrange
        let input = "test";

        // Act
        let result = process(input);

        // Assert
        assert_eq!(result, expected);
    }

    #[test]
    fn test_edge_case() {
        // ...
    }
}
}
Test Naming
#![allow(unused)]
fn main() {
// Good - descriptive test names
#[test]
fn parse_iso8601_date_returns_correct_value() { ... }

#[test]
fn validate_returns_error_for_missing_usubjid() { ... }

// Avoid - vague names
#[test]
fn test1() { ... }
}
Architecture Principles
Separation of Concerns
- Keep business logic out of GUI code
- I/O operations separate from data processing
- Validation rules independent of data loading
Pure Functions
Prefer pure functions where possible:
#![allow(unused)]
fn main() {
// Good - pure function, easy to test
pub fn calculate_confidence(source: &str, target: &str) -> f64 {
    // No side effects, deterministic
}

// Use sparingly - side effects
pub fn log_and_calculate(source: &str, target: &str) -> f64 {
    tracing::info!("Calculating..."); // Side effect
    calculate_confidence(source, target)
}
}
Determinism
Output must be reproducible:
#![allow(unused)]
fn main() {
// Good - deterministic output
pub fn derive_sequence(data: &DataFrame, group_by: &[&str]) -> Vec<i32> {
    // Same input always produces same output
}

// Avoid - non-deterministic
pub fn derive_sequence_random(data: &DataFrame) -> Vec<i32> {
    // Uses random ordering - bad for regulatory compliance
}
}
Performance
Avoid Premature Optimization
Write clear code first, optimize if needed based on profiling.
Use Appropriate Data Structures
#![allow(unused)]
fn main() {
// Good - HashMap for lookups
let lookup: HashMap<String, Variable> =...;

// Good - Vec for ordered data
let results: Vec<ValidationResult> =...;
}
Lazy Evaluation
Use Polars lazy evaluation for large datasets:
#![allow(unused)]
fn main() {
let result = df.lazy()
.filter(col("value").gt(lit(0)))
.collect() ?;
}
Next Steps
- Testing - Testing guidelines
- Pull Requests - PR process
Testing
Testing guidelines for Trial Submission Studio contributions.
Test Types
Unit Tests
Test individual functions and methods:
#![allow(unused)]
fn main() {
#[cfg(test)]
mod tests {
    use super::*;

    #[test]
    fn normalize_column_name_removes_spaces() {
        let result = normalize_column_name("Patient Age");
        assert_eq!(result, "PATIENT_AGE");
    }
}
}
Integration Tests
Test interactions between modules:
#![allow(unused)]
fn main() {
// tests/integration_test.rs
use tss_ingest::CsvReader;
use tss_validate::Validator;

#[test]
fn validate_imported_data() {
    let data = CsvReader::read("tests/data/sample.csv").unwrap();
    let results = Validator::validate(&data, "DM").unwrap();
    assert!(results.errors().is_empty());
}
}
Running Tests
All Tests
cargo test
Specific Crate
cargo test --package tss-submit
Specific Test
cargo test test_name
With Output
cargo test -- --nocapture
Release Mode
cargo test --release
Test Organization
File Structure
crates/tss-submit/
├── src/
│   ├── lib.rs
│   └── validate/
│       └── checks/
└── tests/
    ├── validation_test.rs
    └── data/
        └── sample_dm.csv
Inline Tests
For simple unit tests:
#![allow(unused)]
fn main() {
// src/normalize.rs

pub fn normalize(s: &str) -> String {
    s.trim().to_uppercase()
}

#[cfg(test)]
mod tests {
    use super::*;

    #[test]
    fn test_normalize() {
        assert_eq!(normalize("  hello  "), "HELLO");
    }
}
}
External Tests
For integration tests:
#![allow(unused)]
fn main() {
// tests/validation_integration.rs

use tss_validate::*;

#[test]
fn full_validation_workflow() {
    // Integration test code
}
}
Test Data
Location
Test data files are in:
mockdata/- Shared test datasetscrates/*/tests/data/- Crate-specific test data
Sample Data
STUDYID,DOMAIN,USUBJID,SUBJID,AGE,SEX
ABC123,DM,ABC123-001,001,45,M
ABC123,DM,ABC123-002,002,38,F
Sensitive Data
Never commit real clinical trial data. Use:
- Synthetic/mock data only
- Anonymized examples
- Generated test cases
Writing Good Tests
Structure (AAA Pattern)
#![allow(unused)]
fn main() {
#[test]
fn test_validation_rule() {
    // Arrange - set up test data
    let data = create_test_dataframe();
    let validator = Validator::new();

    // Act - perform the operation
    let results = validator.validate(&data);

    // Assert - verify results
    assert_eq!(results.len(), 1);
    assert_eq!(results[0].severity, Severity::Error);
}
}
Descriptive Names
#![allow(unused)]
fn main() {
// Good
#[test]
fn returns_error_when_usubjid_is_missing() { ... }

#[test]
fn accepts_valid_iso8601_date_format() { ... }

// Avoid
#[test]
fn test1() { ... }

#[test]
fn it_works() { ... }
}
Test Edge Cases
#![allow(unused)]
fn main() {
#[test]
fn handles_empty_dataframe() { ... }

#[test]
fn handles_null_values() { ... }

#[test]
fn handles_unicode_characters() { ... }

#[test]
fn handles_maximum_length_values() { ... }
}
Test Error Conditions
#![allow(unused)]
fn main() {
#[test]
fn returns_error_for_invalid_input() {
    let result = process_file("nonexistent.csv");
    assert!(result.is_err());
}

#[test]
fn error_contains_helpful_message() {
    let err = process_file("bad.csv").unwrap_err();
    assert!(err.to_string().contains("parse error"));
}
}
CI Testing
Automated Checks
Every PR runs:
cargo test- All testscargo clippy- Lintingcargo fmt --check- Formatting
Test Matrix
Tests run on:
- Ubuntu (primary)
- macOS (future)
- Windows (future)
Test Coverage
Goal
Aim for high coverage on critical paths:
- Validation rules
- Data transformations
- File I/O
Not Required
100% coverage isn’t required. Focus on:
- Business logic
- Error handling
- Edge cases
Next Steps
- Pull Requests - Submit your changes
- Coding Standards - Code style
Pull Requests
Guidelines for submitting pull requests to Trial Submission Studio.
Before Creating a PR
Complete Your Changes
- Code compiles:
cargo build - Tests pass:
cargo test - Lints pass:
cargo clippy -- -D warnings - Formatted:
cargo fmt
Commit Guidelines
Conventional Commits
Use conventional commit format:
type(scope): description

[optional body]

[optional footer]
Types
| Type | Description |
|---|---|
feat | New feature |
fix | Bug fix |
docs | Documentation only |
test | Adding/updating tests |
refactor | Code refactoring |
perf | Performance improvement |
chore | Maintenance tasks |
Examples
git commit -m "feat(validate): add CT validation for SEX variable"
git commit -m "fix(xpt): handle missing values correctly"
git commit -m "docs: update installation instructions"
git commit -m "test(map): add property tests for similarity"
git commit -m "refactor(ingest): simplify schema detection"
Keep PRs Focused
- One feature or fix per PR
- Small, reviewable changes
- Don’t mix refactoring with features
Creating a PR
Push Your Branch
git push origin feature/my-feature
Open PR on GitHub
- Go to your fork on GitHub
- Click “Pull Request”
- Select your branch
- Fill in the template
PR Title
Use same format as commits:
feat(submit): add USUBJID cross-domain validation
fix(export): correct numeric precision for large values
docs: add API documentation for tss-submit
PR Description Template
## Summary

Brief description of what this PR does.

## Changes

- Added X
- Fixed Y
- Updated Z

## Testing

How was this tested?

- [ ] Unit tests added
- [ ] Manual testing performed
- [ ] Tested on: macOS / Windows / Linux

## Related Issues

Fixes #123
Related to #456

## Checklist

- [ ] Code compiles without warnings
- [ ] Tests pass
- [ ] Clippy passes
- [ ] Code is formatted
- [ ] Documentation updated (if needed)
Review Process
What Reviewers Look For
- Correctness - Does it work?
- Tests - Are changes tested?
- Style - Follows coding standards?
- Performance - Any concerns?
- Documentation - Updated if needed?
Responding to Feedback
- Address all comments
- Push additional commits
- Mark conversations resolved
- Request re-review when ready
Acceptable Responses
- Fix the issue
- Explain why it’s correct
- Discuss alternative approaches
- Agree to follow up in separate PR
After Merge
Clean Up
# Switch to main
git checkout main

# Update from upstream
git pull upstream main

# Delete local branch
git branch -d feature/my-feature

# Delete remote branch (optional, GitHub can auto-delete)
git push origin --delete feature/my-feature
Update Fork
git push origin main
PR Types
Feature PRs
- Reference the issue or discussion
- Include tests
- Update documentation if user-facing
Bug Fix PRs
- Reference the bug issue
- Include regression test
- Explain root cause if complex
Documentation PRs
- No code changes required
- Preview locally:
mdbook serve - Check links work
Refactoring PRs
- No behavior changes
- All existing tests must pass
- Add tests if coverage was low
Tips for Good PRs
Make Review Easy
- Write clear descriptions
- Add comments on complex code
- Break large changes into steps
Be Patient
- Reviews take time
- Don’t ping repeatedly
- Provide more context if asked
Learn from Feedback
- Feedback improves code quality
- Ask questions if unclear
- Apply learnings to future PRs
Automated Checks
CI Pipeline
Every PR runs:
- Build - Compilation check
- Test - All tests
- Lint - Clippy
- Format - rustfmt
Required Checks
All checks must pass before merge.
Fixing Failed Checks
# If tests fail
cargo test

# If clippy fails
cargo clippy -- -D warnings

# If format fails
cargo fmt
Emergency Fixes
For critical bugs:
- Create PR with
hotfix/prefix - Note urgency in description
- Request expedited review
Questions?
- Ask in PR comments
- Open a Discussion
- Reference documentation
Next Steps
- Getting Started - Contribution overview
- Coding Standards - Style guide
- Testing - Testing guide
macOS Code Signing Setup
This guide explains how to set up Apple Developer certificates for signing and notarizing Trial Submission Studio releases.
Prerequisites
- Active Apple Developer Program membership ($99/year)
- macOS with Xcode Command Line Tools installed
- Access to the GitHub repository settings (for adding secrets)
Step 1: Create Developer ID Application Certificate
1.1 Request Certificate from Apple
- Open Keychain Access (Applications → Utilities → Keychain Access)
- Go to Keychain Access → Certificate Assistant → Request a Certificate From a Certificate Authority
- Fill in:
- Email Address: Your Apple ID email
- Common Name: Your name
- Request is: Saved to disk
- Save the
.certSigningRequestfile
1.2 Create Certificate in Apple Developer Portal
- Go to Apple Developer Certificates
- Click + to create a new certificate
- Select Developer ID Application (NOT “Developer ID Installer”)
- Upload your
.certSigningRequestfile - Download the generated
.cerfile - Double-click the
.cerfile to install it in Keychain Access
1.3 Verify Certificate Installation
Run this command to verify the certificate is installed:
security find-identity -v -p codesigning
You should see output like:
1) ABCDEF1234567890... "Developer ID Application: Your Name (TEAM_ID)"
Step 2: Export Certificate for GitHub Actions
2.1 Export as .p12
- Open Keychain Access
- Find your certificate: “Developer ID Application: Your Name”
- Right-click → Export
- Choose .p12 format
- Set a strong password (you’ll need this later)
- Save the file
2.2 Convert to Base64
base64 -i YourCertificate.p12 | pbcopy
This copies the base64-encoded certificate to your clipboard.
Step 3: Create App-Specific Password
Apple requires an app-specific password for notarization (not your regular Apple ID password).
- Go to Apple ID Account
- Sign in with your Apple ID
- Navigate to App-Specific Passwords
- Click Generate an app-specific password
- Label: “GitHub Actions Notarization”
- Copy the generated password (format:
xxxx-xxxx-xxxx-xxxx)
Step 4: Find Your Team ID
- Go to Apple Developer Account
- Click Membership in the left sidebar
- Copy your Team ID (10-character alphanumeric string)
Step 5: Configure GitHub Secrets
Go to your repository’s Settings → Secrets and variables → Actions and add these 7 secrets:
| Secret Name | Description | How to Get |
|---|---|---|
APPLE_DEVELOPER_CERTIFICATE_P12_BASE64 | Base64-encoded .p12 certificate | Step 2.2 output |
APPLE_DEVELOPER_CERTIFICATE_PASSWORD | Password you set when exporting .p12 | Step 2.1 |
APPLE_CODESIGN_IDENTITY | Full certificate name | security find-identity -v -p codesigning output |
APPLE_NOTARIZATION_APPLE_ID | Your Apple ID email | Your Apple Developer email |
APPLE_NOTARIZATION_APP_PASSWORD | App-specific password | Step 3 output |
APPLE_DEVELOPER_TEAM_ID | 10-character Team ID | Step 4 |
CI_KEYCHAIN_PASSWORD | Random secure password | Generate any secure string |
Example Values
APPLE_CODESIGN_IDENTITY: Developer ID Application: Ruben Talstra (ABCD1234EF)
APPLE_DEVELOPER_TEAM_ID: ABCD1234EF
APPLE_NOTARIZATION_APPLE_ID: your.email@example.com
Local Development
Create App Bundle
cargo build --release
./scripts/macos/create-bundle.sh
Sign Locally (for testing)
./scripts/macos/sign-local.sh
Verify Bundle
./scripts/macos/verify-bundle.sh
Test Gatekeeper
./scripts/macos/test-gatekeeper.sh
open "Trial Submission Studio.app"
Troubleshooting
“No Developer ID Application certificate found”
Ensure the certificate is in your login keychain and not expired:
security find-identity -v -p codesigning
“The signature is invalid”
Re-sign with the --force flag:
codesign --force --options runtime --sign "Developer ID Application: ..." "Trial Submission Studio.app"
“Notarization failed”
Check the notarization log:
xcrun notarytool log <submission-id> --apple-id "..." --password "..." --team-id "..."
Common issues:
- Missing hardened runtime (
--options runtime) - Problematic entitlements (JIT, unsigned memory)
- Unsigned nested code
Security Notes
- Never commit certificates or passwords to the repository
- Use GitHub’s encrypted secrets for all sensitive values
- The app-specific password is NOT your Apple ID password
- Rotate credentials if you suspect they’ve been compromised
Windows Code Signing Setup
This guide explains how to set up Windows code signing using SignPath Foundation for Trial Submission Studio releases.
Overview
Windows code signing uses Authenticode certificates to sign executables. This eliminates SmartScreen warnings (“Windows protected your PC”) and builds user trust.
We use SignPath Foundation which provides free code signing certificates for open source projects. The certificate is issued to SignPath Foundation, and they vouch for your project by verifying binaries are built from your open source repository.
Prerequisites
- Open source project with an OSI-approved license
- GitHub repository with automated builds
- MFA enabled on both GitHub and SignPath accounts
- At least one prior release of your application
Step 1: Apply to SignPath Foundation
1.1 Check Eligibility
Your project must meet these criteria:
- OSI-approved license - Must use an approved open source license (no dual-licensing)
- No malware - No malware or potentially unwanted programs
- Actively maintained - Project must be actively maintained
- Already released - Must have prior releases in the form to be signed
- Documented - Functionality described on download page
- All team members use MFA - For both SignPath and GitHub
- Automated builds - Build process must be fully automated
1.2 Submit Application
- Go to signpath.org/apply
- Fill out the application form with your project details
- Link your GitHub repository
- Wait for approval (typically a few days)
1.3 After Approval
Once approved, you’ll receive:
- Organization ID
- Project slug
- Access to the SignPath dashboard
Step 2: Install SignPath GitHub App
- Go to github.com/apps/signpath
- Click Install
- Select your repository
- Grant necessary permissions
Step 3: Configure SignPath Dashboard
3.1 Add GitHub as Trusted Build System
- Log in to app.signpath.io
- Navigate to your project
- Go to Trusted Build Systems
- Add GitHub.com as a trusted build system
- Link to your repository
3.2 Configure Artifact Format
- Go to Artifact Configurations
- Create a new configuration or use the default
- Set the root element to
<zip-file>(GitHub packages artifacts as ZIP) - Configure the PE file signing within the ZIP
Example artifact configuration:
<artifact-configuration xmlns="http://signpath.io/artifact-configuration/v1">
    <zip-file>
        <pe-file path="*.exe">
            <authenticode-sign/>
        </pe-file>
    </zip-file>
</artifact-configuration>
3.3 Create API Token
- Go to My Profile → API Tokens
- Click Create API Token
- Name: “GitHub Actions”
- Permissions: Submitter role for your project
- Copy the token (you won’t see it again!)
Step 4: Configure GitHub Secrets
Go to your repository’s Settings → Secrets and variables → Actions and add these 4 secrets:
| Secret Name | Description | Where to Find |
|---|---|---|
SIGNPATH_API_TOKEN | API token with submitter permissions | Step 3.3 |
SIGNPATH_ORGANIZATION_ID | Your organization ID | SignPath dashboard URL or settings |
SIGNPATH_PROJECT_SLUG | Project identifier | SignPath project settings |
SIGNPATH_SIGNING_POLICY_SLUG | Signing policy name | SignPath project (typically “release-signing”) |
Finding Your IDs
Organization ID: Look at your SignPath dashboard URL:
https://app.signpath.io/Web/YOUR_ORG_ID/...
Project Slug: Found in your project’s URL or settings page.
Signing Policy Slug: Usually release-signing for open source projects.
How It Works
When you push a tag to release:
- Build: GitHub Actions builds the unsigned
.exe - Upload: The unsigned artifact is uploaded to GitHub
- Submit: The SignPath action submits the artifact for signing
- Sign: SignPath signs the executable with their certificate
- Download: The signed artifact is downloaded back to the workflow
- Verify: The workflow verifies the signature is valid
- Release: The signed executable is included in the GitHub release
Verification
After signing, users can verify the signature:
Windows
Right-click the .exe → Properties → Digital Signatures tab
PowerShell
Get-AuthenticodeSignature "trial-submission-studio.exe"
The publisher will show as SignPath Foundation.
Troubleshooting
“Signing request rejected”
Check the SignPath dashboard for the rejection reason. Common issues:
- Artifact format doesn’t match configuration
- Missing permissions on API token
- Project not linked to GitHub as trusted build system
“API token invalid”
- Ensure the token has Submitter permissions
- Check token hasn’t expired
- Verify the token is for the correct organization
“Artifact not found”
- Ensure the artifact is uploaded before the signing step
- Check the artifact ID is correctly passed between steps
- Verify artifact name matches what SignPath expects
SmartScreen still warns
After signing, SmartScreen warnings should disappear. If they persist:
- The signature may need time to build reputation
- Check the certificate is valid in Properties → Digital Signatures
- Ensure users download from official GitHub releases
Security Notes
- Never commit API tokens to the repository
- Use GitHub’s encrypted secrets for all sensitive values
- SignPath stores keys in HSM (Hardware Security Module)
- The signing certificate is managed by SignPath Foundation
- All signing requests are logged and auditable
Cost
SignPath Foundation is free for open source projects that meet the eligibility criteria. There are no hidden fees or limits for qualifying projects.
Resources
- SignPath Foundation - Official website
- SignPath Documentation - Full documentation
- SignPath GitHub Action - GitHub Action
- SignPath Terms - Eligibility requirements
Code Signing Policy
Trial Submission Studio uses code signing to ensure authenticity and integrity of distributed binaries.
Attribution
Windows: Free code signing provided by SignPath.io, certificate by SignPath Foundation.
macOS: Signed and notarized with Apple Developer ID.
Linux: Unsigned (standard for AppImage distribution).
Team Roles
Per SignPath Foundation requirements, this project has a single maintainer:
| Role | Member | Responsibility |
|---|---|---|
| Author | @rubentalstra | Source code ownership, trusted commits |
| Reviewer | @rubentalstra | Review all external contributions |
| Approver | @rubentalstra | Authorize signing requests |
All external contributions (pull requests) are reviewed before merging. Only merged code is included in signed releases.
Privacy & Network Communication
See Privacy Policy for full details.
Summary: This application only connects to GitHub when you explicitly request an update check. No clinical data or personal information is ever transmitted.
Build Verification
All signed binaries are:
- Built from source code in this repository
- Compiled via GitHub Actions (auditable CI/CD)
- Tagged releases with full git history
- Verified with SLSA build provenance attestations
Security Requirements
- MFA required for SignPath access
- MFA recommended for GitHub access (best practice)
- Private signing keys are HSM-protected (SignPath infrastructure)
- All signing requests are logged and auditable
Verifying Signatures
Windows
Right-click the .exe file → Properties → Digital Signatures tab.
Or use PowerShell:
Get-AuthenticodeSignature "trial-submission-studio.exe"
The publisher should show SignPath Foundation.
macOS
codesign -dv --verbose=4 /Applications/Trial\ Submission\ Studio.app
spctl --assess -vvv /Applications/Trial\ Submission\ Studio.app
Reporting Issues
- Security vulnerabilities: GitHub Security Advisories
- Code signing concerns: support@signpath.io
macOS Gatekeeper Issues
This guide helps resolve common issues when opening Trial Submission Studio on macOS.
“Trial Submission Studio is damaged and can’t be opened”
This error typically means the app is not properly signed or notarized by Apple.
For Users: Quick Fix
If you downloaded from our official GitHub releases and see this error:
- Open System Settings → Privacy & Security
- Scroll down to the Security section
- Look for a message about “Trial Submission Studio” being blocked
- Click Open Anyway
- Confirm in the dialog that appears
For Developers: Root Causes
This error can occur when:
- App is not code signed - No Developer ID certificate was used
- App is not notarized - Apple’s notary service didn’t approve it
- Entitlements are too permissive - Certain entitlements can cause rejection
- GitHub secrets not configured - CI skipped signing due to missing secrets
“Apple cannot check it for malicious software”
This warning appears for apps that are signed but not notarized.
Workaround
- Right-click (or Control+click) the app
- Select Open from the context menu
- Click Open in the dialog
Note: On macOS Sequoia (15.0+), Control+click bypass no longer works. You must use System Settings → Privacy & Security → Open Anyway.
Verifying App Signature
To check if an app is properly signed:
# Check code signature
codesign --verify --deep --strict --verbose=2 "Trial Submission Studio.app"

# Check notarization
xcrun stapler validate "Trial Submission Studio.app"

# Check Gatekeeper assessment
spctl --assess --type execute --verbose=2 "Trial Submission Studio.app"
Expected output for a properly signed and notarized app:
valid on diskfrom codesignThe validate action worked!from stapleracceptedfrom spctl
Removing Quarantine Attribute
If you’re a developer testing the app, you can remove the quarantine attribute:
xattr -d com.apple.quarantine "Trial Submission Studio.app"
Warning: Only do this for apps you trust. This bypasses macOS security.
macOS Sequoia (15.0+) Changes
Apple significantly tightened Gatekeeper in macOS Sequoia:
- Control+click bypass removed - The old workaround no longer works
- New bypass path: System Settings → Privacy & Security → Open Anyway
- Admin password required - You’ll need to authenticate twice
spctl --master-disableremoved - Can’t globally disable Gatekeeper via terminal
This makes proper code signing and notarization more important than ever.
Reporting Issues
If you downloaded from our official releases and still have issues:
- Check the GitHub Releases page
- Ensure you downloaded the
.dmgfile (not the.zip) - Report issues at GitHub Issues
Include:
- macOS version (
sw_vers) - Where you downloaded the app from
- The exact error message
- Output of
codesign --verify --verbose=2(if possible)
Frequently Asked Questions
Common questions about Trial Submission Studio.
General
What is Trial Submission Studio?
Trial Submission Studio is a free, open-source desktop application for transforming clinical trial source data (CSV) into CDISC-compliant formats like XPT for FDA submissions.
Is my data sent anywhere?
No. Your clinical trial data stays on your computer. Trial Submission Studio works completely offline - all CDISC standards are embedded in the application, and no data is transmitted over the network.
Is Trial Submission Studio free?
Yes! Trial Submission Studio is free and open source, licensed under the MIT License. You can use it commercially without any fees.
Which platforms are supported?
- macOS (Apple Silicon and Intel)
- Windows (x86_64 and ARM64)
- Linux (x86_64)
CDISC Standards
Which CDISC standards are supported?
Currently Supported:
- SDTM-IG v3.4
- Controlled Terminology (2024-2025 versions)
Planned:
- ADaM-IG v1.3
- SEND-IG v3.1.1
Can I use this for FDA submissions?
Not yet. Trial Submission Studio is currently in alpha development. Our goal is to generate FDA-compliant outputs, but until the software reaches stable release, all outputs should be validated by qualified regulatory professionals before submission.
How often is controlled terminology updated?
Controlled terminology updates are included in application releases. We aim to incorporate new CDISC CT versions within a reasonable time after their official release.
Technical
Do I need SAS installed?
No. Trial Submission Studio is completely standalone and does not require SAS or any other software. It generates XPT files natively.
What input formats are supported?
Currently, Trial Submission Studio supports CSV files as input. The CSV should have:
- Headers in the first row
- UTF-8 encoding (recommended)
- Comma-separated values
What output formats are available?
- XPT V5 - FDA standard SAS Transport format
- XPT V8 - Extended SAS Transport (longer names)
- Dataset-XML - CDISC XML format
- Define-XML 2.1 - Metadata documentation
How large datasets can it handle?
Trial Submission Studio can handle datasets with hundreds of thousands of rows. For very large datasets (1M+ rows), ensure adequate RAM (8GB+) and consider processing in batches.
Usage
How does column mapping work?
Trial Submission Studio uses fuzzy matching to suggest mappings between your source column names and SDTM variables. It analyzes name similarity and provides confidence scores. You can accept suggestions or map manually.
What happens if validation fails?
Validation errors must be resolved before export. The validation panel shows:
- Errors (red) - Must fix
- Warnings (yellow) - Should review
- Info (blue) - Informational
Each message includes the affected rows and suggestions for fixing.
Can I save my mapping configuration?
Yes, you can save mapping templates and reuse them for similar datasets. This is useful when processing multiple studies with consistent source data structures.
Troubleshooting
The application won’t start on macOS
On first launch, macOS may block the application. Right-click and select “Open”, then click “Open” in the dialog to bypass Gatekeeper.
Import shows garbled characters
Your file may not be UTF-8 encoded. Open it in a text editor and save with UTF-8 encoding, then re-import.
Validation shows many errors
Common causes:
- Incorrect domain selection
- Wrong column mappings
- Data quality issues in source
- Controlled terminology mismatches
Review errors one by one, starting with mapping issues.
Export creates empty file
Ensure:
- Data is imported successfully
- Mappings are configured
- No blocking validation errors exist
Development
How can I contribute?
See our Contributing Guide for details. We welcome:
- Bug reports
- Feature requests
- Code contributions
- Documentation improvements
Where do I report bugs?
Open an issue on GitHub Issues.
Is there a roadmap?
Yes! See our Roadmap for planned features and development priorities.
More Questions?
- GitHub Discussions: Ask questions
- Issues: Report problems
- Documentation: You’re reading it!
Glossary
Terms and definitions used in Trial Submission Studio and CDISC standards.
A
ADaM
Analysis Data Model - CDISC standard for analysis-ready datasets derived from SDTM data.
ADSL
ADaM Subject-Level - ADaM dataset containing one record per subject with demographics and key variables.
B
BDS
Basic Data Structure - An ADaM structure used for parameter-based data like vital signs and lab results.
C
CDISC
Clinical Data Interchange Standards Consortium - Organization that develops global data standards for clinical research.
Codelist
A defined set of valid values for a variable. Also known as controlled terminology.
Controlled Terminology (CT)
Standardized sets of terms and codes published by CDISC for use in SDTM and ADaM datasets.
D
Dataset-XML
A CDISC standard XML format for representing tabular clinical data.
Define-XML
An XML standard for describing the structure and content of clinical trial datasets. Required for FDA submissions.
Domain
A logical grouping of SDTM data organized by observation type (e.g., DM for Demographics, AE for Adverse Events).
DM
Demographics - SDTM domain containing one record per subject with demographic information.
E
eCTD
Electronic Common Technical Document - Standard format for regulatory submissions.
F
FDA
Food and Drug Administration - US regulatory agency that requires CDISC standards for drug submissions.
Findings Class
SDTM observation class for collected measurements and test results (e.g., Labs, Vital Signs).
I
ISO 8601
International standard for date and time formats. SDTM uses ISO 8601 format: YYYY-MM-DD.
Interventions Class
SDTM observation class for treatments given to subjects (e.g., Exposure, Concomitant Medications).
M
MedDRA
Medical Dictionary for Regulatory Activities - Standard medical terminology for adverse events.
Metadata
Data that describes other data. In Define-XML, metadata describes dataset structure and variable definitions.
O
ODM
Operational Data Model - CDISC standard for representing clinical data and metadata in XML.
P
PMDA
Pharmaceuticals and Medical Devices Agency - Japanese regulatory agency that requires CDISC standards.
S
SAS Transport (XPT)
File format for SAS datasets used for FDA submissions. See XPT.
SDTM
Study Data Tabulation Model - CDISC standard structure for organizing clinical trial data.
SDTM-IG
SDTM Implementation Guide - Detailed guidance for implementing SDTM, including variable definitions and business rules.
SEND
Standard for Exchange of Nonclinical Data - CDISC standard for nonclinical (animal) study data.
Special Purpose Domain
SDTM domains that don’t fit standard observation classes (e.g., DM, Trial Design domains).
STUDYID
Standard SDTM variable containing the unique study identifier.
U
USUBJID
Unique Subject Identifier - Standard SDTM variable that uniquely identifies each subject across all studies.
V
Variable
An individual data element within a dataset. In SDTM, variables have standard names, labels, and data types.
X
XPT
SAS Transport Format - Binary file format used to transport SAS datasets. Required by FDA for data submissions.
XPT V5
Original SAS Transport format with 8-character variable names.
XPT V8
Extended SAS Transport format supporting 32-character variable names.
Numbers
–DTC Variables
SDTM timing variables containing dates/times in ISO 8601 format (e.g., AESTDTC, VSDTC).
–SEQ Variables
SDTM sequence variables providing unique record identifiers within a domain (e.g., AESEQ, VSSEQ).
–TESTCD Variables
SDTM test code variables in Findings domains (e.g., VSTESTCD, LBTESTCD).
Changelog
All notable changes to Trial Submission Studio.
The format is based on Keep a Changelog, and this project adheres to Semantic Versioning.
Unreleased
Added
- Initial mdBook documentation site
- Comprehensive user guide
- CDISC standards reference
- Architecture documentation
- Contributing guidelines
Changed
- Updated documentation structure
Fixed
- Various documentation improvements
0.0.1-alpha.1 - 2024-XX-XX
Added
Core Features
- CSV file import with automatic schema detection
- Column-to-SDTM variable mapping with fuzzy matching
- XPT V5 and V8 export support
- Basic SDTM validation
- Controlled terminology validation
Standards Support
- SDTM-IG v3.4 embedded
- Controlled Terminology 2024 versions
- Domain definitions for common SDTM domains
User Interface
- Native desktop GUI (Iced 0.14.0)
- Data preview grid
- Mapping interface with suggestions
- Validation results panel
- Export options dialog
Platform Support
- macOS (Apple Silicon)
- macOS (Intel)
- Windows (x86_64)
- Windows (ARM64)
- Linux (x86_64)
Known Issues
- Alpha software - not for production use
- ADaM support not yet implemented
- SEND support not yet implemented
- Dataset-XML export in progress
- Define-XML export in progress
Version History
| Version | Date | Status |
|---|---|---|
| 0.0.1-alpha.1 | TBD | Current |
Release Notes Format
Each release includes:
- Added - New features
- Changed - Changes to existing features
- Deprecated - Features to be removed
- Removed - Removed features
- Fixed - Bug fixes
- Security - Security fixes
Getting Updates
Check for Updates
Trial Submission Studio checks for updates automatically. You can also:
- Visit GitHub Releases
- Download the latest version for your platform
- Replace your existing installation
Update Notifications
When a new version is available, you’ll see a notification in the application.
Reporting Issues
Found a bug or have a feature request?
Roadmap
Development plans for Trial Submission Studio.
Note
This roadmap reflects current plans and priorities. Items may change based on community feedback and project needs.
Current Focus
Features actively being developed:
- Complete SDTM transformation pipeline
- Dataset-XML export
- Define-XML 2.1 generation
- Comprehensive SDTM validation rules
- Full export workflow
Short-term
Features planned for near-term development:
- Batch processing (multiple domains)
- Export templates and presets
- Improved error messages and validation feedback
- Session save/restore
- Mapping templates (save and reuse mappings)
Medium-term
Features planned after core functionality is stable:
- ADaM (Analysis Data Model) support
- SUPP domain handling improvements
- Custom validation rules
- Report generation
- Undo/redo functionality improvements
Long-term
Features for future consideration:
- SEND (Standard for Exchange of Nonclinical Data) support
- Batch CLI mode for automation
- Define-XML import (reverse engineering)
- Plugin system for custom transformations
- Multi-study support
Completed
Features that have been implemented:
- Core XPT read/write (V5 + V8)
- CSV ingestion with schema detection
- Fuzzy column mapping engine
- Controlled Terminology validation
- Desktop GUI (Iced 0.14.0)
- SDTM-IG v3.4 standards embedded
- Controlled Terminology (2024-2025)
- Cross-platform support (macOS, Windows, Linux)
How to Contribute
We welcome contributions! See the Contributing Guide for details.
Working on Roadmap Items
If you’d like to work on a roadmap item:
- Check if there’s an existing GitHub Issue
- Comment to express interest
- Wait for maintainer feedback before starting work
- Follow the PR guidelines
Suggesting New Features
Have ideas for the roadmap?
- Check existing issues and discussions
- Open a new issue or discussion
- Describe the feature and use case
- Engage with community feedback
Prioritization
Features are prioritized based on:
- Regulatory compliance - FDA submission requirements
- User impact - Benefit to most users
- Complexity - Development effort required
- Dependencies - Prerequisites from other features
- Community feedback - Requested features
Versioning Plan
| Version | Focus |
|---|---|
| 0.1.0 | Core SDTM workflow stable |
| 0.2.0 | Define-XML and Dataset-XML |
| 0.3.0 | ADaM support |
| 1.0.0 | Production ready |
Stay Updated
- Watch the GitHub repository
- Check Releases
- Follow Discussions
Disclaimer
Important notices about Trial Submission Studio.
Alpha Software Notice
Warning
Trial Submission Studio is currently in alpha development.
This software is provided for evaluation and development purposes only. It is not yet suitable for production use in regulatory submissions.
What This Means
- Features may be incomplete or change without notice
- Bugs and unexpected behavior may occur
- Data outputs should be independently validated
- No guarantee of regulatory compliance
Not for Production Submissions
Do not use Trial Submission Studio outputs for actual FDA, PMDA, or other regulatory submissions until the software reaches stable release (version 1.0.0 or later).
Before Submission
All outputs from Trial Submission Studio should be:
- Validated by qualified regulatory professionals
- Verified against CDISC standards independently
- Reviewed for completeness and accuracy
- Tested with regulatory authority validation tools
Limitation of Liability
Trial Submission Studio is provided “as is” without warranty of any kind, express or implied. The authors and contributors:
- Make no guarantees about output accuracy
- Are not responsible for submission rejections
- Cannot be held liable for regulatory issues
- Do not provide regulatory consulting
See the full MIT License for complete terms.
CDISC Standards
Trial Submission Studio implements CDISC standards based on publicly available documentation:
- SDTM-IG v3.4 - Study Data Tabulation Model Implementation Guide
- Controlled Terminology - 2024-2025 versions
CDISC standards are developed by the Clinical Data Interchange Standards Consortium. Trial Submission Studio is not affiliated with or endorsed by CDISC.
Regulatory Guidance
This software does not constitute regulatory advice. For guidance on:
- FDA submissions: Consult FDA Data Standards
- PMDA submissions: Consult PMDA guidelines
- EMA submissions: Consult EMA standards
Data Privacy
Trial Submission Studio:
- Processes all clinical data locally on your computer
- Does not collect usage analytics or telemetry
- Does not transmit clinical data over the network
Network communication is limited to user-initiated update checks via GitHub API. No clinical data or personal information is ever transmitted.
See our full Privacy Policy for details.
You are responsible for protecting any sensitive or confidential data processed with this software.
Reporting Issues
If you encounter problems:
- Do not rely on potentially incorrect outputs
- Report issues on GitHub
- Validate outputs through independent means
Future Stability
We are actively working toward a stable release. Progress can be tracked on our Roadmap.
| Version | Status |
|---|---|
| 0.x.x | Alpha - Not for production |
| 1.0.0+ | Stable - Production ready |
Questions?
Code of Conduct
Our Pledge
We as members, contributors, and leaders pledge to make participation in our community a harassment-free experience for everyone, regardless of age, body size, visible or invisible disability, ethnicity, sex characteristics, gender identity and expression, level of experience, education, socio-economic status, nationality, personal appearance, race, religion, or sexual identity and orientation.
Our Standards
Examples of behavior that contributes to a positive environment:
- Using welcoming and inclusive language
- Being respectful of differing viewpoints and experiences
- Gracefully accepting constructive criticism
- Focusing on what is best for the community
- Showing empathy towards other community members
Examples of unacceptable behavior:
- The use of sexualized language or imagery and unwelcome sexual attention or advances
- Trolling, insulting or derogatory comments, and personal or political attacks
- Public or private harassment
- Publishing others’ private information without explicit permission
- Other conduct which could reasonably be considered inappropriate in a professional setting
Enforcement Responsibilities
Community leaders are responsible for clarifying and enforcing our standards of acceptable behavior and will take appropriate and fair corrective action in response to any behavior that they deem inappropriate, threatening, offensive, or harmful.
Scope
This Code of Conduct applies within all community spaces, and also applies when an individual is officially representing the community in public spaces.
Enforcement
Instances of abusive, harassing, or otherwise unacceptable behavior may be reported by opening an issue on the GitHub repository or contacting the project maintainers directly.
All complaints will be reviewed and investigated promptly and fairly.
Attribution
This Code of Conduct is adapted from the Contributor Covenant, version 2.1.
Privacy Policy
Trial Submission Studio is designed with privacy as a core principle.
Data Collection
We do not collect any data. Trial Submission Studio:
- Does not collect usage analytics or telemetry
- Does not track user behavior
- Does not collect personal information
- Does not access or transmit clinical trial data
Local Processing
All clinical data processing occurs entirely on your local computer:
- Source files (CSV, XPT) are read locally
- Transformations execute in local memory
- Output files are written to local storage
- No data is uploaded to any server
Network Communication
Trial Submission Studio connects to the internet only when you explicitly request it:
| Action | Destination | Purpose |
|---|---|---|
| Check for Updates | api.github.com | Fetch latest release info |
| Download Update | github.com | Download new version |
Important:
- Update checks are user-initiated only (not automatic)
- No clinical data is ever transmitted
- No personal information is sent
- All connections use TLS encryption
This complies with SignPath Foundation’s requirement:
“This program will not transfer any information to other networked systems unless specifically requested by the user.”
Third-Party Services
The only third-party service used is GitHub for:
- Hosting releases and source code
- Providing update information via GitHub Releases API
For GitHub’s data practices, see: GitHub Privacy Statement
Data Storage
Trial Submission Studio may store the following locally:
| Data | Location | Purpose |
|---|---|---|
| User preferences | OS config directory | Remember settings |
| Recent files list | OS config directory | Quick access |
| Window state | OS config directory | Restore layout |
Storage locations by platform:
- Windows:
%APPDATA%\trial-submission-studio\ - macOS:
~/Library/Application Support/trial-submission-studio/ - Linux:
~/.config/trial-submission-studio/
No clinical data is ever stored by the application itself.
Your Responsibilities
You are responsible for:
- Protecting clinical data on your system
- Compliance with HIPAA, GxP, 21 CFR Part 11 as applicable
- Secure storage of source and output files
- Access control on your computer
Changes to This Policy
Changes will be documented in release notes and this file.
Contact
Questions about privacy: GitHub Discussions